> ## Documentation Index
> Fetch the complete documentation index at: https://help.scribe-mail.com/llms.txt
> Use this file to discover all available pages before exploring further.
# Google Workspace (Server Side)
> Add Scribe signatures to your team's Google Workspace emails automatically from any device by routing outbound mail through Scribe's secure servers.
**Centralized one-click installation.** No teammate action needed. Users don't see signatures when composing emails. Your emails are processed through Scribe's secure servers for signature injection.
**Supported platforms:** Web, Desktop, Apple Mail, iOS, Android
## Installation guide
This is an advanced user feature. IT support is required to set up this integration.
* Users don't see signatures when composing an email.
* Your emails are processed through Scribe's secure servers to install signatures. Scribe cannot read or edit your emails.
* You can combine [cloud-based integration](/en/integrations/signatures/google-workspace-client-side) with server-side integration. If both are connected, Scribe defaults to cloud-based integration so users can see their signatures when composing emails.
To route emails through Scribe's secure servers, create a host in Google Workspace Gmail. In Google Admin, go to **Apps → Google Workspace → Gmail**, then click 'Hosts'.
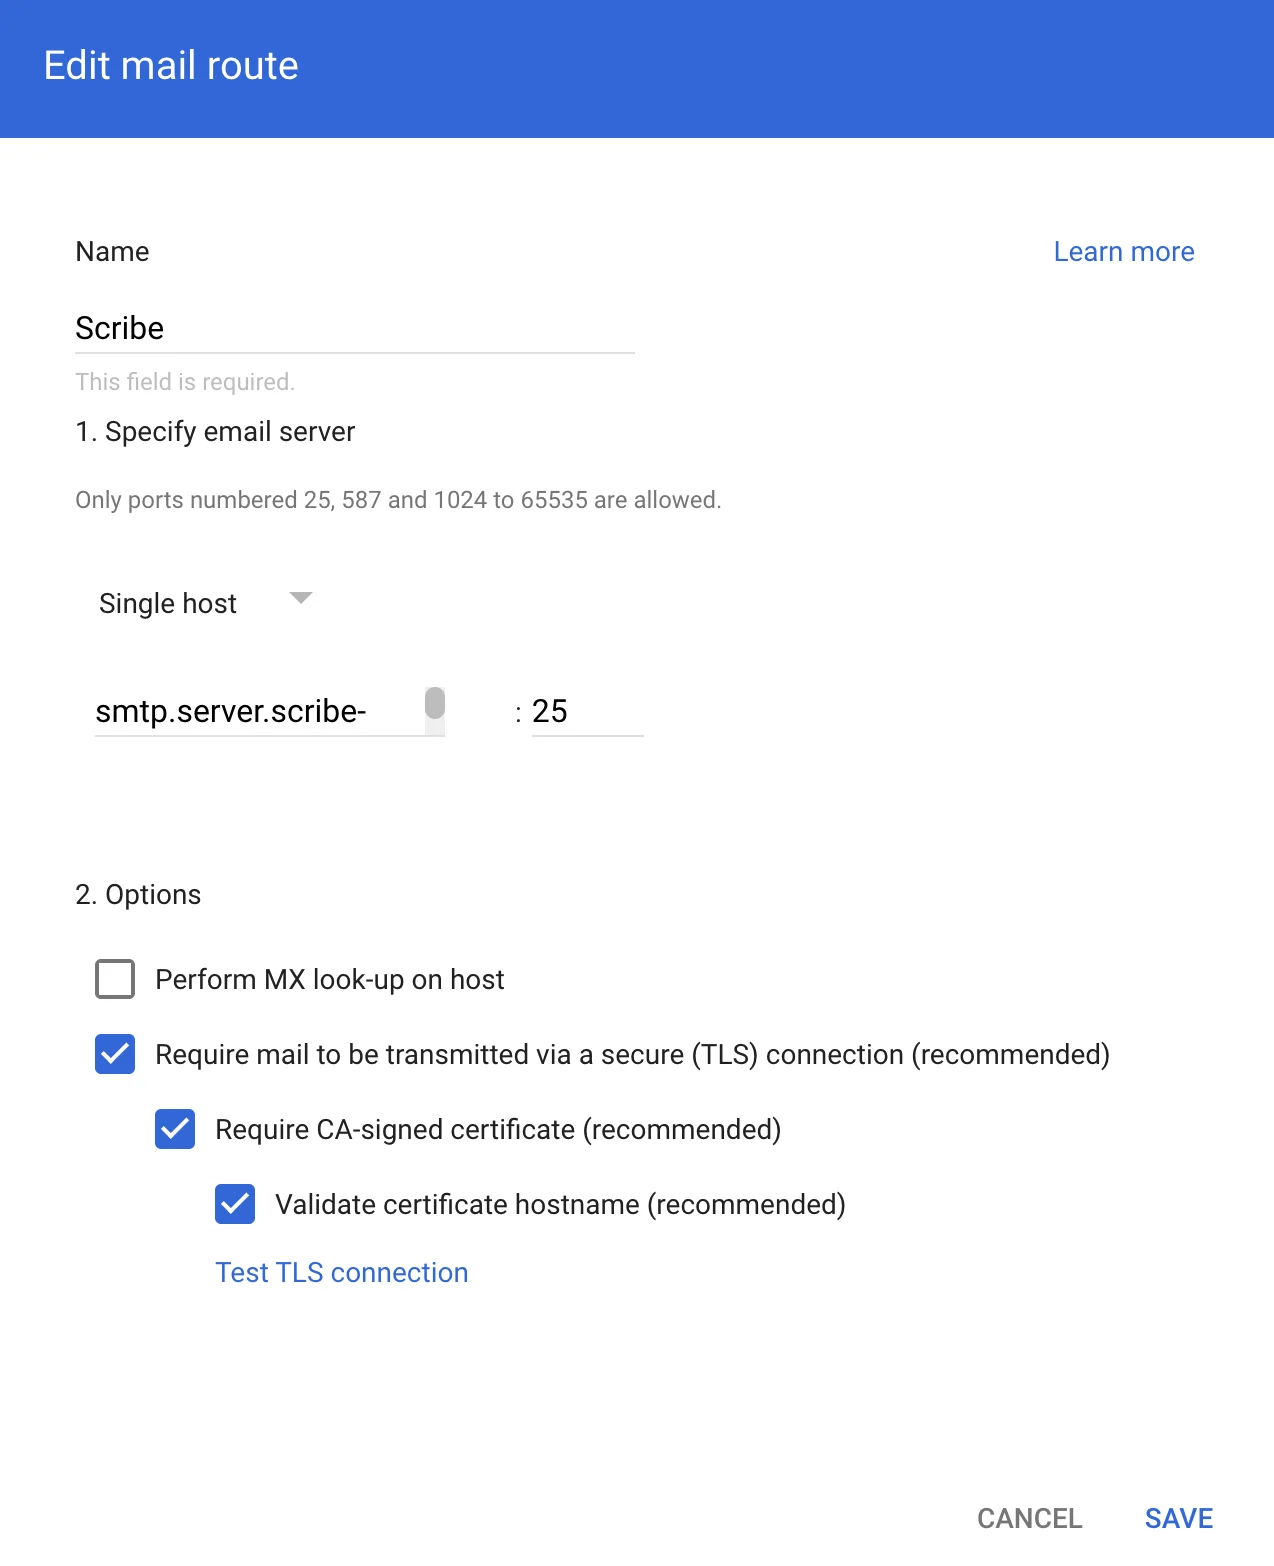
 Fill in the form with the following info:
**a. Name:** Scribe
**b. Select:** "Single host"
**c. Host name or IP:**
```text theme={null}
smtp.server.scribe-mail.com
```
**d. Port:** 25
**e. Select:** the options like in the screenshot below
Fill in the form with the following info:
**a. Name:** Scribe
**b. Select:** "Single host"
**c. Host name or IP:**
```text theme={null}
smtp.server.scribe-mail.com
```
**d. Port:** 25
**e. Select:** the options like in the screenshot below
 To receive emails back from Scribe for routing to recipients, go to **Apps → Google Workspace → Gmail** in Google Admin, then click 'Routing'.
 On the next page, click **Configure** under "SMTP relay service".
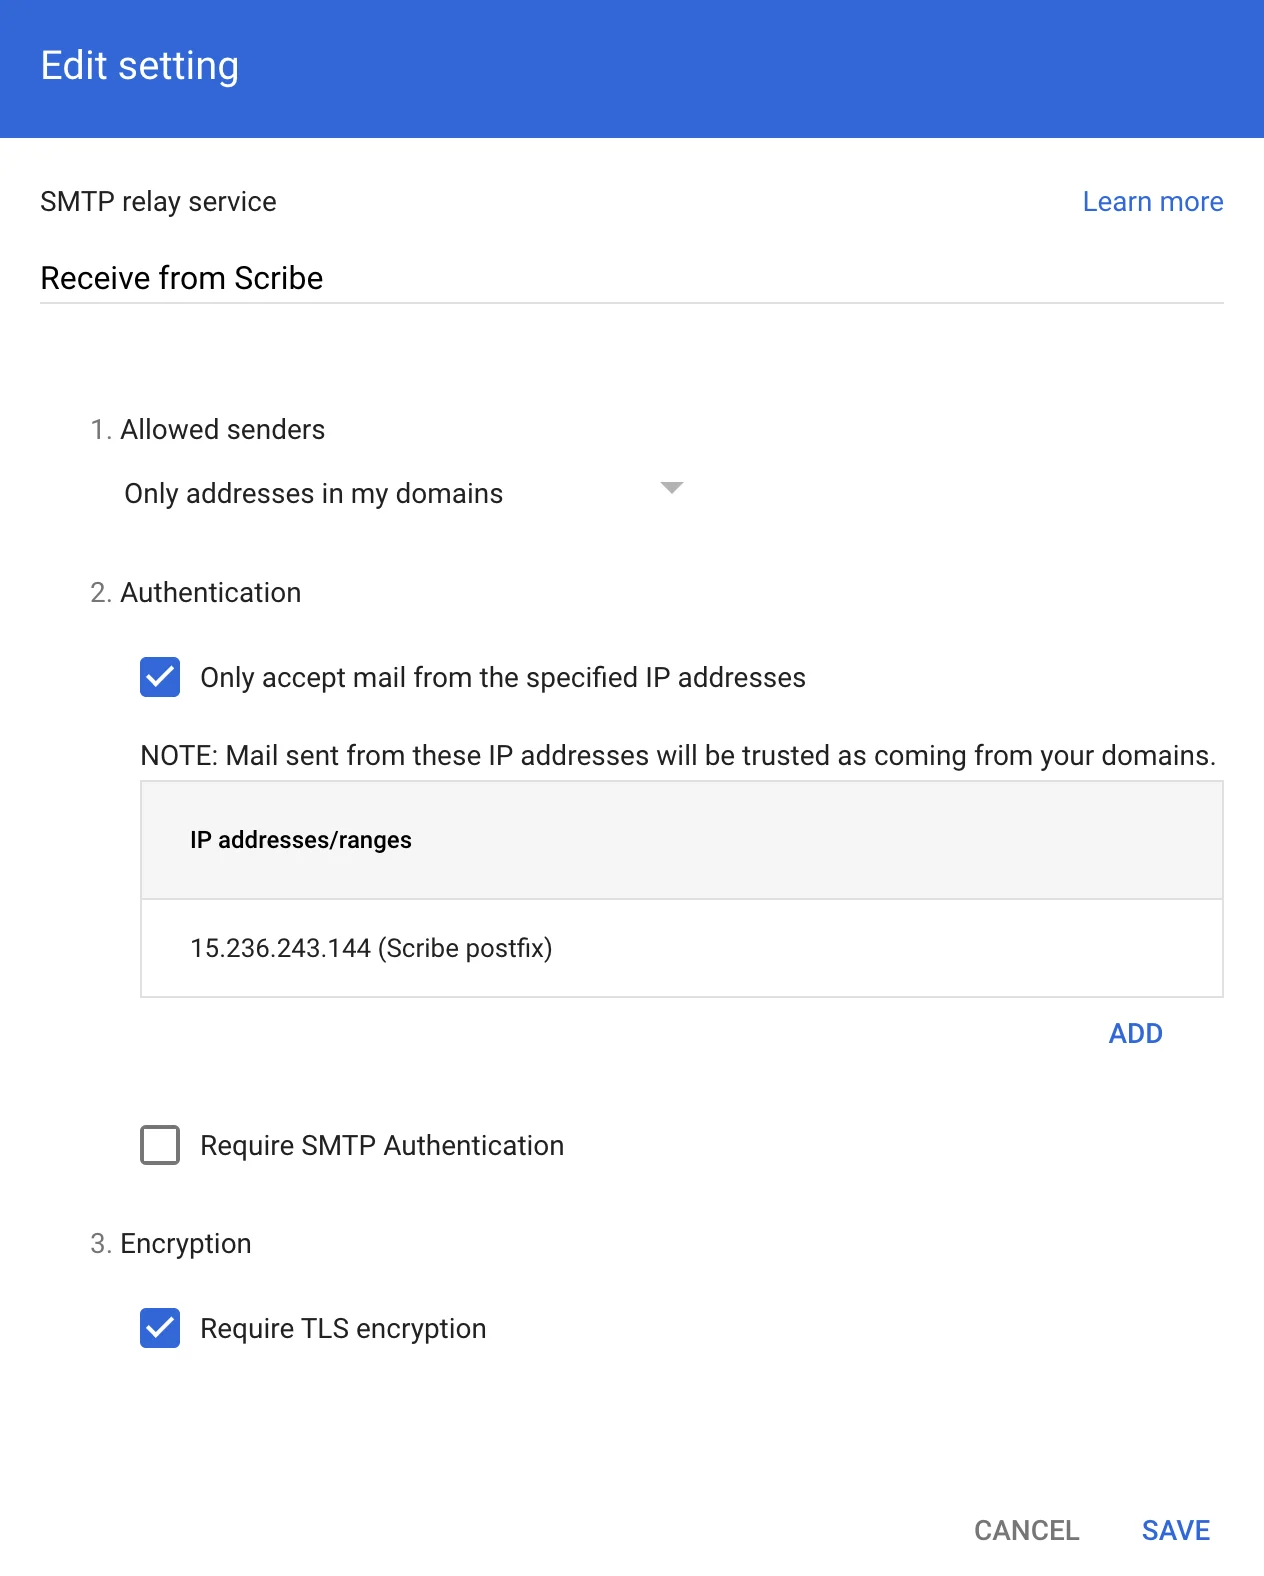
 Fill in the form with the following information:
**a. Description:** Receive from Scribe
**b. Authentication:** Check "Only accept mail from the specified IP addresses" Add:
```text theme={null}
15.236.243.144
```
and
```text theme={null}
51.44.50.107
```
**c. Select:** "Require TLS encryption"
**d. Click:** "Save"
Fill in the form with the following information:
**a. Description:** Receive from Scribe
**b. Authentication:** Check "Only accept mail from the specified IP addresses" Add:
```text theme={null}
15.236.243.144
```
and
```text theme={null}
51.44.50.107
```
**c. Select:** "Require TLS encryption"
**d. Click:** "Save"
 In Google Admin, go to **Apps → Google Workspace → Gmail**, then click 'Compliance'.
 On the next page, click **Configure** under "Content compliance".
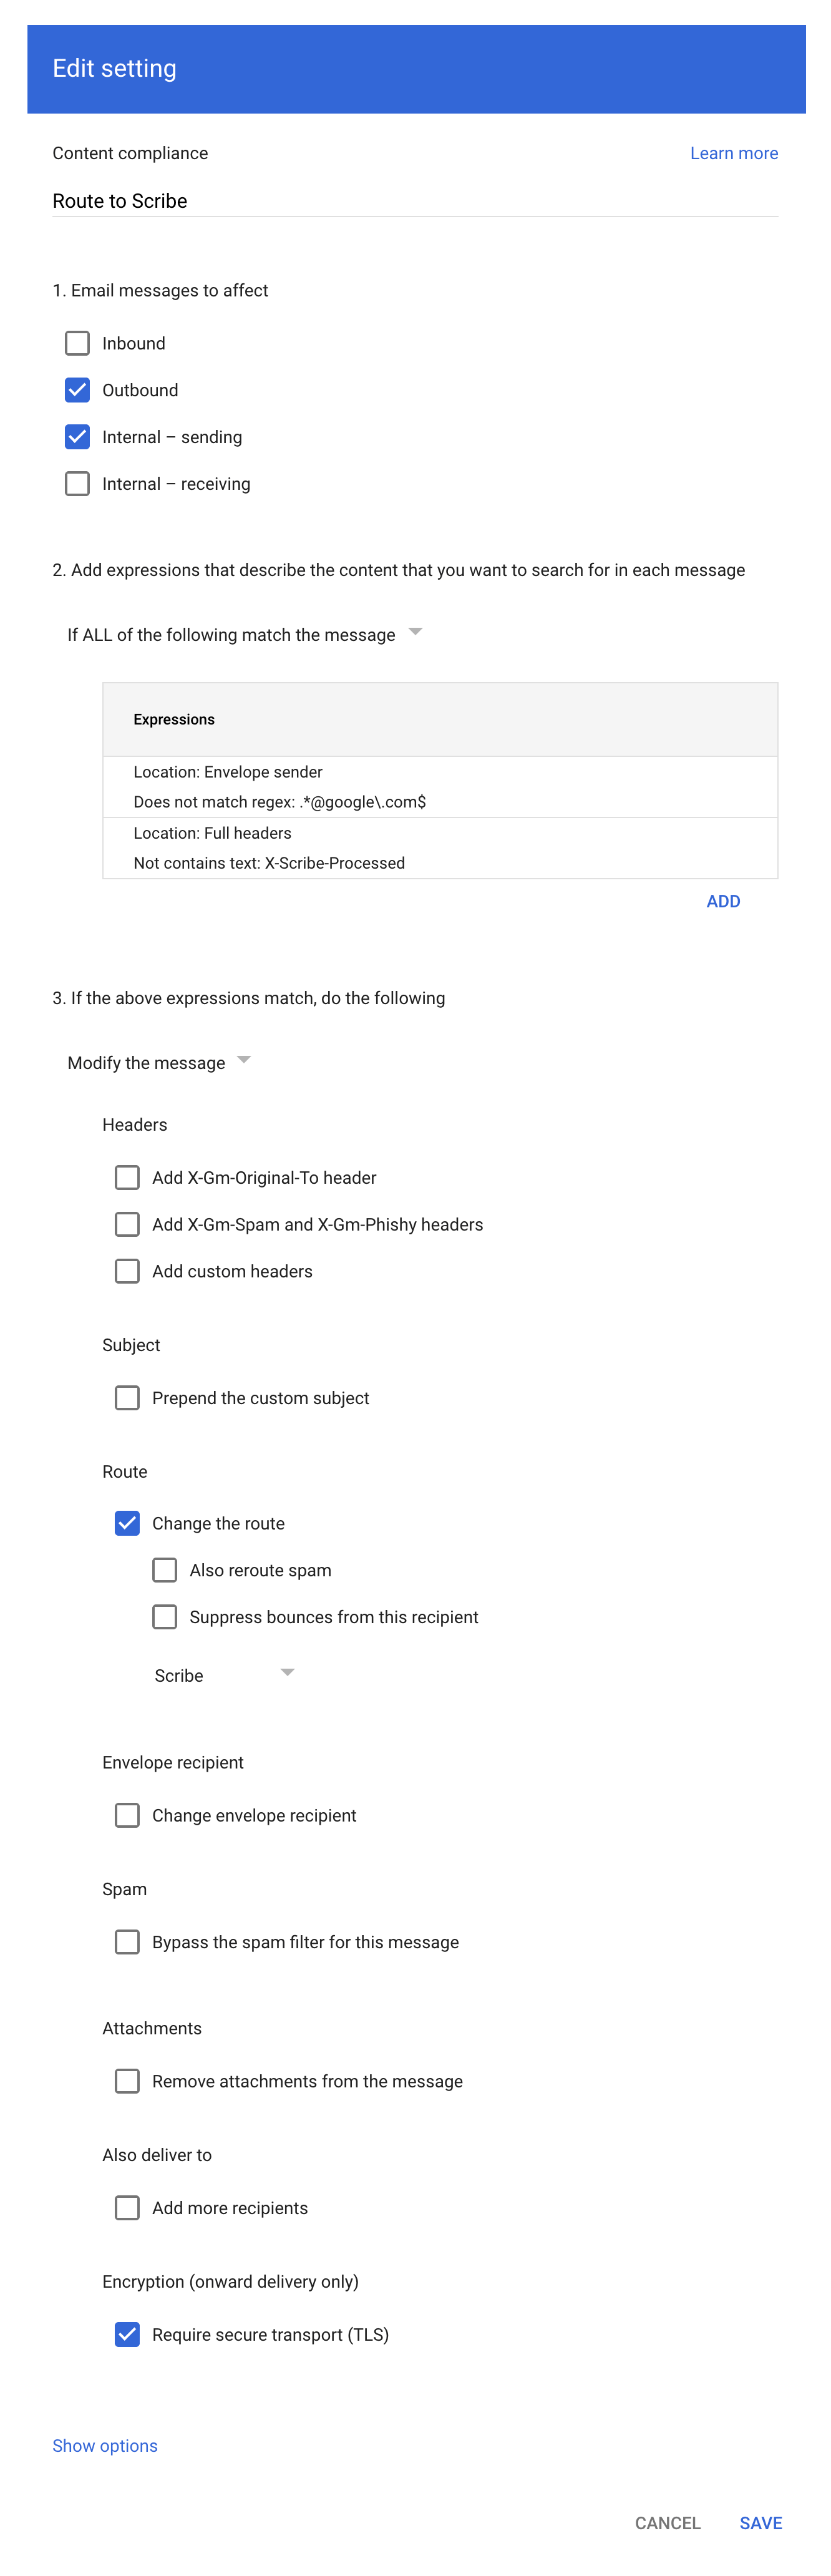
 Fill in the form as shown in the screenshot:
**a. Description:** Route to Scribe
**b. Select:** "Outbound" and "Internal - sending" in "Email messages to affect"
**c. In the second configuration item ("Add expressions…"),** set the matching to **"If ALL of the following match the message"**, then click **ADD** and add these two Advanced content match expressions:
* Location: Full headers, Match type: Does not contain text, Content: `X-Scribe-Processed` — prevents processing your email multiple times.
* Location: Envelope sender, Match type: Does not match regex, Regexp: `.*@google\.com$` — excludes system mail such as Google Forms receipts (from [forms-receipts-noreply@google.com](mailto:forms-receipts-noreply@google.com)), which Google's SMTP relay rejects if routed through Scribe.
**d. In the third configuration item,** change the route to the host you created in part 1 of this guide.
**e. Select:** "Require secure transport (TLS)"
**f. Click:** "Save"
Fill in the form as shown in the screenshot:
**a. Description:** Route to Scribe
**b. Select:** "Outbound" and "Internal - sending" in "Email messages to affect"
**c. In the second configuration item ("Add expressions…"),** set the matching to **"If ALL of the following match the message"**, then click **ADD** and add these two Advanced content match expressions:
* Location: Full headers, Match type: Does not contain text, Content: `X-Scribe-Processed` — prevents processing your email multiple times.
* Location: Envelope sender, Match type: Does not match regex, Regexp: `.*@google\.com$` — excludes system mail such as Google Forms receipts (from [forms-receipts-noreply@google.com](mailto:forms-receipts-noreply@google.com)), which Google's SMTP relay rejects if routed through Scribe.
**d. In the third configuration item,** change the route to the host you created in part 1 of this guide.
**e. Select:** "Require secure transport (TLS)"
**f. Click:** "Save"
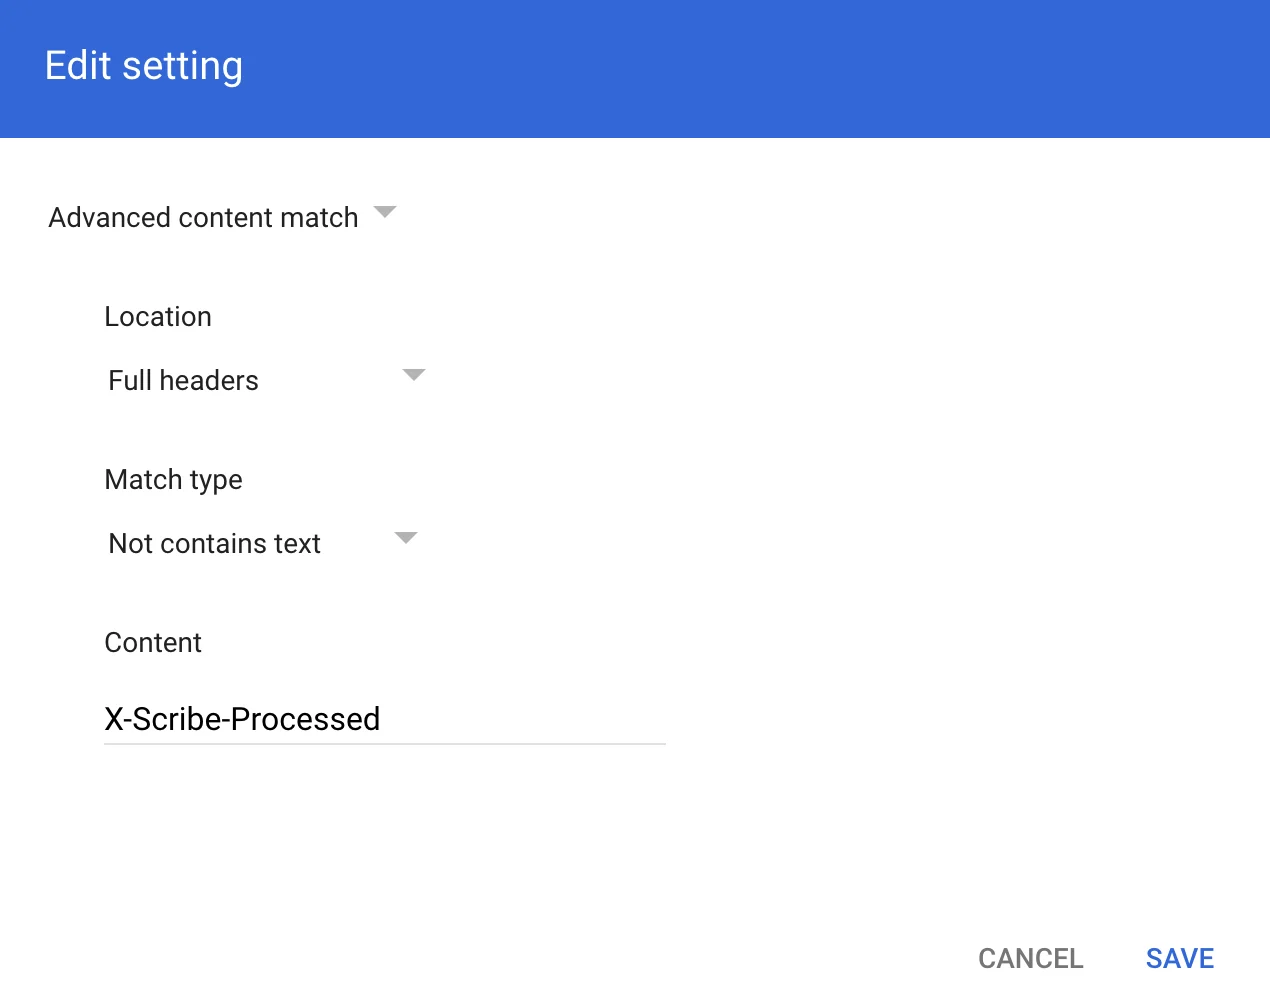
 In the Compliance rule expression modal, add the info as shown in the screenshot:
Advanced content match:
* **Location:** Full headers
* **Match type:** Not contains text
* **Content:** X-Scribe-Processed
In the Compliance rule expression modal, add the info as shown in the screenshot:
Advanced content match:
* **Location:** Full headers
* **Match type:** Not contains text
* **Content:** X-Scribe-Processed
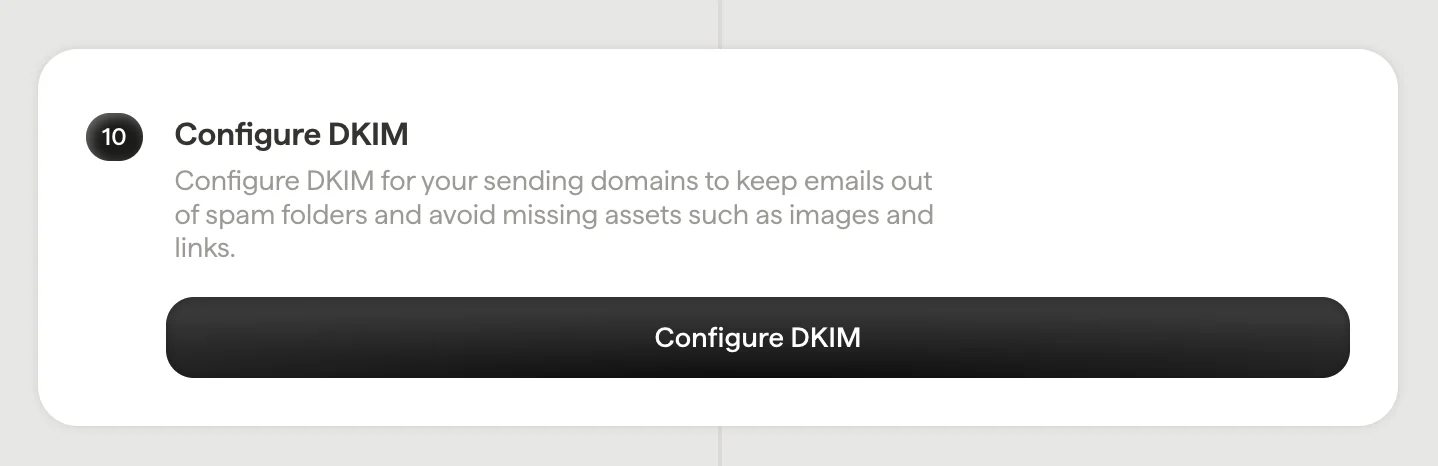
 Configure DKIM for your [sending domains](/en/configure-your-sending-domain) to keep emails out of spam folders and avoid missing assets such as images and links.
Click **Configure DKIM** in Scribe to start the configuration.
Configure DKIM for your [sending domains](/en/configure-your-sending-domain) to keep emails out of spam folders and avoid missing assets such as images and links.
Click **Configure DKIM** in Scribe to start the configuration.
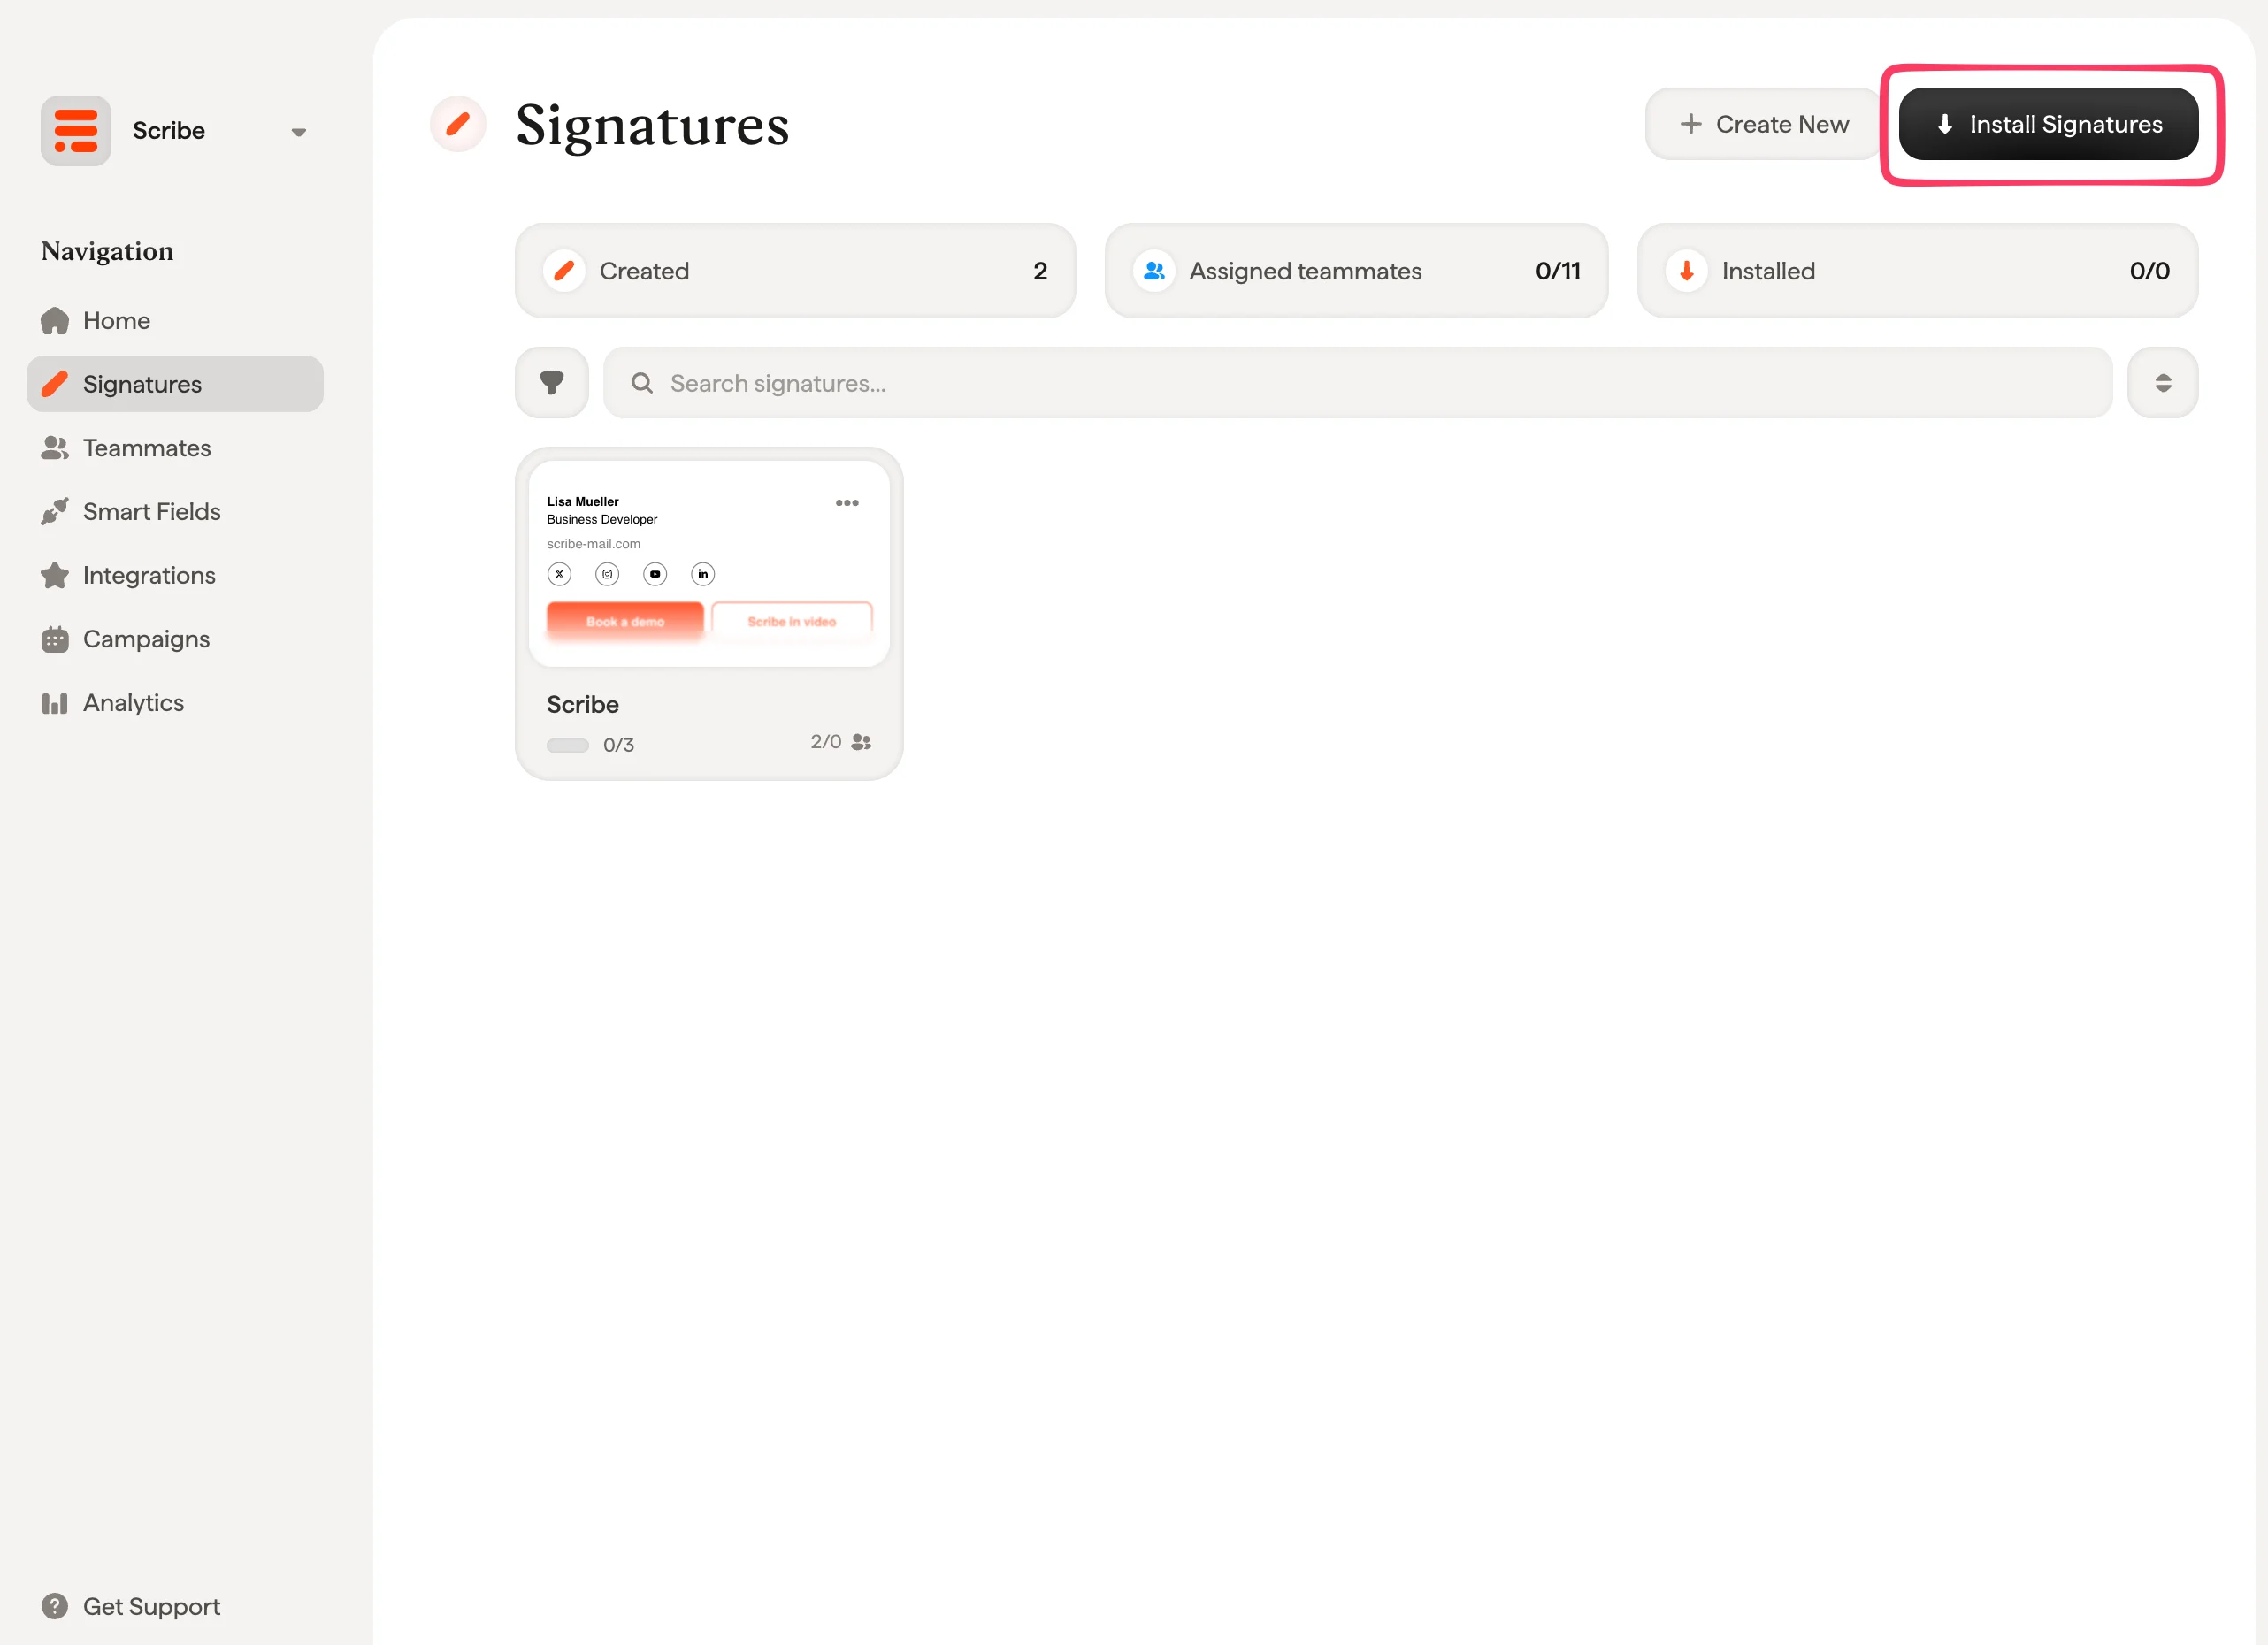
 From your signatures list, [install all signatures at once for your teammates](/en/install-signatures) or install them one by one for a progressive rollout.
 ## Related articles
* [Integrations overview](/en/integrations-overview): all the ways to deploy Scribe signatures, cloud or server side.
* [Microsoft 365 (server side)](/en/integrations/signatures/microsoft-365-server-side): route mail through Scribe for all-device coverage.
* [Signature variants](/en/signature-variants): on-reply and internal variants for Outlook and server side.
## Related articles
* [Integrations overview](/en/integrations-overview): all the ways to deploy Scribe signatures, cloud or server side.
* [Microsoft 365 (server side)](/en/integrations/signatures/microsoft-365-server-side): route mail through Scribe for all-device coverage.
* [Signature variants](/en/signature-variants): on-reply and internal variants for Outlook and server side.