> ## Documentation Index
> Fetch the complete documentation index at: https://help.scribe-mail.com/llms.txt
> Use this file to discover all available pages before exploring further.
# Marketing Campaign
> Run marketing campaigns inside your team's email signatures: target by signature or smart field, design a banner, schedule dates, then track clicks and CTR.
This guide walks you through creating a [marketing campaign](/en/marketing-overview), designing the marketing block, and managing active campaigns.
## Create a campaign
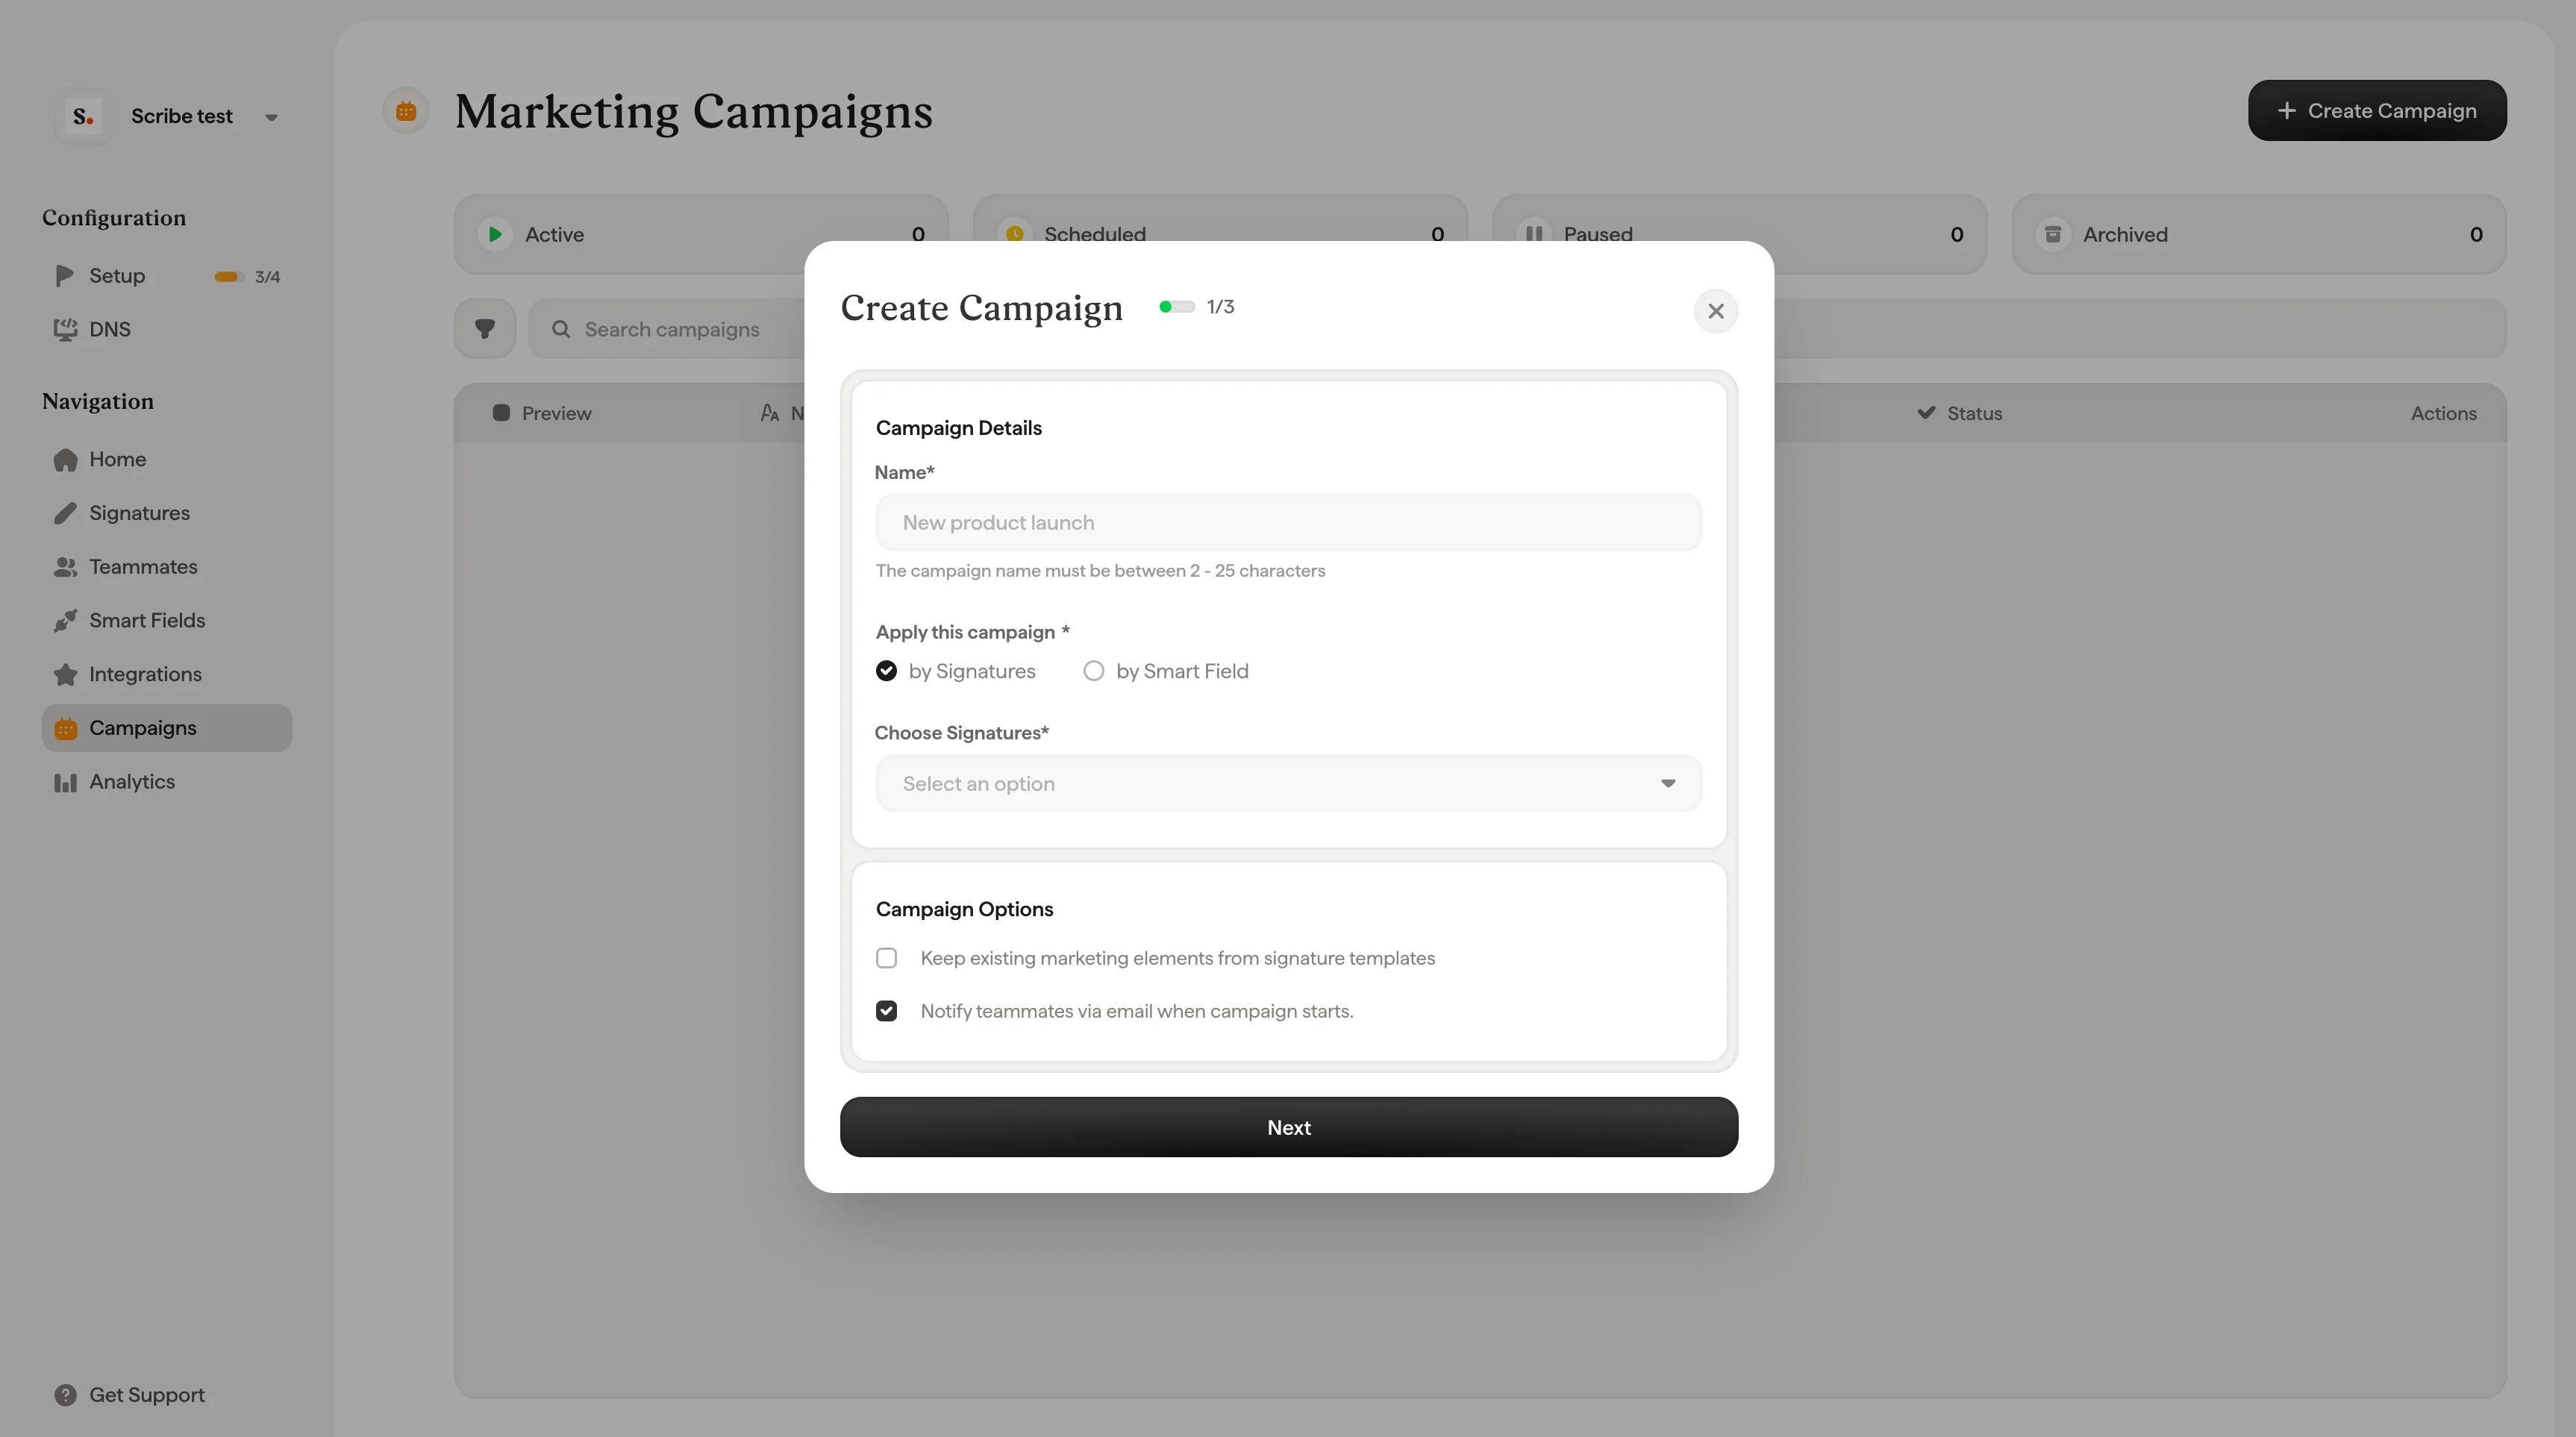
Navigate to **Campaigns** in the left sidebar and click **+ Create campaign** in the top right corner. This opens the Create Campaign modal (step 1 of 2).
Fill in the **Campaign Details** section:
* **Name.** Give your campaign a descriptive name (2 to 25 characters).
* **Apply this campaign.** Choose how to target teammates:
* **By Signatures.** Select one or more signature templates from the dropdown. All teammates using those signatures will receive the campaign.
* **By Smart Field.** Define targeting rules using any [Smart Field](/en/smart-fields) from any source connected to Scribe. For example, "If Department is any of Sales" or "If Location is any of Paris." Click **+ Add Rule** to combine multiple conditions and target exactly the teammates you need.
 In the **Campaign Dates** section:
* **Time Zone.** Select your time zone from the dropdown (e.g., Guadalajara GMT-6, Berlin GMT+2, Paris GMT+2).
* **From.** Pick the start date and time for the campaign.
* **To.** Pick the end date and time.
* **Frequency.** Choose how often the campaign runs:
* **One time only.** Runs once for the defined period.
* **Monthly.** Repeats automatically every month.
* **Quarterly.** Repeats automatically every quarter.
* **Yearly.** Repeats automatically every year.
Under **Campaign Options**, you have two optional settings:
* **Keep existing marketing blocks in signatures.** When checked, the new campaign's marketing elements are combined with any existing ones already in teammates' signatures. When unchecked, the new campaign replaces any current marketing elements.
* **Notify team by email when campaign starts.** Sends an email to all targeted teammates letting them know a new marketing campaign has been added to their signature. Click **Preview email** to see what the notification looks like.
If some teammates are already part of an active campaign, a warning will appear letting you know. Running this campaign will combine marketing elements from both campaigns in their signatures.
Click **Next** to proceed to step 2 of 2. This opens the campaign editor where you'll design the marketing element that will appear in signatures.
The editor has three panels:
* **Left panel (Actions).** Shows your signature structure tree with Undo/Redo controls and an **+ Add Block** button at the bottom.
* **Center panel (Preview).** Live preview of the signature with the marketing block. Use the left/right arrows to cycle through different signature templates if multiple are targeted.
* **Right panel (Content).** Appears when you select a marketing block, letting you customize its content and style.
Click **+ Add Block** to open the block picker. Choose from the available marketing block types:
Socials, Banner, Button, Browser store, Food delivery, Games store, Product Hunt, Y Combinator, Podcast, Store apps, Ratings, Live streaming, TV streaming, Online store, Reading apps, and Music streaming.
After selecting a block type, it appears in the signature preview, and the **Content** panel opens on the right. Depending on the block type, you can configure:
**Content**
* **Image.** Upload or link to an image. A thumbnail preview is shown.
* **Image Link.** The URL that opens when someone clicks the marketing element.
**Style**
* **Appearance.** Adjust opacity and border radius.
* **Layout.** Set the height and width in pixels.
* **Colors.** Choose a background color.
* **Margin.** Control spacing around the block.
The live preview in the center panel updates as you make changes.
When you're happy with the campaign, you have two options:
* **Create Campaign.** Launches the campaign immediately (or at the scheduled start time). A success confirmation appears with the campaign name and end date.
* **Save as Draft.** Saves the campaign without activating it. You can come back to launch it later.
## View campaign details
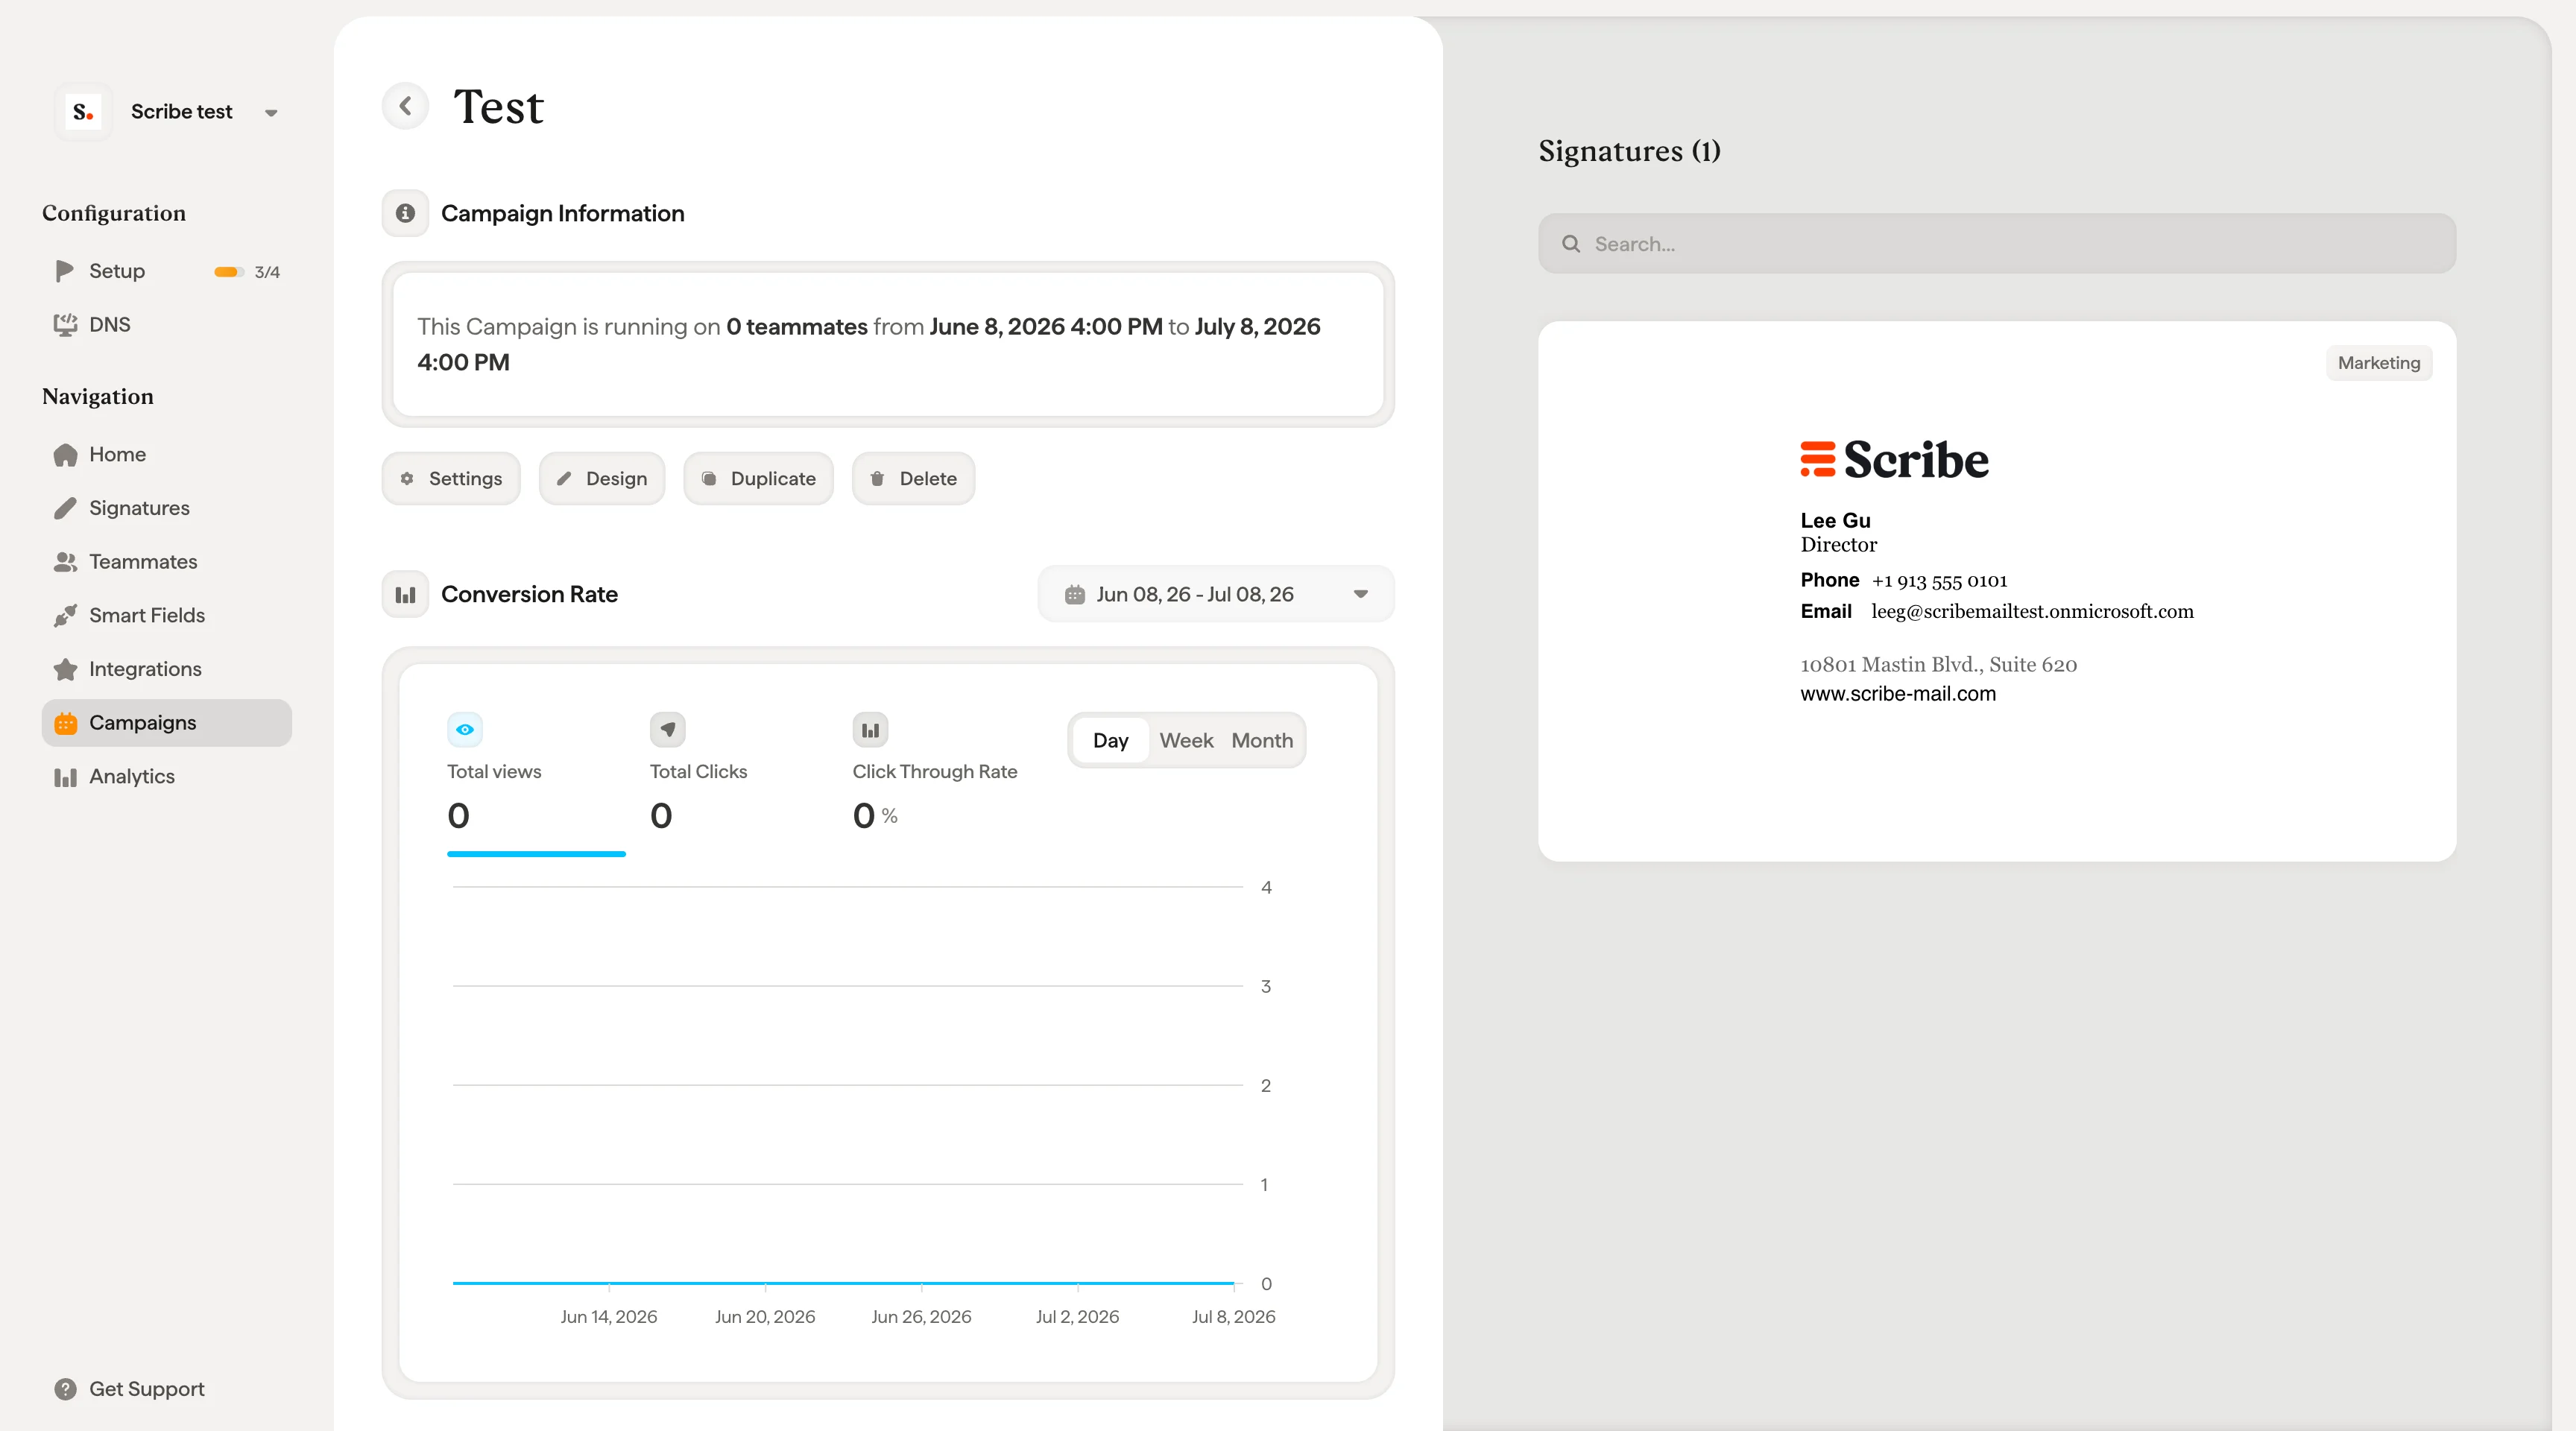
Click on any campaign from the Campaigns list (or the eye icon under **Actions**) to open the campaign detail page. Here you'll find:
* **Campaign name and status** (Active / Inactive) at the top.
* **Campaign Information.** Shows the number of signatures, start date, and end date.
* **Conversion Rate** section with three metrics:
* **Total views.** Number of times the marketing element was displayed.
* **Total clicks.** Number of clicks on the marketing element.
* **Average CTR.** Click-through rate as a percentage.
* **Timeline chart.** Visual breakdown of clicks over the campaign period.
* **Signatures panel** (right side). Searchable list of all signatures included in the campaign, each showing the marketing element in context.
In the **Campaign Dates** section:
* **Time Zone.** Select your time zone from the dropdown (e.g., Guadalajara GMT-6, Berlin GMT+2, Paris GMT+2).
* **From.** Pick the start date and time for the campaign.
* **To.** Pick the end date and time.
* **Frequency.** Choose how often the campaign runs:
* **One time only.** Runs once for the defined period.
* **Monthly.** Repeats automatically every month.
* **Quarterly.** Repeats automatically every quarter.
* **Yearly.** Repeats automatically every year.
Under **Campaign Options**, you have two optional settings:
* **Keep existing marketing blocks in signatures.** When checked, the new campaign's marketing elements are combined with any existing ones already in teammates' signatures. When unchecked, the new campaign replaces any current marketing elements.
* **Notify team by email when campaign starts.** Sends an email to all targeted teammates letting them know a new marketing campaign has been added to their signature. Click **Preview email** to see what the notification looks like.
If some teammates are already part of an active campaign, a warning will appear letting you know. Running this campaign will combine marketing elements from both campaigns in their signatures.
Click **Next** to proceed to step 2 of 2. This opens the campaign editor where you'll design the marketing element that will appear in signatures.
The editor has three panels:
* **Left panel (Actions).** Shows your signature structure tree with Undo/Redo controls and an **+ Add Block** button at the bottom.
* **Center panel (Preview).** Live preview of the signature with the marketing block. Use the left/right arrows to cycle through different signature templates if multiple are targeted.
* **Right panel (Content).** Appears when you select a marketing block, letting you customize its content and style.
Click **+ Add Block** to open the block picker. Choose from the available marketing block types:
Socials, Banner, Button, Browser store, Food delivery, Games store, Product Hunt, Y Combinator, Podcast, Store apps, Ratings, Live streaming, TV streaming, Online store, Reading apps, and Music streaming.
After selecting a block type, it appears in the signature preview, and the **Content** panel opens on the right. Depending on the block type, you can configure:
**Content**
* **Image.** Upload or link to an image. A thumbnail preview is shown.
* **Image Link.** The URL that opens when someone clicks the marketing element.
**Style**
* **Appearance.** Adjust opacity and border radius.
* **Layout.** Set the height and width in pixels.
* **Colors.** Choose a background color.
* **Margin.** Control spacing around the block.
The live preview in the center panel updates as you make changes.
When you're happy with the campaign, you have two options:
* **Create Campaign.** Launches the campaign immediately (or at the scheduled start time). A success confirmation appears with the campaign name and end date.
* **Save as Draft.** Saves the campaign without activating it. You can come back to launch it later.
## View campaign details
Click on any campaign from the Campaigns list (or the eye icon under **Actions**) to open the campaign detail page. Here you'll find:
* **Campaign name and status** (Active / Inactive) at the top.
* **Campaign Information.** Shows the number of signatures, start date, and end date.
* **Conversion Rate** section with three metrics:
* **Total views.** Number of times the marketing element was displayed.
* **Total clicks.** Number of clicks on the marketing element.
* **Average CTR.** Click-through rate as a percentage.
* **Timeline chart.** Visual breakdown of clicks over the campaign period.
* **Signatures panel** (right side). Searchable list of all signatures included in the campaign, each showing the marketing element in context.
 ## Pause a campaign
From the campaign detail page, click the **Pause** button. A confirmation dialog will appear explaining that campaign marketing elements will no longer appear in signatures and will be replaced with the previous marketing elements.
Click **Pause campaign** to confirm, or **Cancel** to keep it running.
Pausing a campaign immediately removes the marketing elements from all affected signatures. You can resume a paused campaign at any time to re-activate it.
## Resume a campaign
From the detail page of a paused campaign, click **Resume** to reactivate it. The marketing elements will reappear in all targeted signatures.
## Edit a campaign
Paused campaigns can be edited. From the detail page of a paused campaign, click the **Edit** button to modify the campaign details, targeting, dates, or marketing block. Once you're done, resume the campaign to push your changes live.
## Duplicate a campaign
Click the **Duplicate** button on the campaign detail page to create a copy of the campaign. This is useful when you want to run a similar campaign with minor adjustments, like a new date range or updated banner image, without starting from scratch.
## Delete a campaign
Click the **Delete** button on the campaign detail page to permanently remove the campaign. If the campaign is currently active, marketing elements will be removed from all affected signatures before deletion.
## Related articles
* [Marketing campaigns overview](/en/marketing-overview): how campaigns work, targeting, scheduling, and block types.
* [Analytics](/en/analytics-overview): measure views, clicks, and CTR for your campaigns.
* [Add a promotional banner](/en/can-i-add-a-promotional-banner-in-my-email-signature): design and use cases for signature banners.
* [Smart Fields](/en/smart-fields): build targeting rules from synced teammate data.
## Pause a campaign
From the campaign detail page, click the **Pause** button. A confirmation dialog will appear explaining that campaign marketing elements will no longer appear in signatures and will be replaced with the previous marketing elements.
Click **Pause campaign** to confirm, or **Cancel** to keep it running.
Pausing a campaign immediately removes the marketing elements from all affected signatures. You can resume a paused campaign at any time to re-activate it.
## Resume a campaign
From the detail page of a paused campaign, click **Resume** to reactivate it. The marketing elements will reappear in all targeted signatures.
## Edit a campaign
Paused campaigns can be edited. From the detail page of a paused campaign, click the **Edit** button to modify the campaign details, targeting, dates, or marketing block. Once you're done, resume the campaign to push your changes live.
## Duplicate a campaign
Click the **Duplicate** button on the campaign detail page to create a copy of the campaign. This is useful when you want to run a similar campaign with minor adjustments, like a new date range or updated banner image, without starting from scratch.
## Delete a campaign
Click the **Delete** button on the campaign detail page to permanently remove the campaign. If the campaign is currently active, marketing elements will be removed from all affected signatures before deletion.
## Related articles
* [Marketing campaigns overview](/en/marketing-overview): how campaigns work, targeting, scheduling, and block types.
* [Analytics](/en/analytics-overview): measure views, clicks, and CTR for your campaigns.
* [Add a promotional banner](/en/can-i-add-a-promotional-banner-in-my-email-signature): design and use cases for signature banners.
* [Smart Fields](/en/smart-fields): build targeting rules from synced teammate data.