> ## Documentation Index
> Fetch the complete documentation index at: https://help.scribe-mail.com/llms.txt
> Use this file to discover all available pages before exploring further.
# Signature detail page
> Everything you see when you open a signature: design preview, setup checklist, installation stats, campaigns, and analytics at a glance.
Click on any signature card from the Signatures page to open its detail page. This is your command center for managing a single signature, from design to deployment.
The detail page is organized into five tabs: **Overview**, **[Teammates](/en/assign-teammates-to-a-signature)**, **[Variants](/en/signature-variants)**, **[Analytics](/en/signature-analytics)**, and **[Settings](/en/signature-settings)**. This article covers the Overview tab.
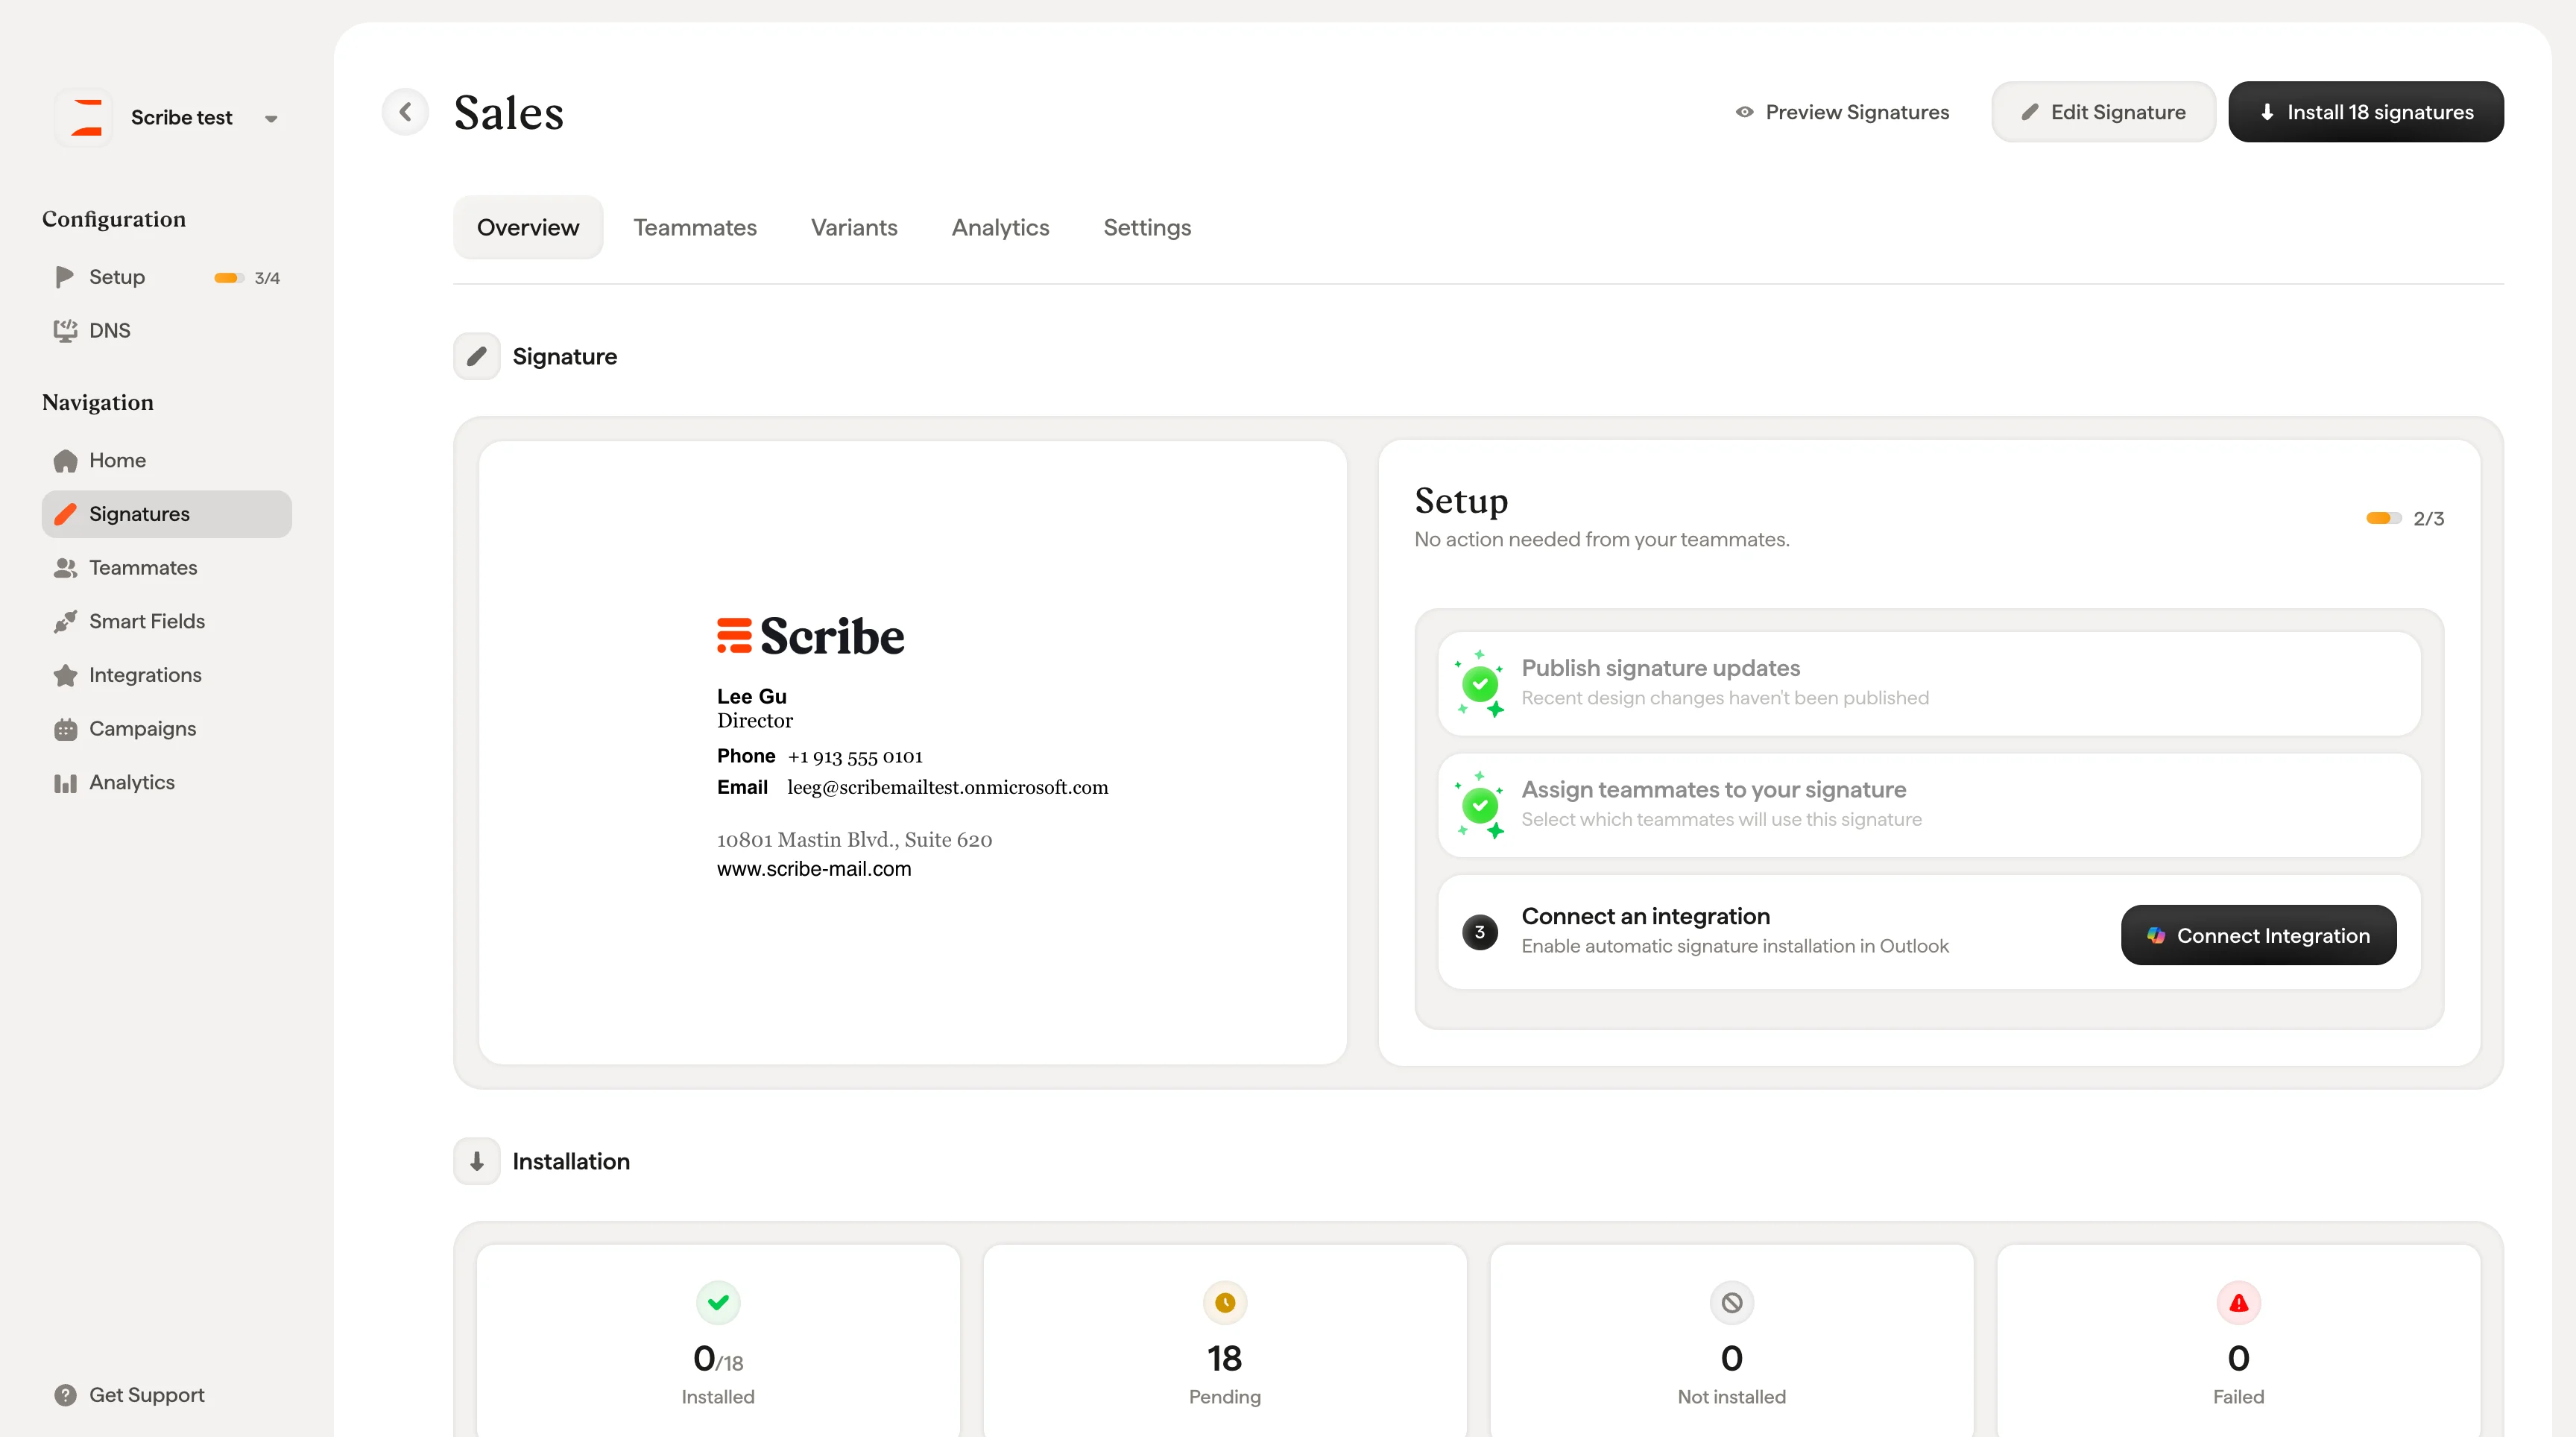 At the top of the page, three actions are always available:
* **[Preview Signatures](/en/preview-signatures)**: See how the signature looks for each teammate
* **Edit Signature**: Open the signature editor
* **Install X signatures**: Deploy the signature to assigned teammates
## Signature preview
The left side of the Overview tab shows a live preview of your signature design. Hover over the preview to reveal the **Edit signature** button, which takes you directly to the editor.
At the top of the page, three actions are always available:
* **[Preview Signatures](/en/preview-signatures)**: See how the signature looks for each teammate
* **Edit Signature**: Open the signature editor
* **Install X signatures**: Deploy the signature to assigned teammates
## Signature preview
The left side of the Overview tab shows a live preview of your signature design. Hover over the preview to reveal the **Edit signature** button, which takes you directly to the editor.
 ## Setup checklist
The right side shows a step-by-step **Setup** panel that tracks your progress. A counter in the top-right corner (e.g., "1/3") shows how many steps are complete.
The steps differ depending on whether you use an automated integration or a manual setup.
**With an integration (Google Workspace or Microsoft 365):**
1. **Publish signature updates**: If you've made design changes that haven't been published yet, click **Publish Updates** to push them live. After the initial installation, published updates are automatically pushed to your teammates, with no reinstall needed.
2. **Assign teammates to your signature**: Select which teammates will use this signature. Shows an "Assigned" badge once teammates have been added.
3. **Connect an integration**: Link your Google Workspace or Microsoft 365 account to enable automatic installation. Click **Connect Integration** to set it up.
**Without an integration (manual setup):**
1. **Publish signature updates**: Same as above.
2. **Assign teammates to your signature**: Same as above.
3. **Invite teammates to install their signatures**: Click **Invite teammates** to send an email inviting your teammates to join Scribe and install their signature themselves.
With an automated integration, the Setup panel shows **"No action needed from your teammates"**. Everything is handled by the admin. With a manual setup, teammates will need to take action by accepting the invitation and installing their signature.
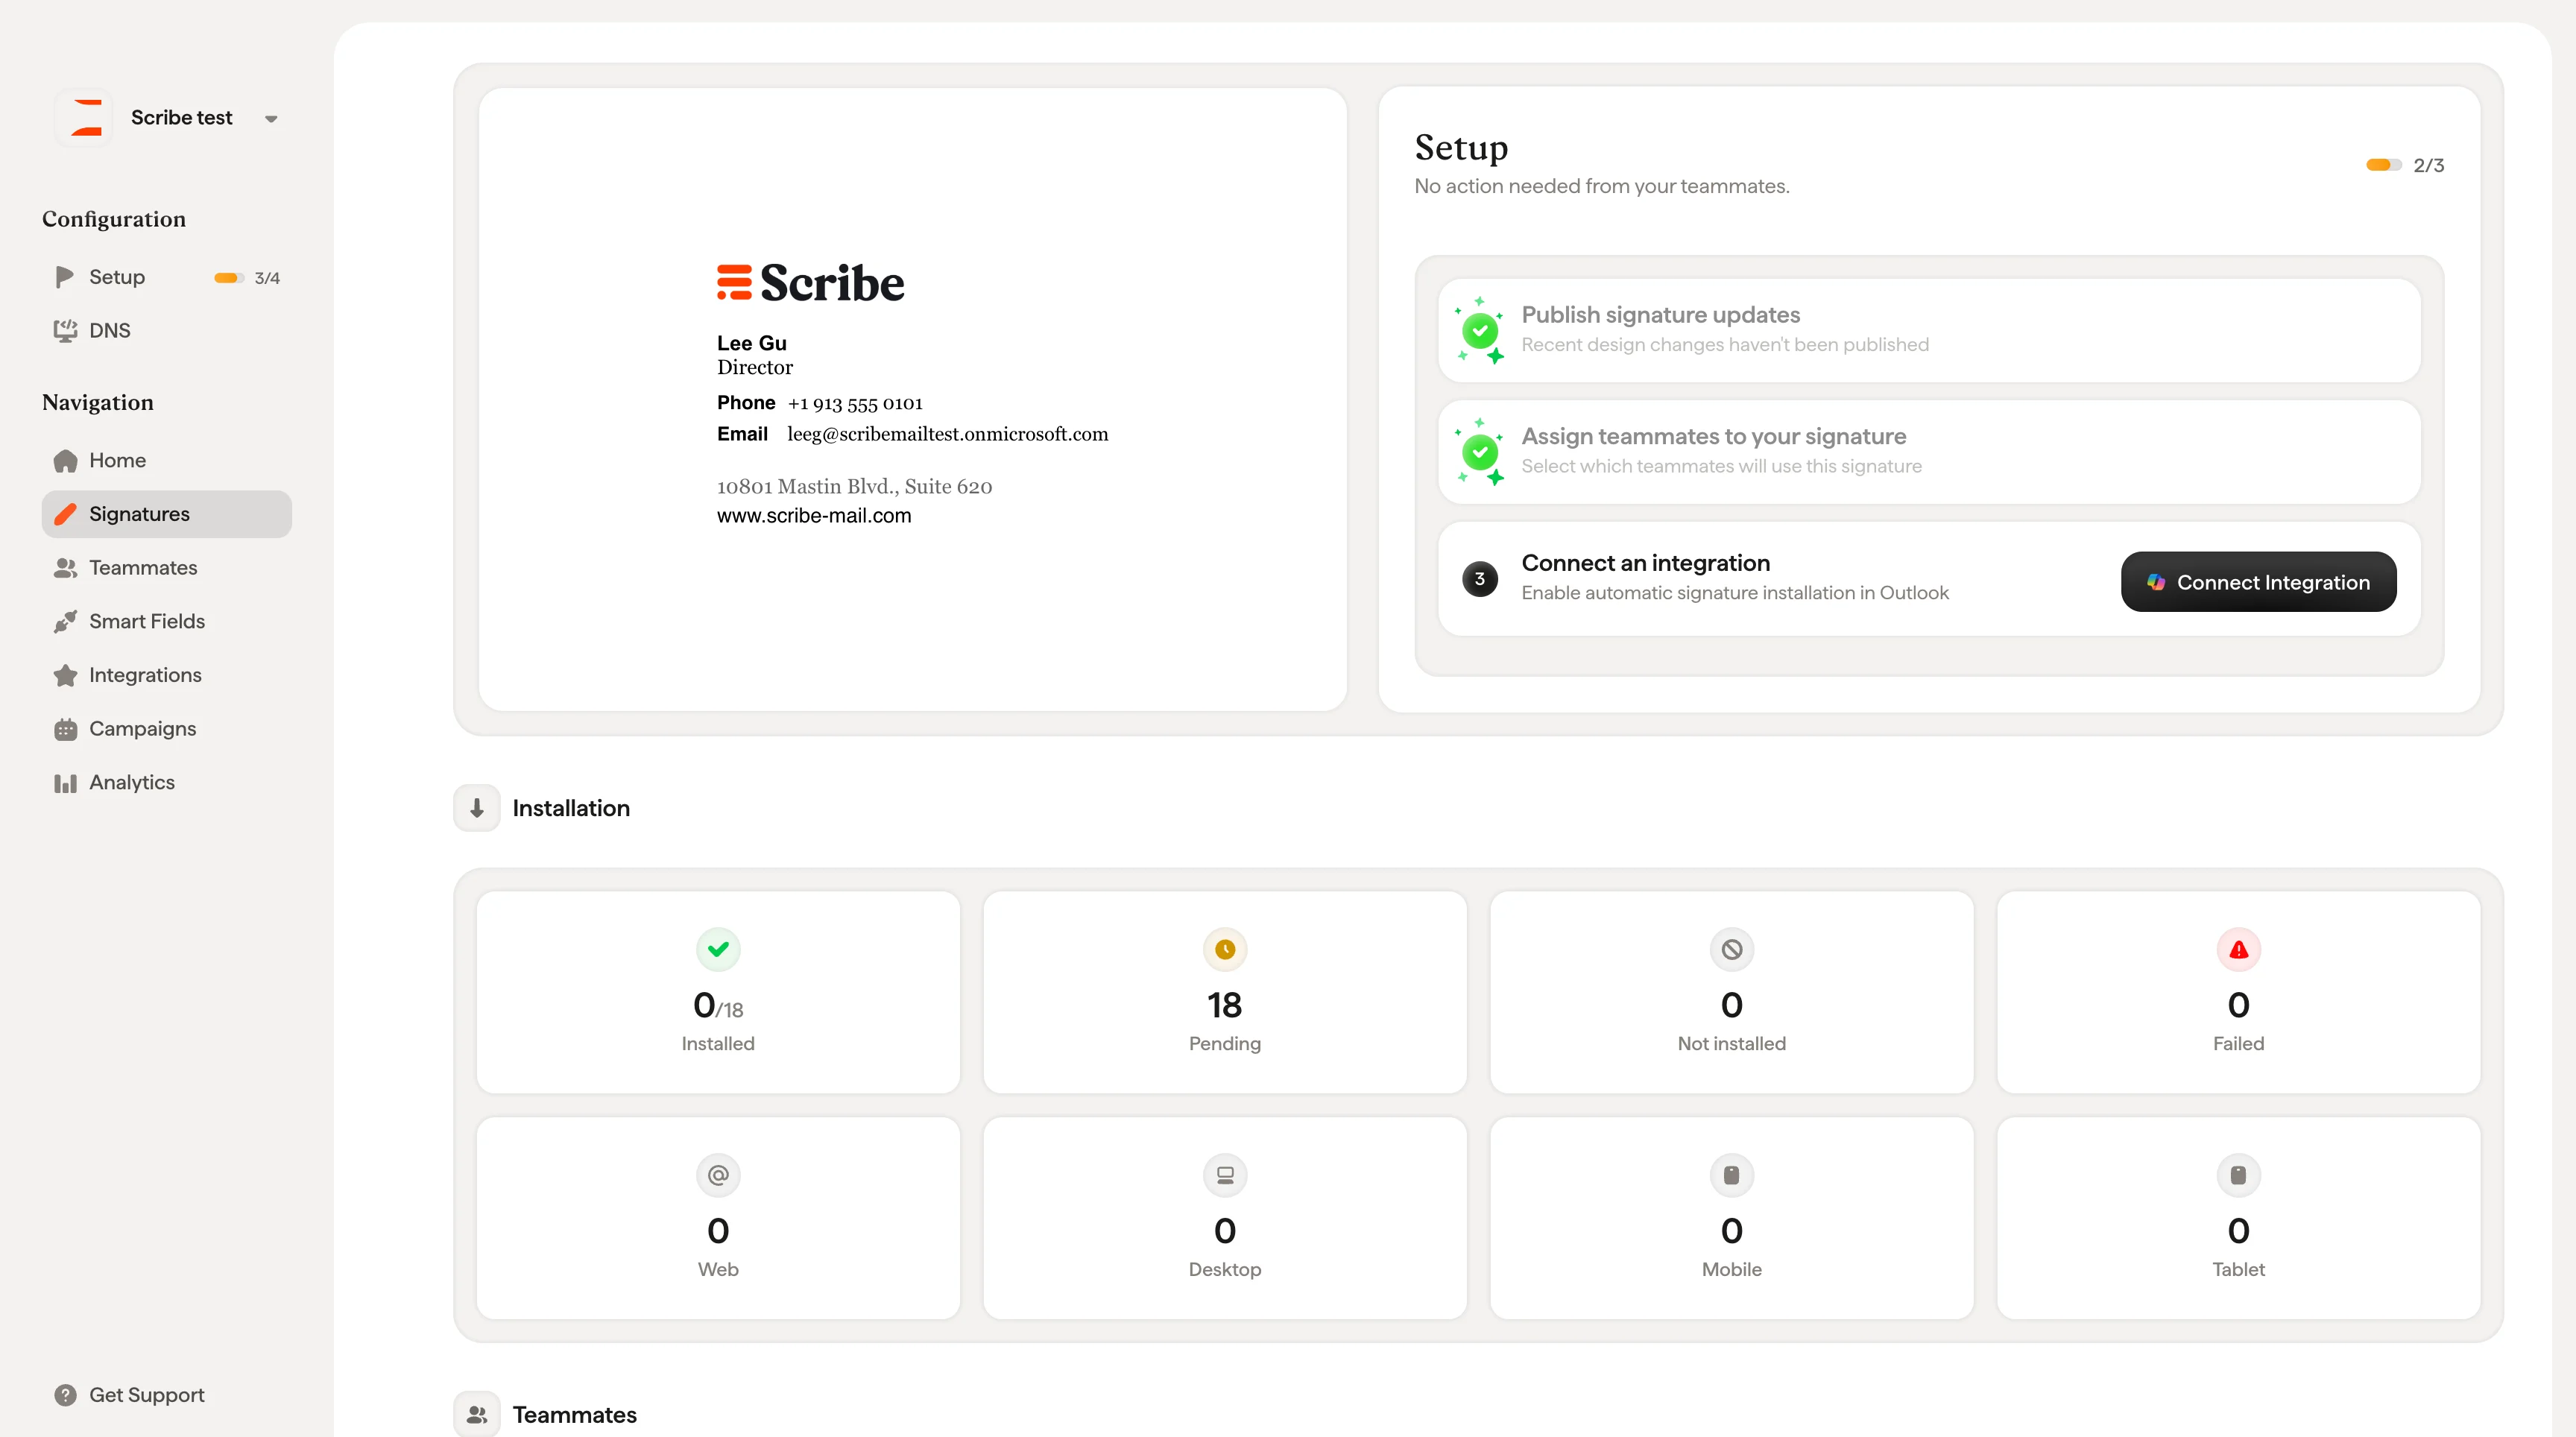
## Installation
Below the setup panel, four cards summarize the installation status for this signature:
| Card | Meaning |
| ----------------- | ------------------------------------------------------------------------ |
| **Installed** | Teammates with the signature successfully deployed (e.g., "0/1") |
| **Pending** | Installation request sent, waiting for Google or Microsoft to process it |
| **Not installed** | Teammates who haven't received the signature yet |
| **Failed** | Installation encountered an error |
A second row of cards shows installation breakdown by device type: **Web**, **Desktop**, **Mobile**, and **Tablet**.
## Setup checklist
The right side shows a step-by-step **Setup** panel that tracks your progress. A counter in the top-right corner (e.g., "1/3") shows how many steps are complete.
The steps differ depending on whether you use an automated integration or a manual setup.
**With an integration (Google Workspace or Microsoft 365):**
1. **Publish signature updates**: If you've made design changes that haven't been published yet, click **Publish Updates** to push them live. After the initial installation, published updates are automatically pushed to your teammates, with no reinstall needed.
2. **Assign teammates to your signature**: Select which teammates will use this signature. Shows an "Assigned" badge once teammates have been added.
3. **Connect an integration**: Link your Google Workspace or Microsoft 365 account to enable automatic installation. Click **Connect Integration** to set it up.
**Without an integration (manual setup):**
1. **Publish signature updates**: Same as above.
2. **Assign teammates to your signature**: Same as above.
3. **Invite teammates to install their signatures**: Click **Invite teammates** to send an email inviting your teammates to join Scribe and install their signature themselves.
With an automated integration, the Setup panel shows **"No action needed from your teammates"**. Everything is handled by the admin. With a manual setup, teammates will need to take action by accepting the invitation and installing their signature.
## Installation
Below the setup panel, four cards summarize the installation status for this signature:
| Card | Meaning |
| ----------------- | ------------------------------------------------------------------------ |
| **Installed** | Teammates with the signature successfully deployed (e.g., "0/1") |
| **Pending** | Installation request sent, waiting for Google or Microsoft to process it |
| **Not installed** | Teammates who haven't received the signature yet |
| **Failed** | Installation encountered an error |
A second row of cards shows installation breakdown by device type: **Web**, **Desktop**, **Mobile**, and **Tablet**.
 ## Teammates
Two cards show teammate assignment at a glance:
* **Teammates Assigned**: How many teammates are assigned to this signature
* **Profile Completion**: The average completion percentage across all assigned teammates' Smart Field data
A low profile completion means some teammates are missing information (e.g., phone number, job title) that the signature design uses. This will result in empty fields or placeholder text in their signatures.
## Smart Fields used in this signature
A table lists every [Smart Field](/en/smart-fields) used in this signature's design, with three columns:
* **Name**: The Smart Field (e.g., First name, Job Position, Work phone number)
* **Integration**: Where the data comes from (e.g., Entra ID, Google Workspace, or Scribe)
* **Teammates Completion**: A progress bar and count (e.g., "15/19" at 79%) showing how many assigned teammates have this field filled
This helps you quickly identify which fields are causing incomplete signatures and take action, either by updating teammate profiles or adjusting the signature design.
## Teammates
Two cards show teammate assignment at a glance:
* **Teammates Assigned**: How many teammates are assigned to this signature
* **Profile Completion**: The average completion percentage across all assigned teammates' Smart Field data
A low profile completion means some teammates are missing information (e.g., phone number, job title) that the signature design uses. This will result in empty fields or placeholder text in their signatures.
## Smart Fields used in this signature
A table lists every [Smart Field](/en/smart-fields) used in this signature's design, with three columns:
* **Name**: The Smart Field (e.g., First name, Job Position, Work phone number)
* **Integration**: Where the data comes from (e.g., Entra ID, Google Workspace, or Scribe)
* **Teammates Completion**: A progress bar and count (e.g., "15/19" at 79%) showing how many assigned teammates have this field filled
This helps you quickly identify which fields are causing incomplete signatures and take action, either by updating teammate profiles or adjusting the signature design.
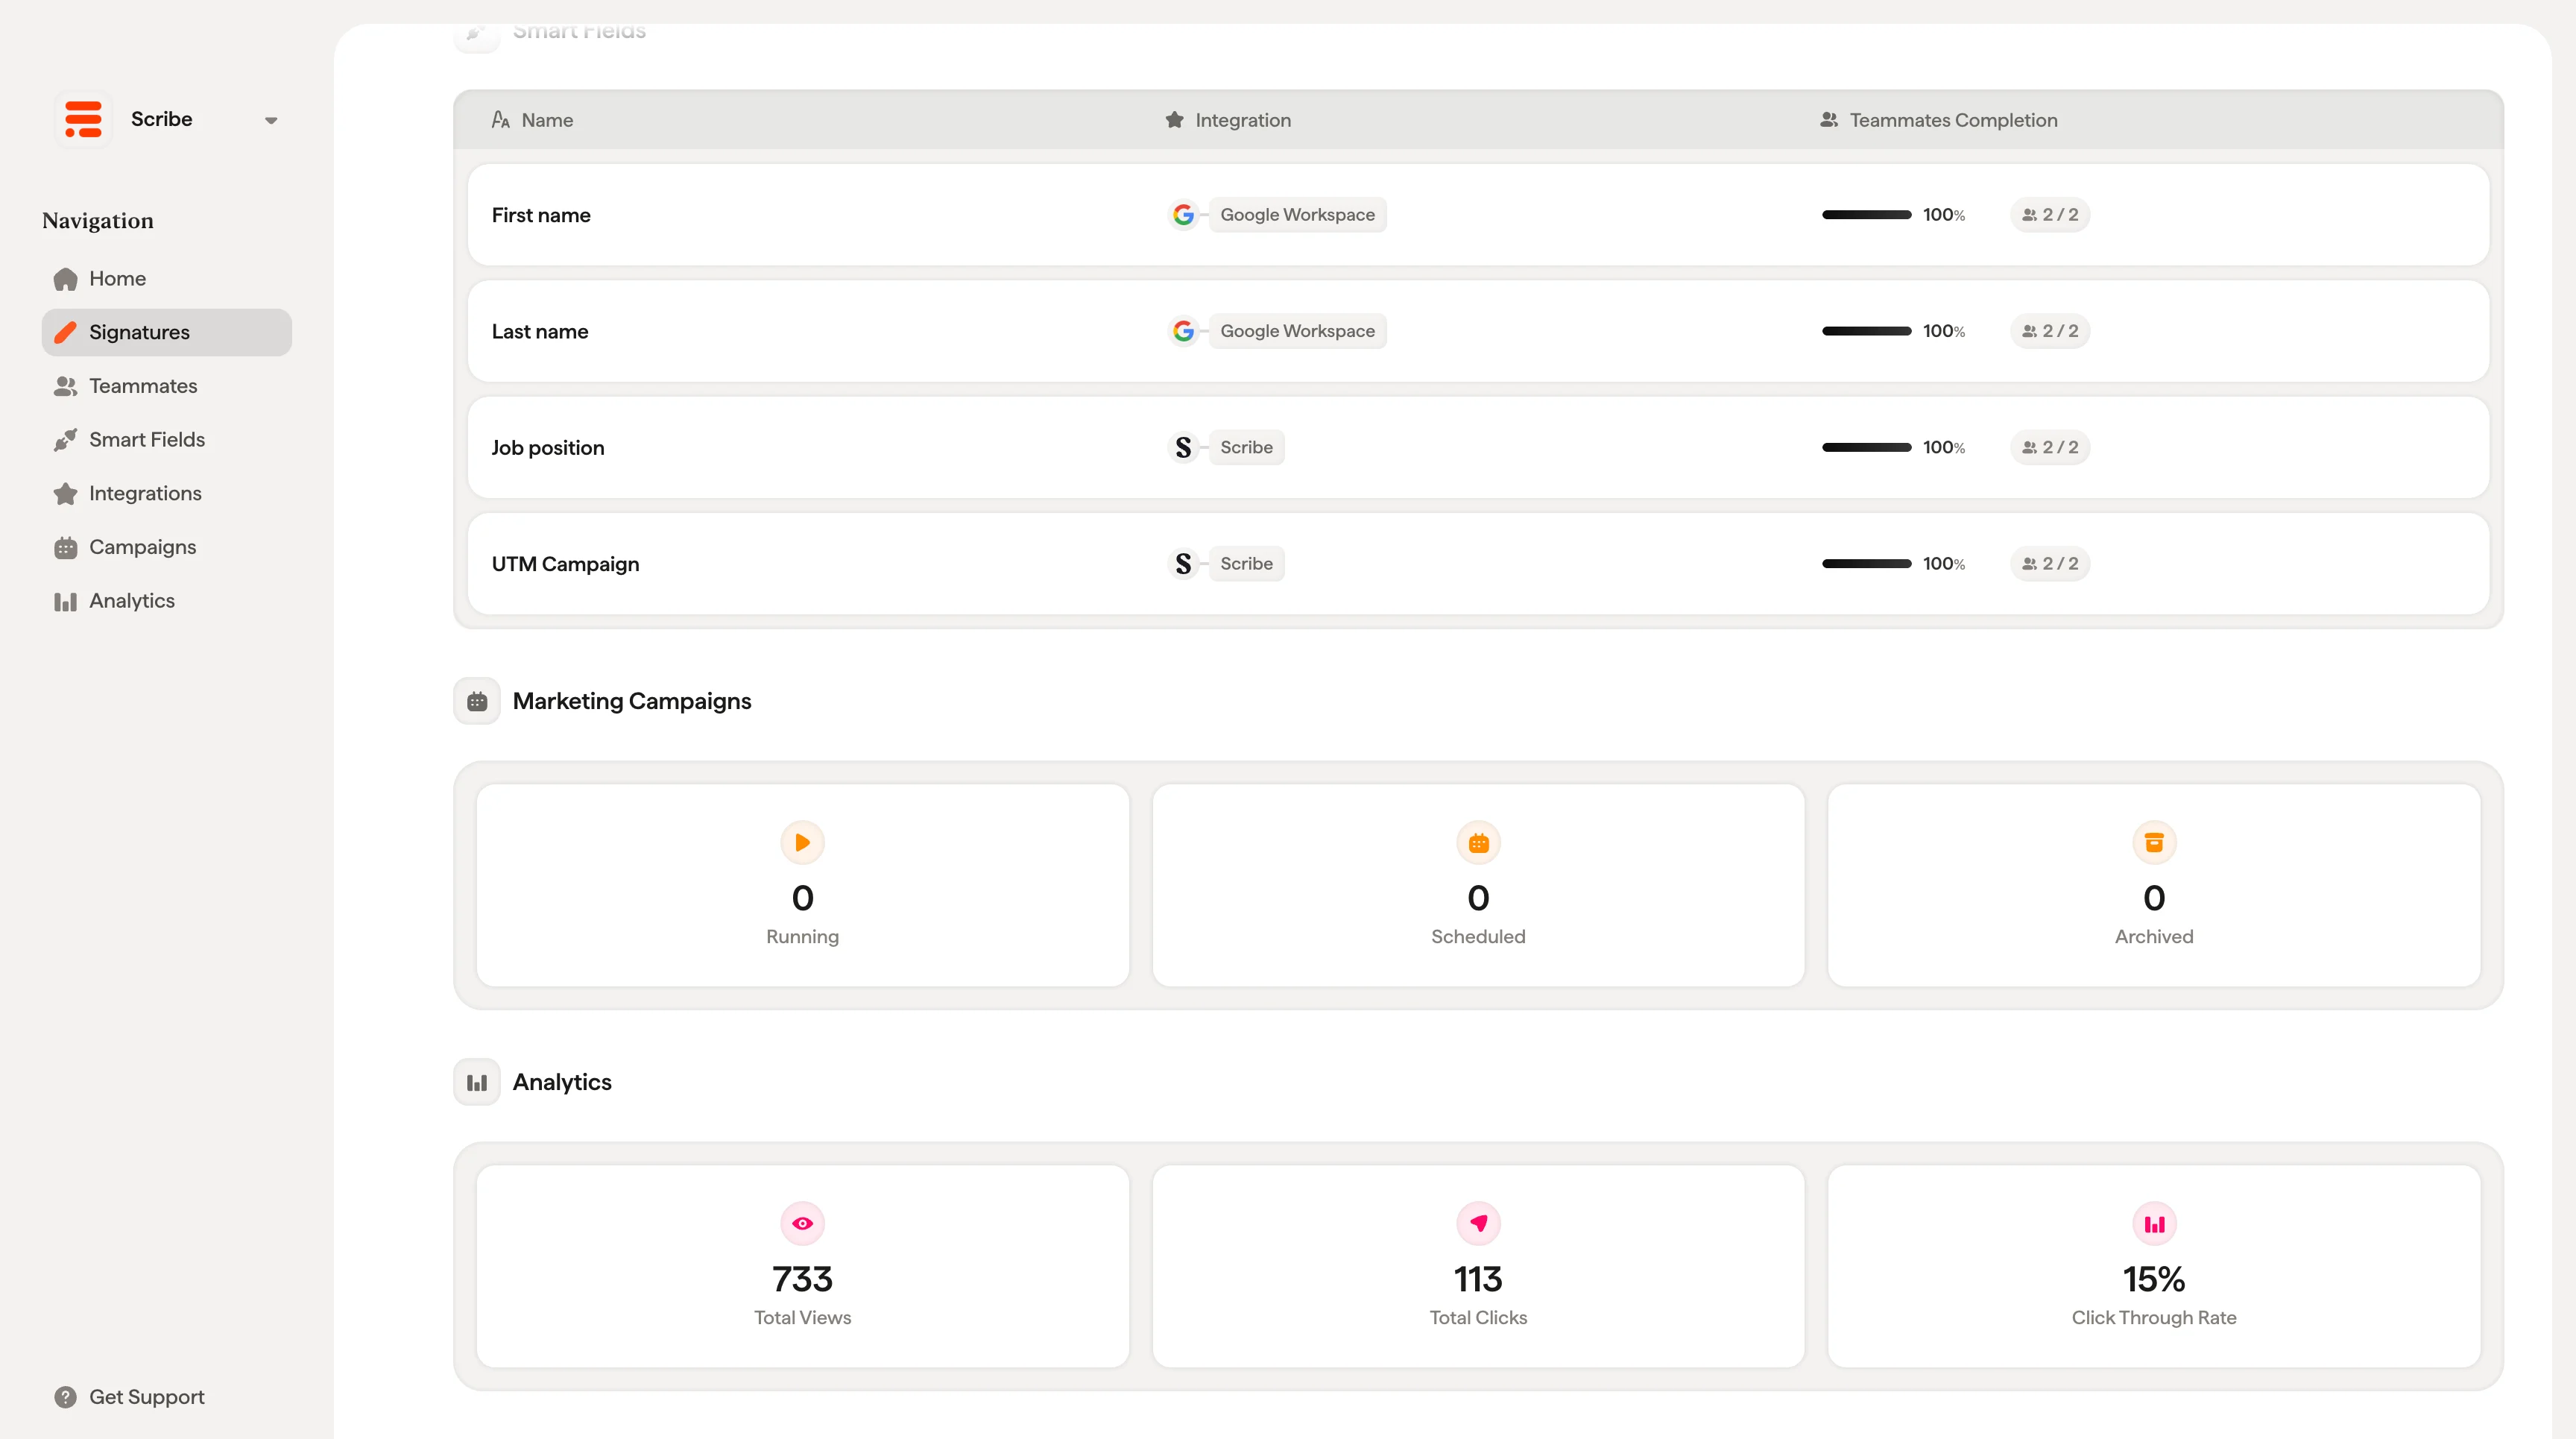
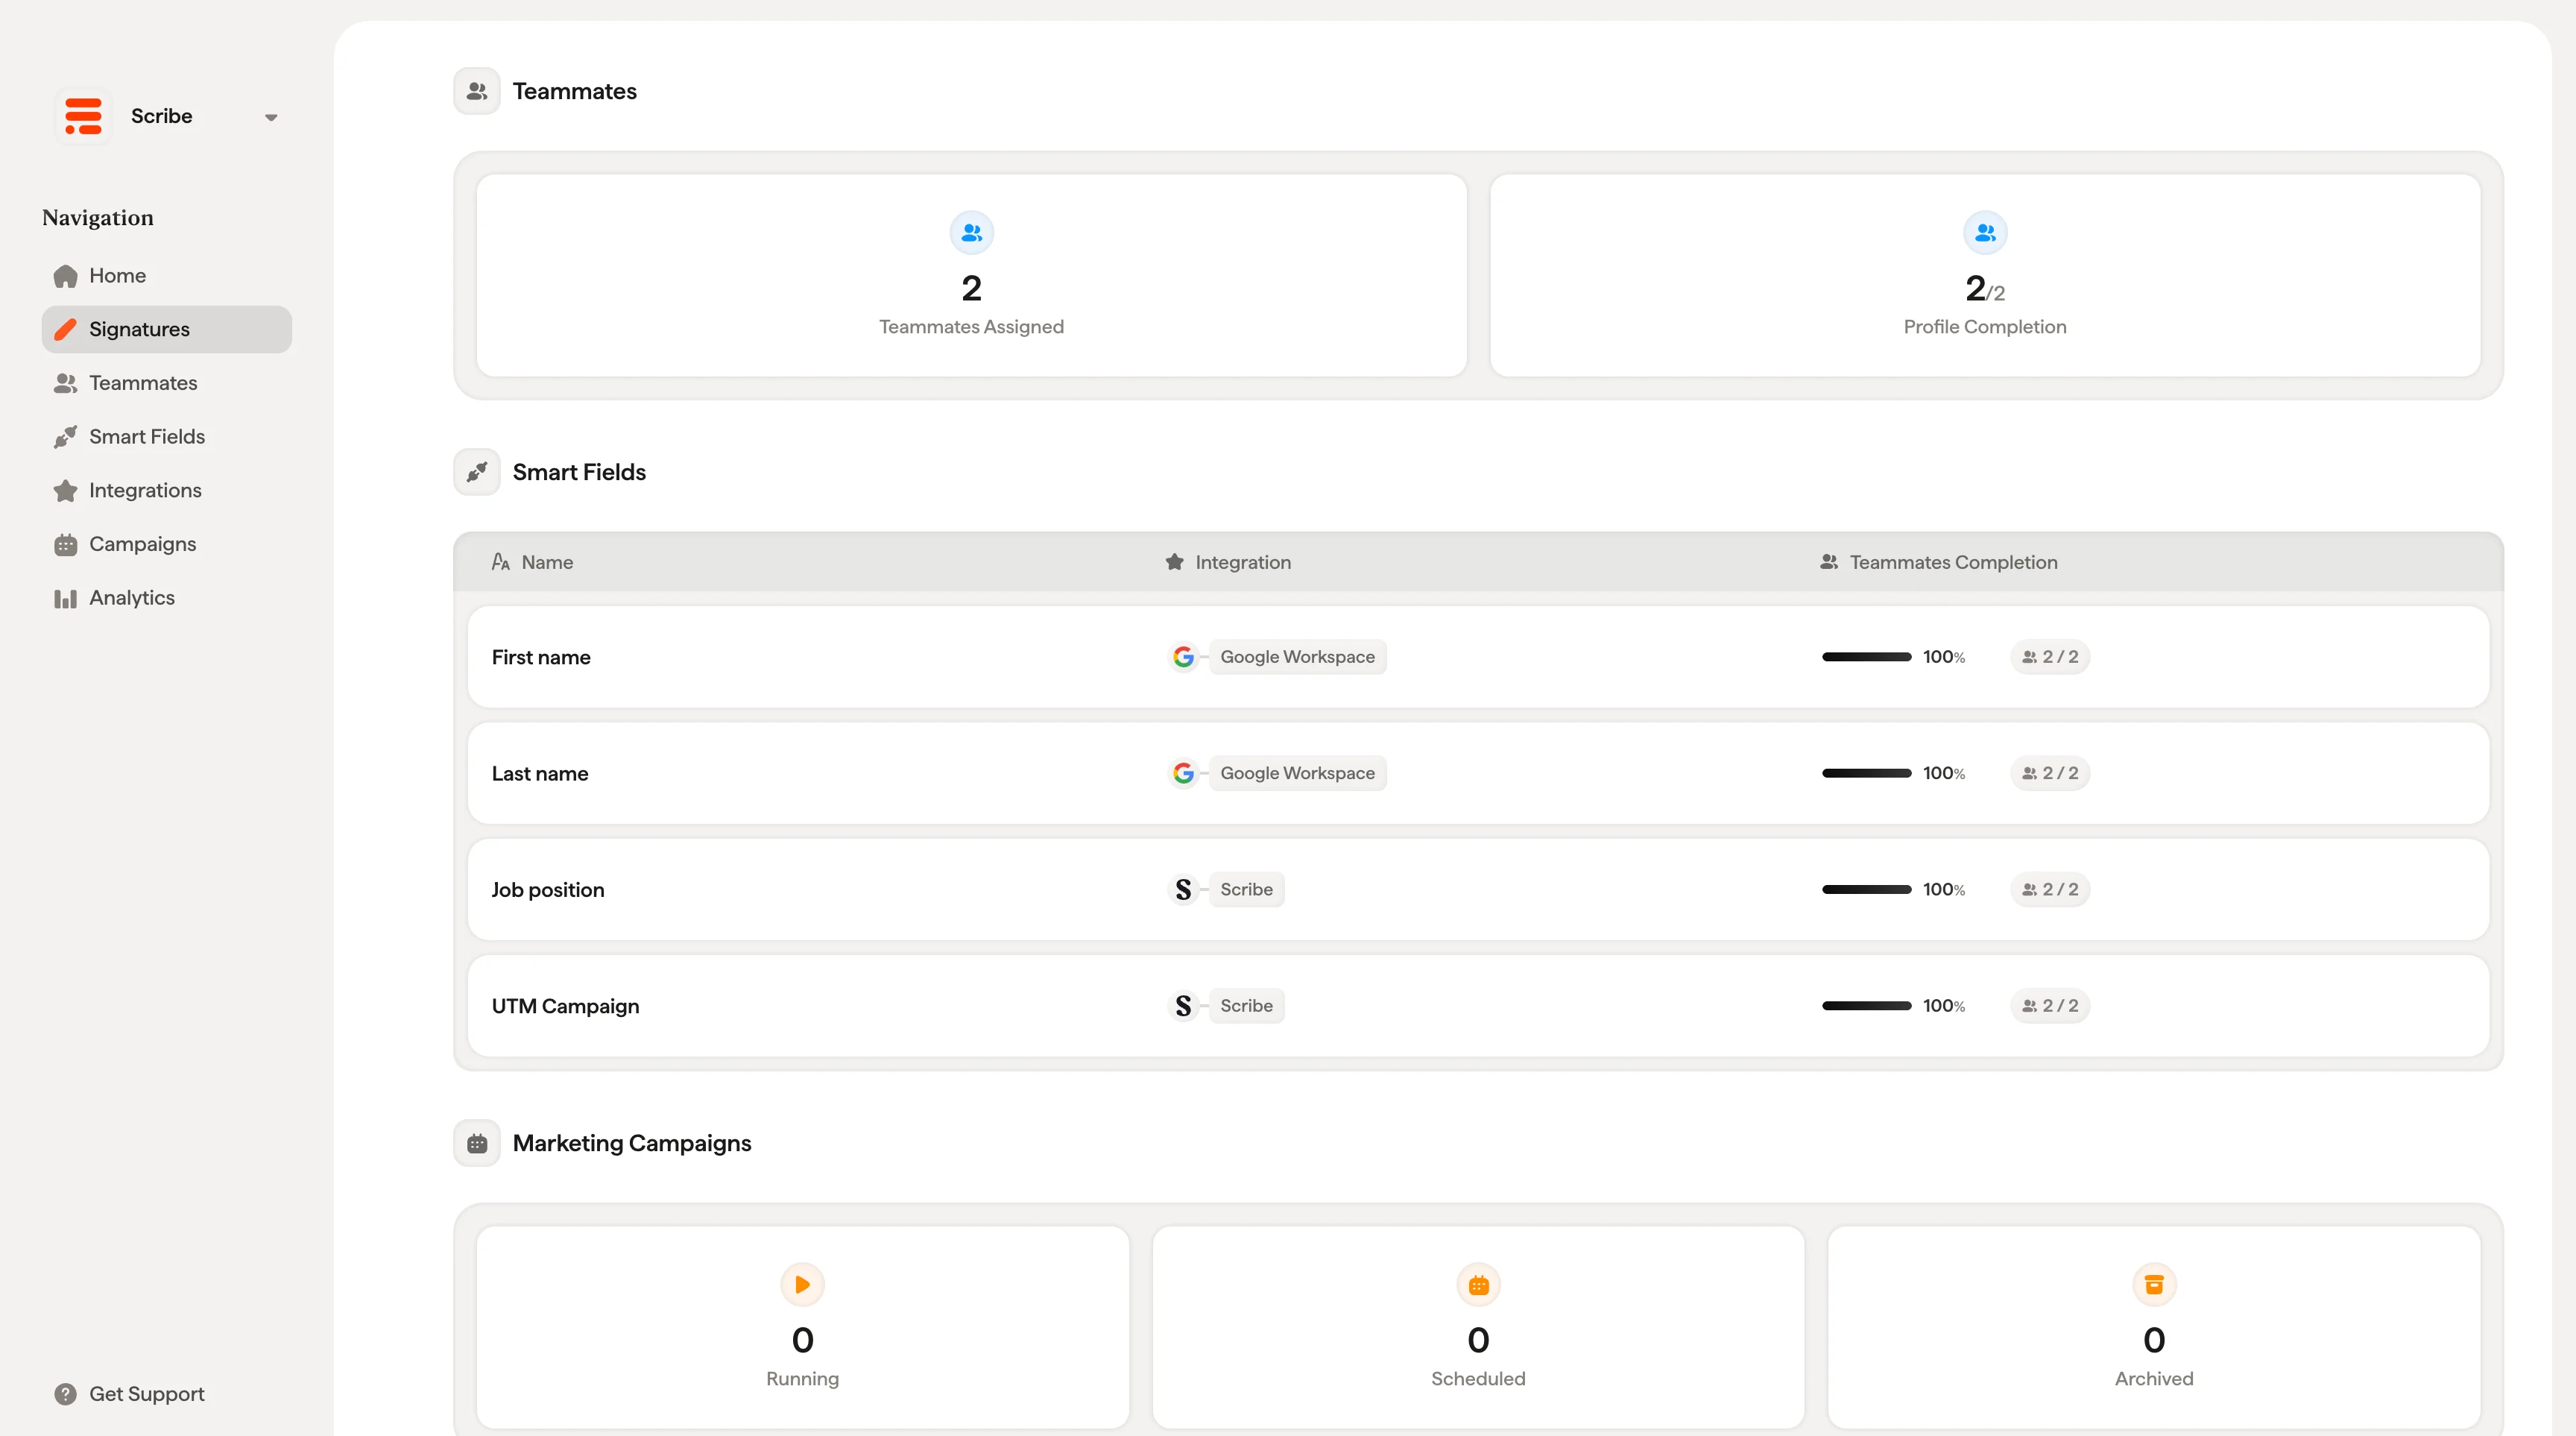 ## Marketing Campaigns
Three cards show the campaign status for this signature:
* **Running**: Currently active campaigns
* **Scheduled**: Campaigns set to start in the future
* **Archived**: Past campaigns
Campaigns are managed from the dedicated Campaigns section. This is just a summary view.
## Analytics
Three cards give you a quick performance snapshot:
* **Total Views**: How many times the signature has been seen
* **Total Clicks**: How many times recipients clicked on elements in the signature
* **Click-through Rate**: The percentage of views that resulted in a click
For detailed analytics, switch to the **Analytics** tab.
## Marketing Campaigns
Three cards show the campaign status for this signature:
* **Running**: Currently active campaigns
* **Scheduled**: Campaigns set to start in the future
* **Archived**: Past campaigns
Campaigns are managed from the dedicated Campaigns section. This is just a summary view.
## Analytics
Three cards give you a quick performance snapshot:
* **Total Views**: How many times the signature has been seen
* **Total Clicks**: How many times recipients clicked on elements in the signature
* **Click-through Rate**: The percentage of views that resulted in a click
For detailed analytics, switch to the **Analytics** tab.
 ## Related articles
* [Signatures overview](/en/signatures-overview): how the signature library and detail page fit together.
* [Create and manage signatures](/en/create-and-manage-signatures): create, duplicate, and organize signatures.
* [Install signatures](/en/install-signatures): deploy the signature to assigned teammates.
## Related articles
* [Signatures overview](/en/signatures-overview): how the signature library and detail page fit together.
* [Create and manage signatures](/en/create-and-manage-signatures): create, duplicate, and organize signatures.
* [Install signatures](/en/install-signatures): deploy the signature to assigned teammates.