> ## Documentation Index
> Fetch the complete documentation index at: https://help.scribe-mail.com/llms.txt
> Use this file to discover all available pages before exploring further.

# Rippling

> HR·IT 플랫폼인 Rippling에서 직책, 부서 등 직원 정보를 동기화하여 이메일 서명을 정확하고 최신 상태로 유지하세요.

Rippling을 데이터 소스로 사용해 [팀원의 서명을 자동 입력](/ko/smart-fields)하려면 다음 단계를 따르세요.

<Info>
  **팀원이 별도로 해야 할 작업은 없어요.**
</Info>

<Info>
  **Rippling의 변경 사항은 Scribe로 자동 동기화돼요.**
</Info>

<Info>
  **SOC 2 Type II 인증.** [데이터는 안전하게 보호됩니다](/ko/security/data-collection/rippling).
</Info>

## 설치 가이드

### 사전 준비

* Rippling 계정의 관리자 권한
* 관리자 권한이 있는 Scribe 계정

<Steps>
  <Step title="Rippling 앱 스토어로 이동">
    <Warning>
      이 연동을 설치하려면 **Rippling의 Admin** 권한이 필요해요.
    </Warning>

    **Go to Rippling app store**를 클릭해 연동을 시작하세요.

    <Frame>
      <img src="https://mintcdn.com/scribe/xbQhr3JjkYildsKM/images/rippling-go-to-app-store-button.png?fit=max&auto=format&n=xbQhr3JjkYildsKM&q=85&s=4a660fe55b175baabd0096772d6da332" alt="Scribe 연동 설정의 Go to Rippling App Store 버튼" width="3454" height="1930" data-path="images/rippling-go-to-app-store-button.png" />
    </Frame>
  </Step>

  <Step title="Rippling 계정에 로그인">
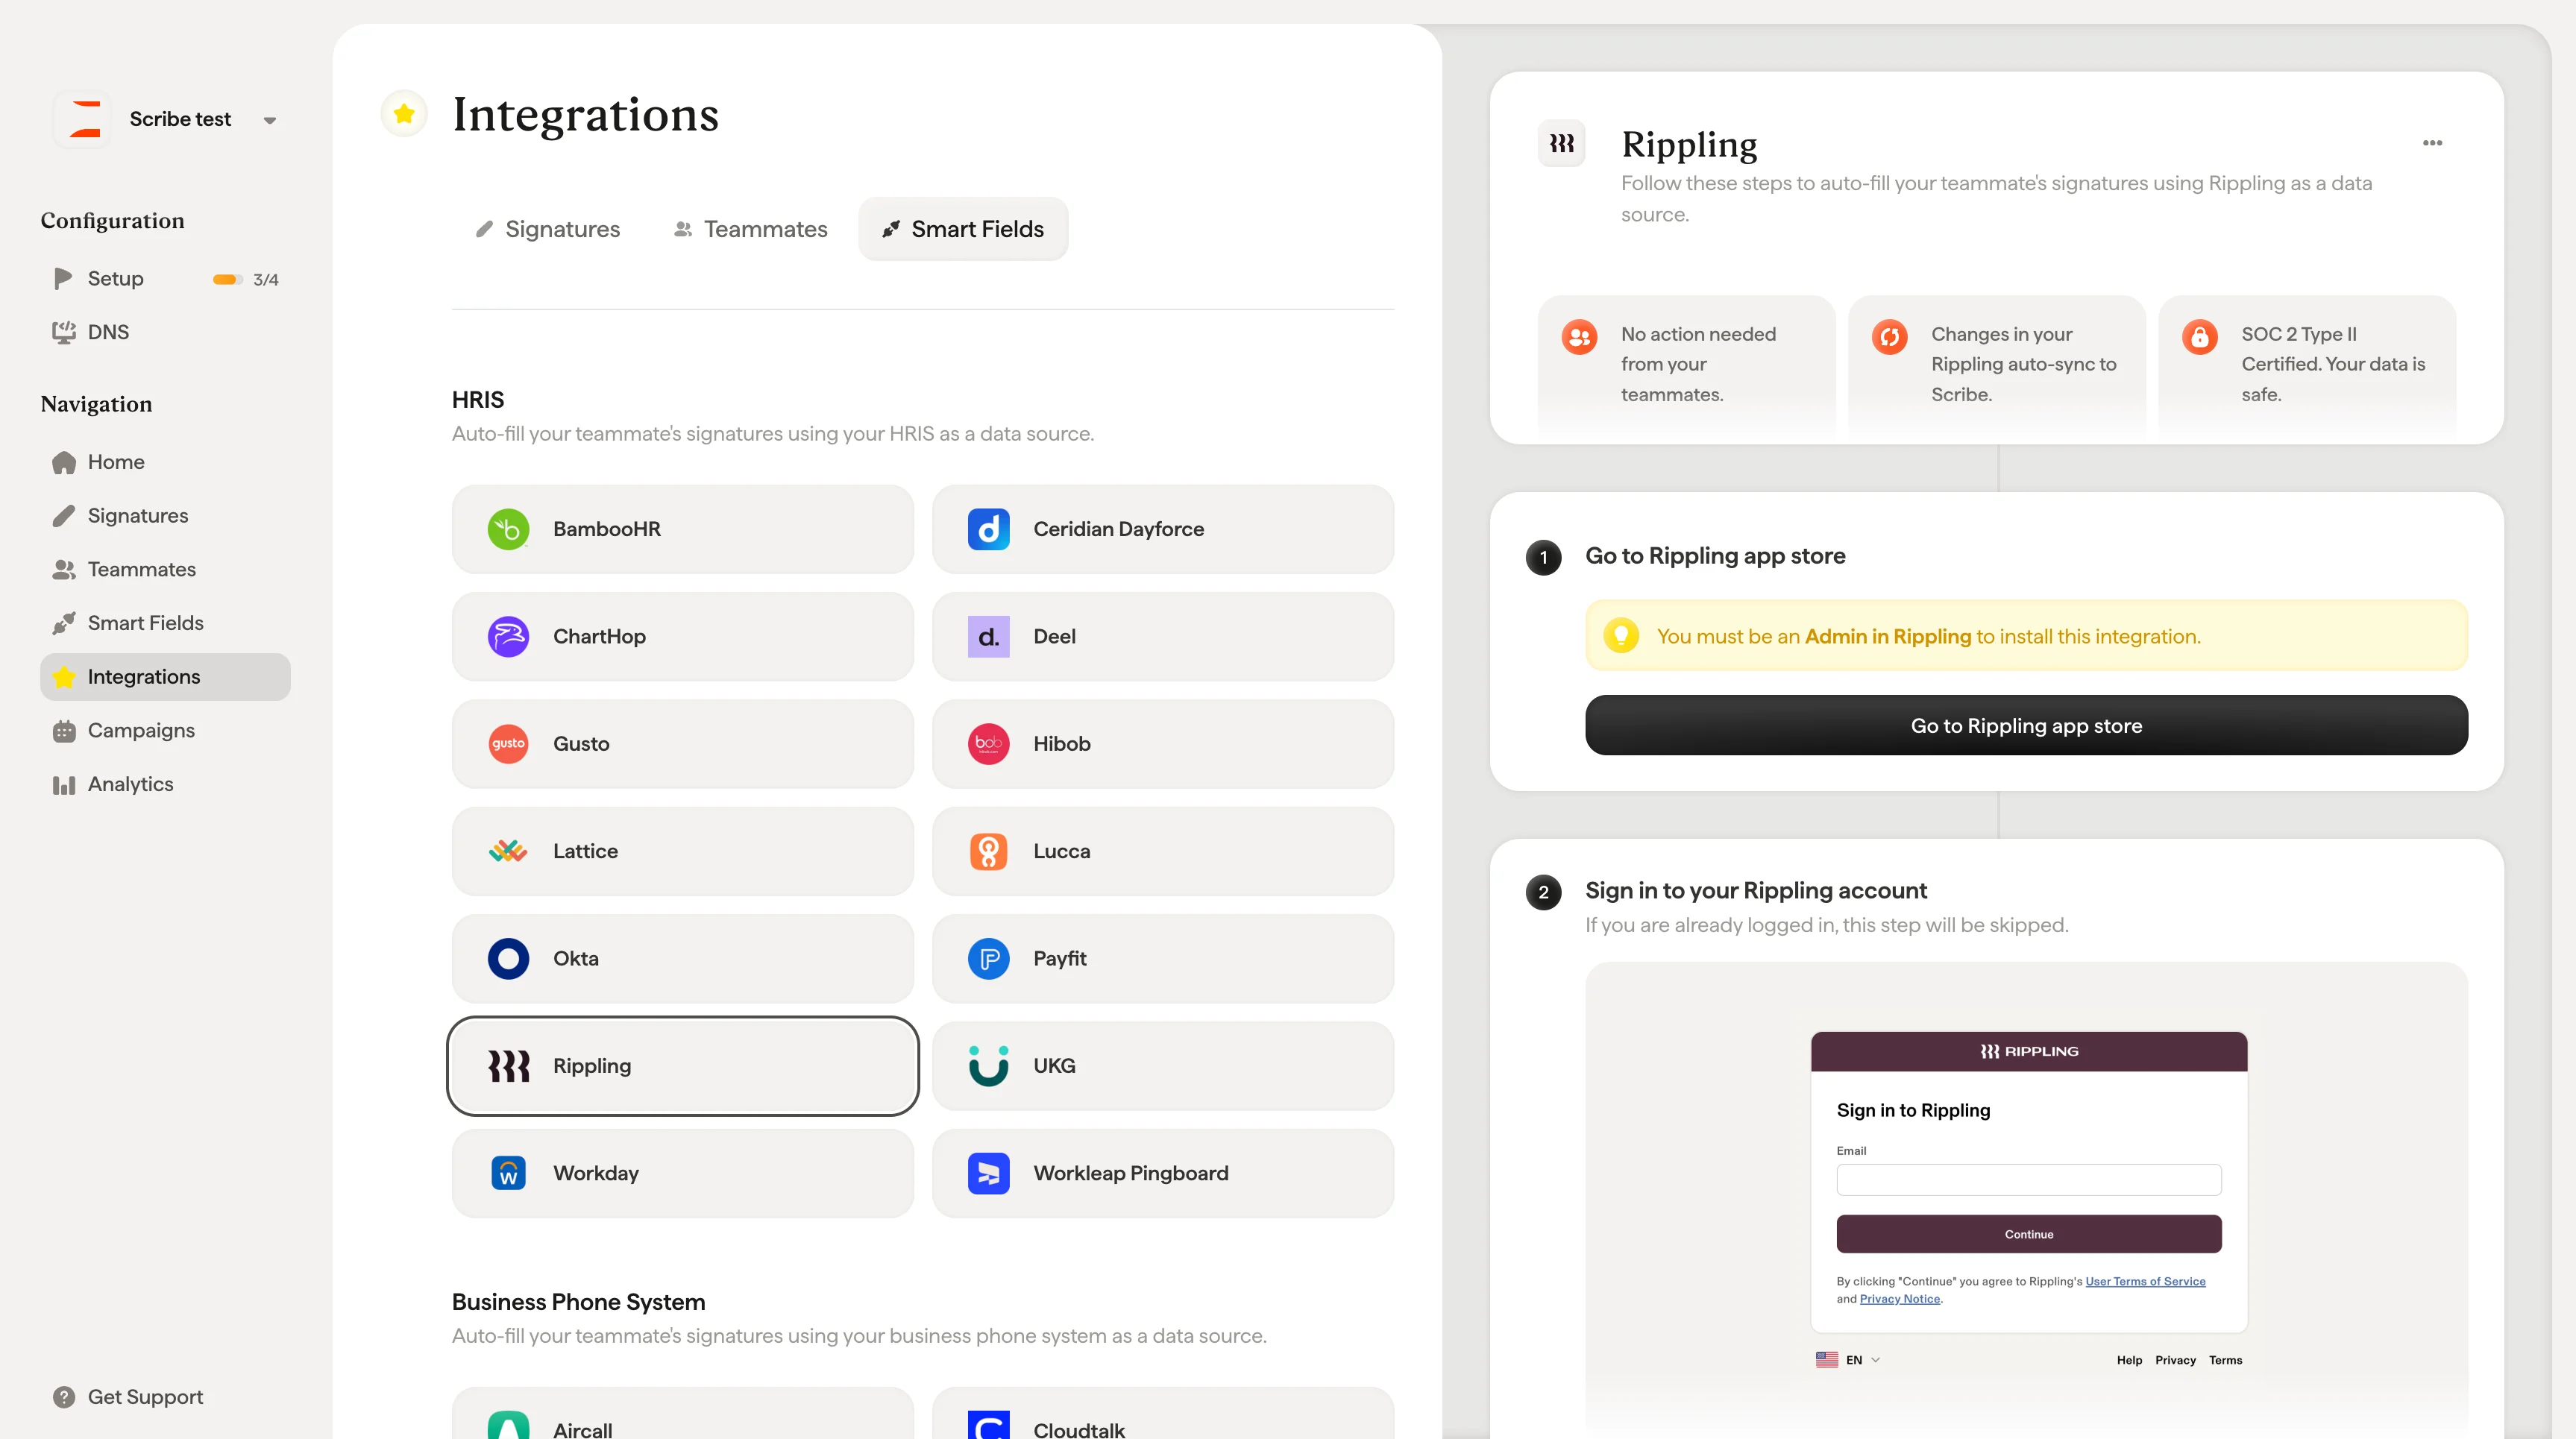
    이미 로그인되어 있다면 이 단계는 건너뛰어요.

    <Frame>
      <img src="https://mintcdn.com/scribe/pvZJQ56rCCLLmCwt/integrations/smart-fields/images/rippling-step-2.png?fit=max&auto=format&n=pvZJQ56rCCLLmCwt&q=85&s=ec0c411eae3d067156c43ddb45187b3d" alt="Rippling 로그인 화면" className="mx-auto" style={{ width:"72%" }} width="1188" height="978" data-path="integrations/smart-fields/images/rippling-step-2.png" />
    </Frame>
  </Step>

  <Step title="'Connect Account' 클릭">
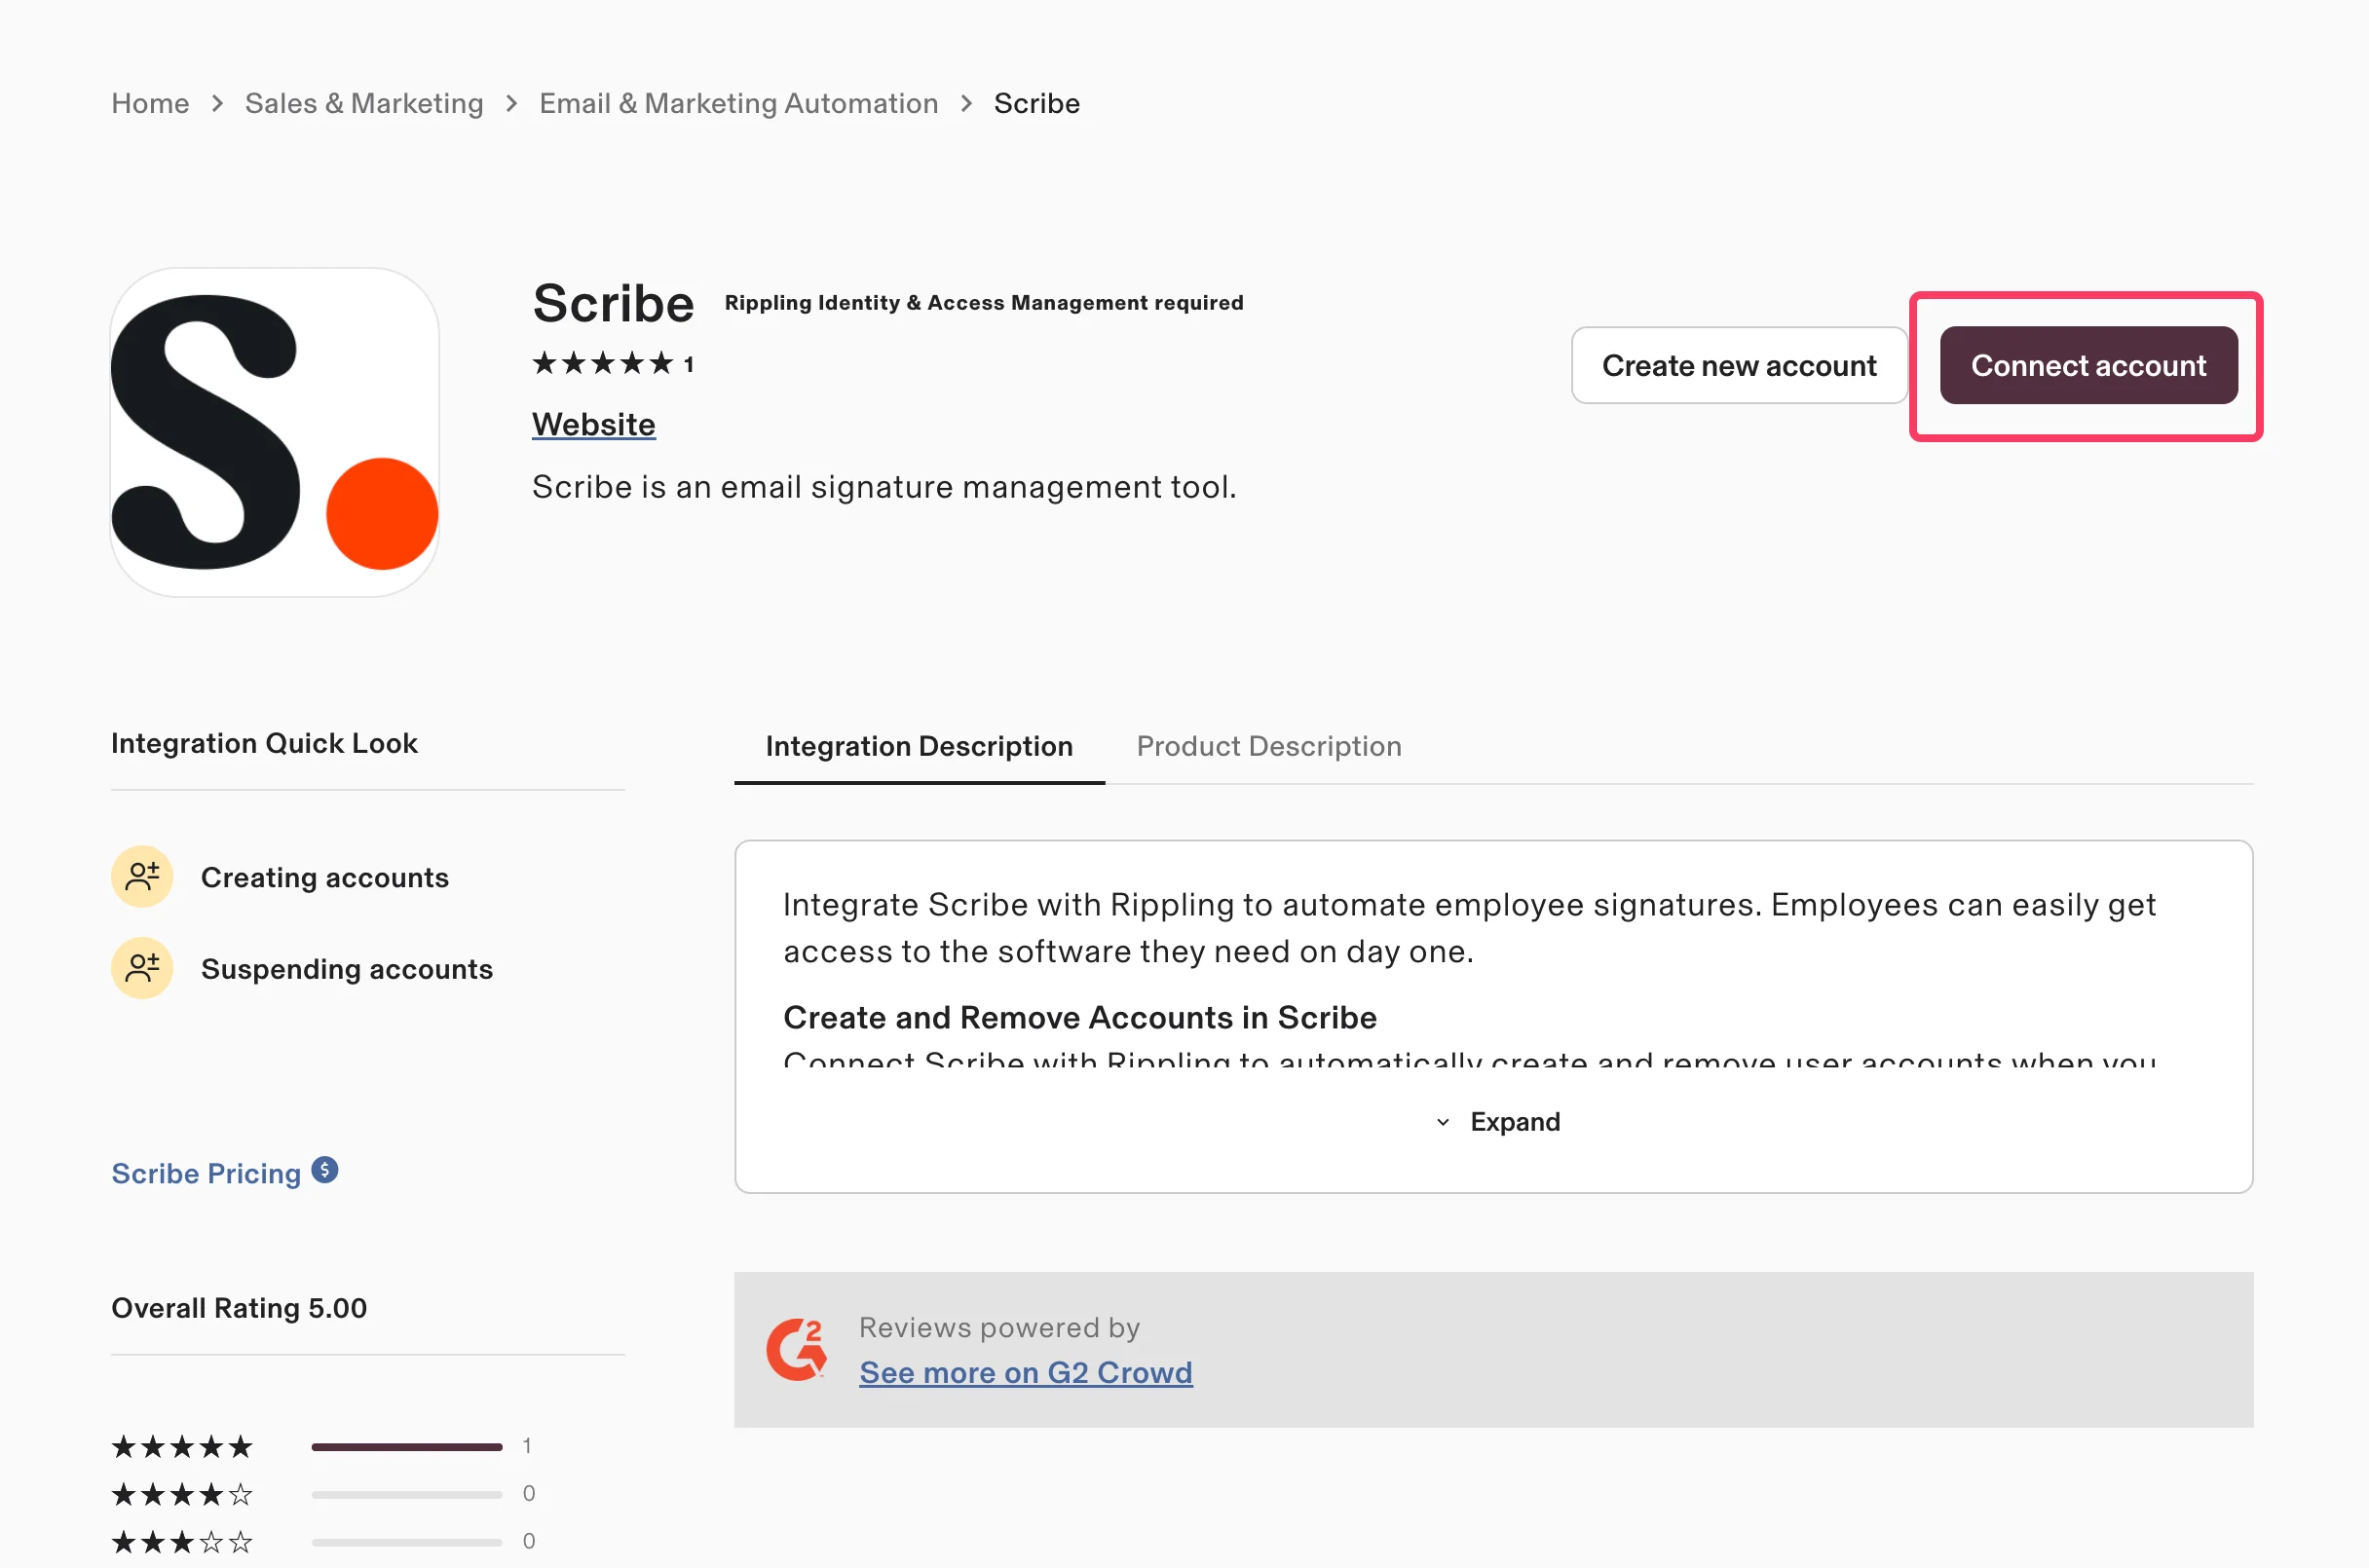
    Rippling 앱 스토어의 Scribe 앱 페이지에서 **Connect account**를 클릭하세요.

    <Frame>
      <img src="https://mintcdn.com/scribe/pvZJQ56rCCLLmCwt/integrations/smart-fields/images/rippling-step-3.png?fit=max&auto=format&n=pvZJQ56rCCLLmCwt&q=85&s=154decbf970c554142790ed6fb9d0809" alt="Connect account 버튼이 강조된 Rippling 앱 스토어의 Scribe 앱 페이지" className="mx-auto" style={{ width:"69%" }} width="2432" height="1610" data-path="integrations/smart-fields/images/rippling-step-3.png" />
    </Frame>
  </Step>

  <Step title="첫 번째 옵션을 선택하고 'Continue' 클릭">
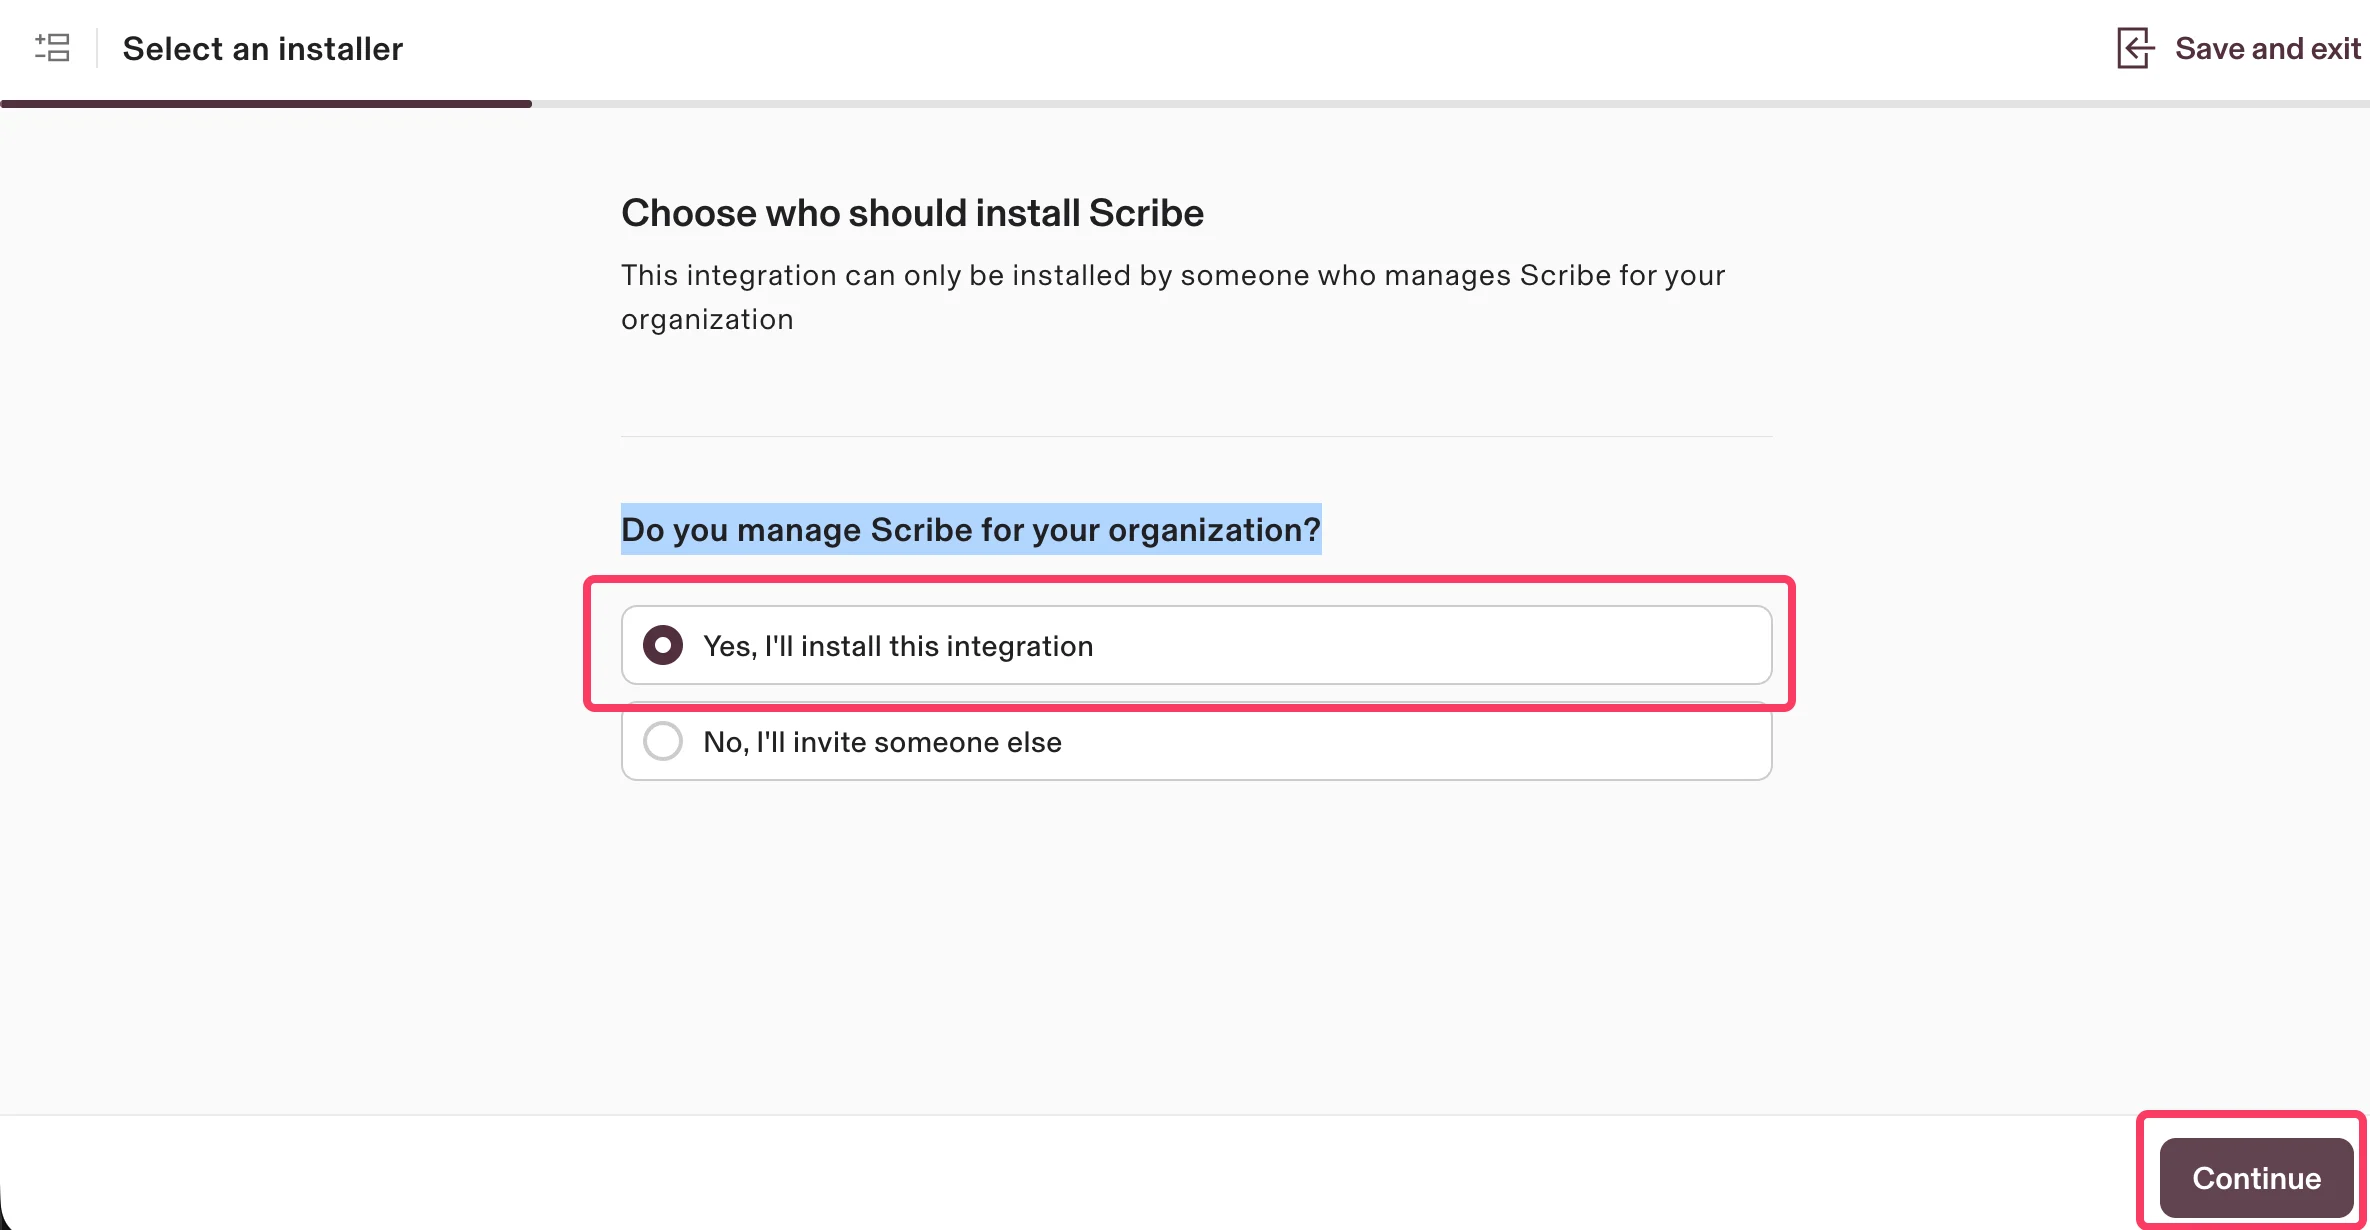
    조직에서 Scribe를 관리하고 있음을 확인하기 위해 **Yes, I'll install this integration**을 선택한 다음 **Continue**를 클릭하세요.

    <Frame>
      <img src="https://mintcdn.com/scribe/pvZJQ56rCCLLmCwt/integrations/smart-fields/images/rippling-step-4.png?fit=max&auto=format&n=pvZJQ56rCCLLmCwt&q=85&s=80a794fcf5edec50c717b7ad2493dec3" alt="Yes I'll install this integration 옵션이 선택된 설치자 선택 화면" className="mx-auto" style={{ width:"82%" }} width="2370" height="1230" data-path="integrations/smart-fields/images/rippling-step-4.png" />
    </Frame>
  </Step>

  <Step title="권한 범위를 확인하고 'Authorize' 클릭">
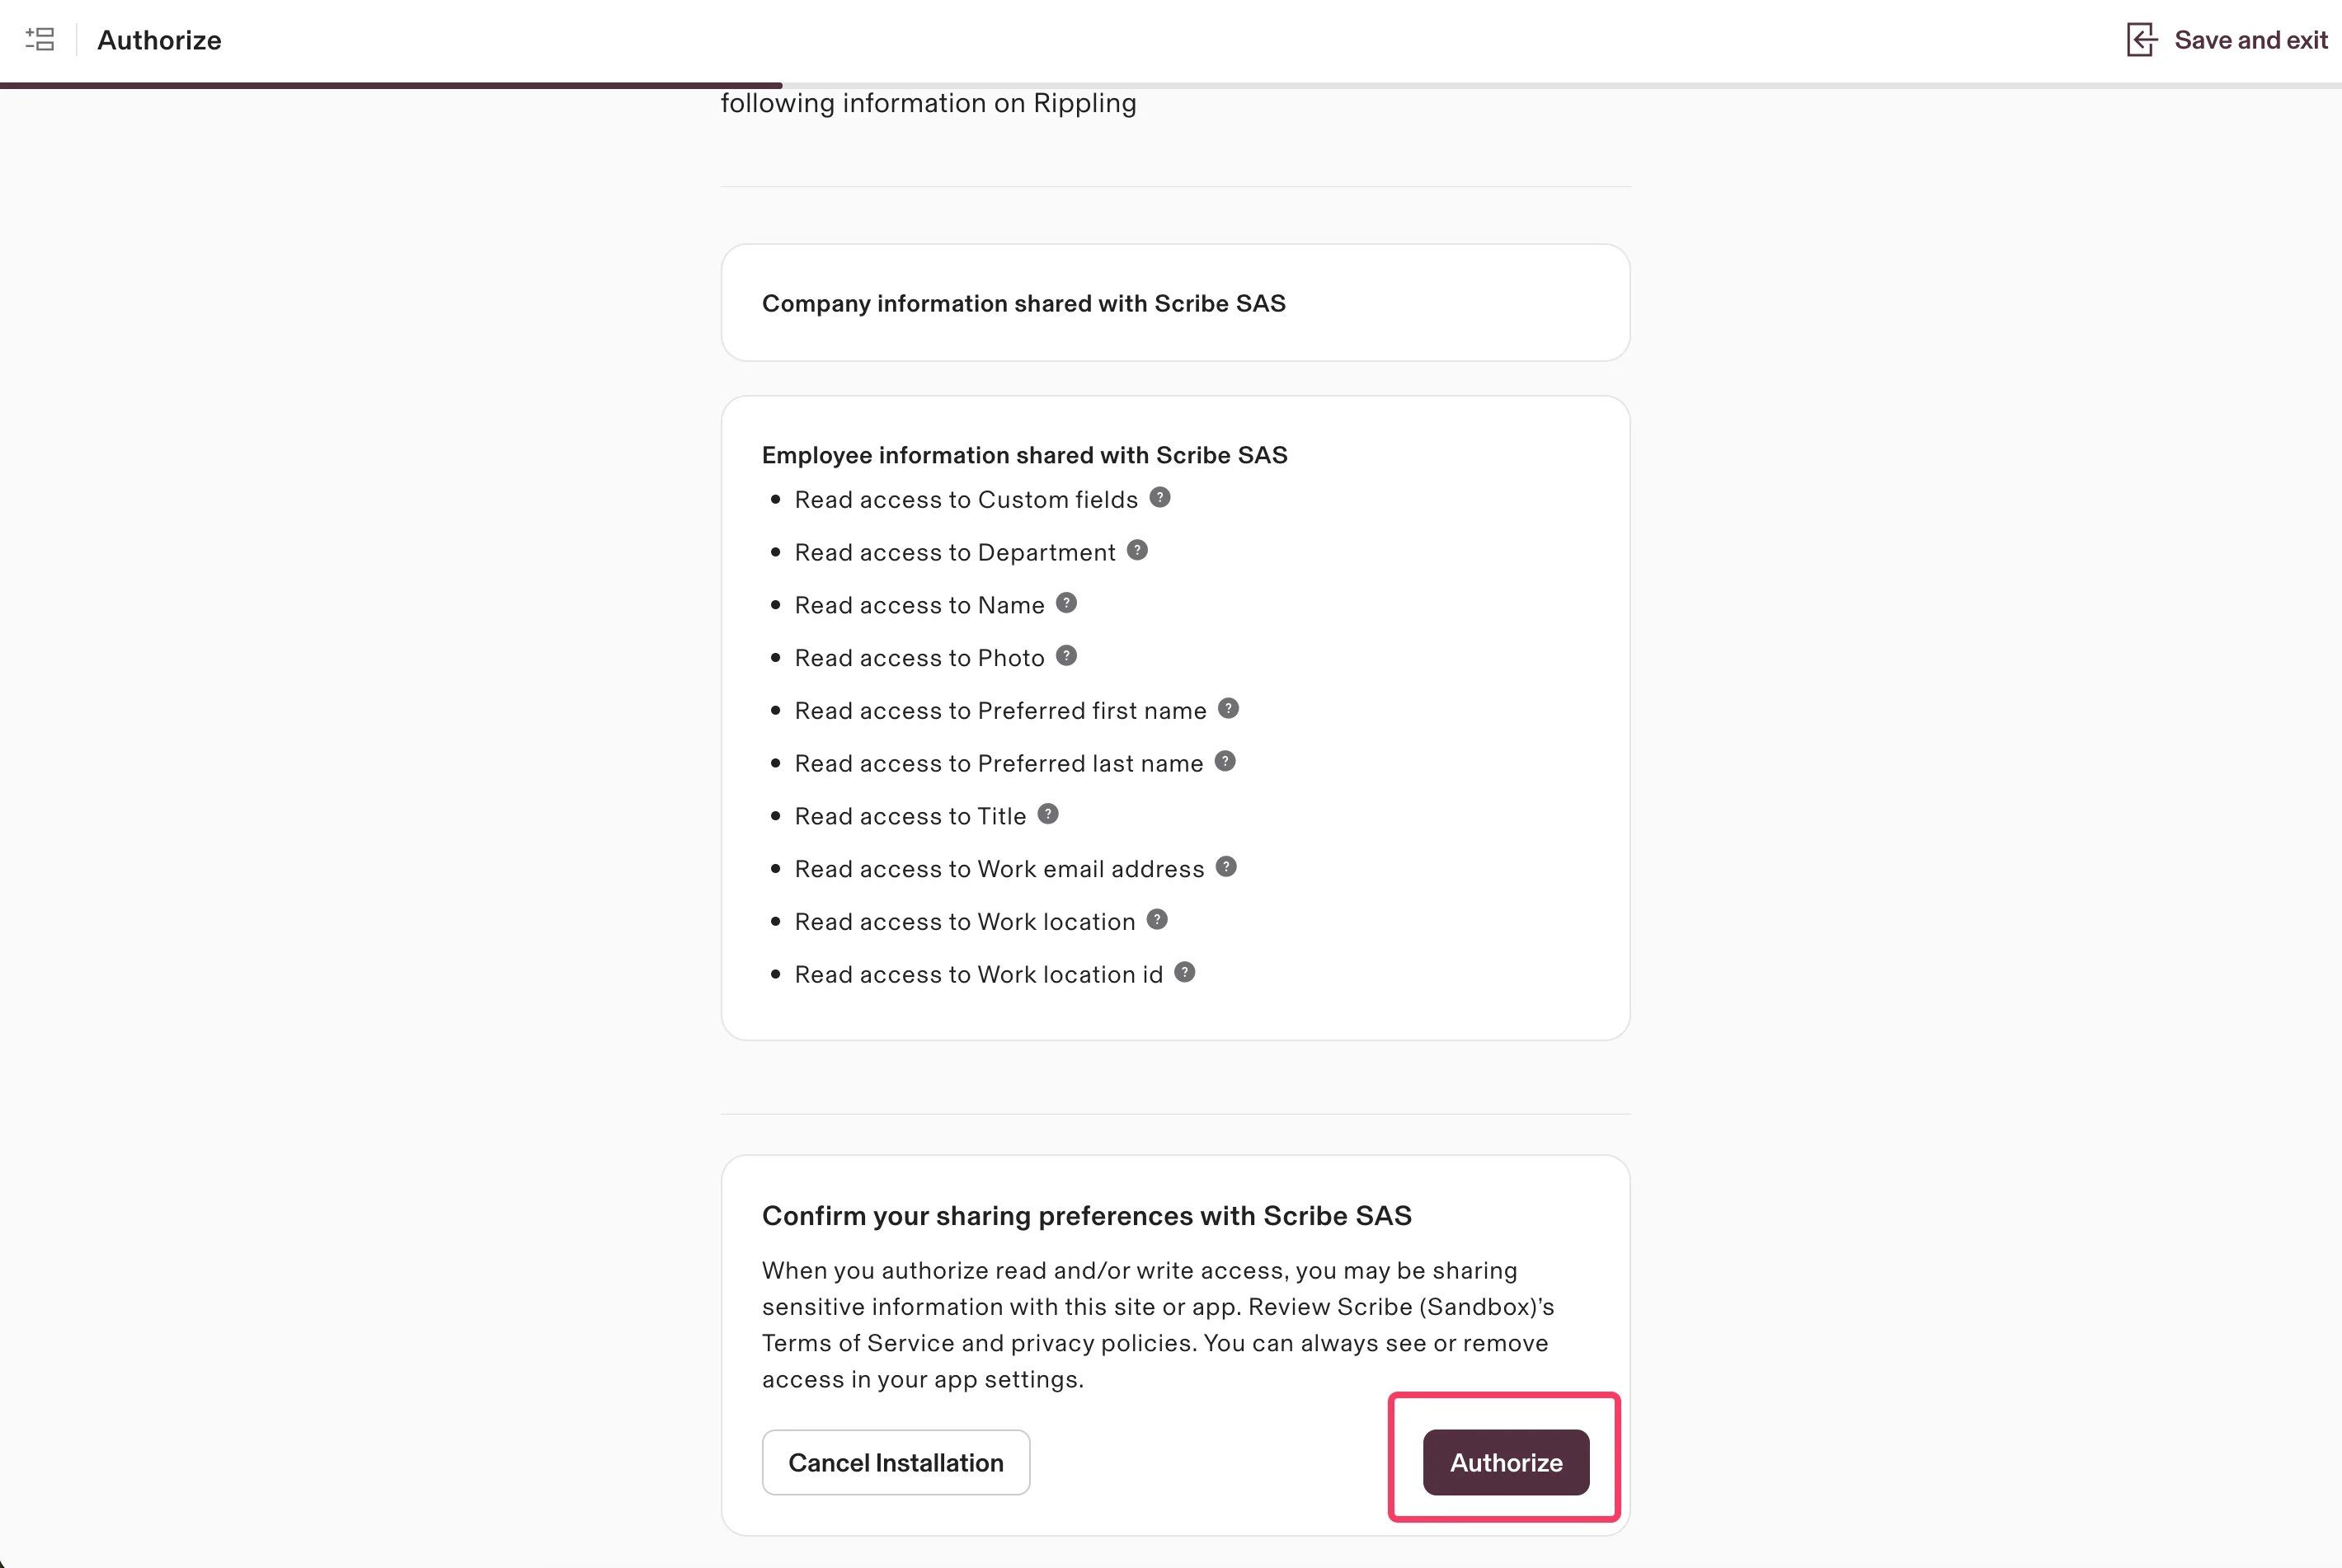
    Scribe는 데이터에 대해 읽기 권한만 갖습니다. 요청된 권한을 확인하고 **Authorize**를 클릭하세요.

    <Frame>
      <img src="https://mintcdn.com/scribe/pvZJQ56rCCLLmCwt/integrations/smart-fields/images/rippling-step-5.png?fit=max&auto=format&n=pvZJQ56rCCLLmCwt&q=85&s=cf9e5ad0b6fc25ce43eaa1a74906075c" alt="읽기 전용 권한 범위와 Authorize 버튼이 있는 인증 화면" className="mx-auto" style={{ width:"88%" }} width="2840" height="1902" data-path="integrations/smart-fields/images/rippling-step-5.png" />
    </Frame>
  </Step>

  <Step title="첫 번째 옵션을 선택하고 'Continue'를 클릭하세요">
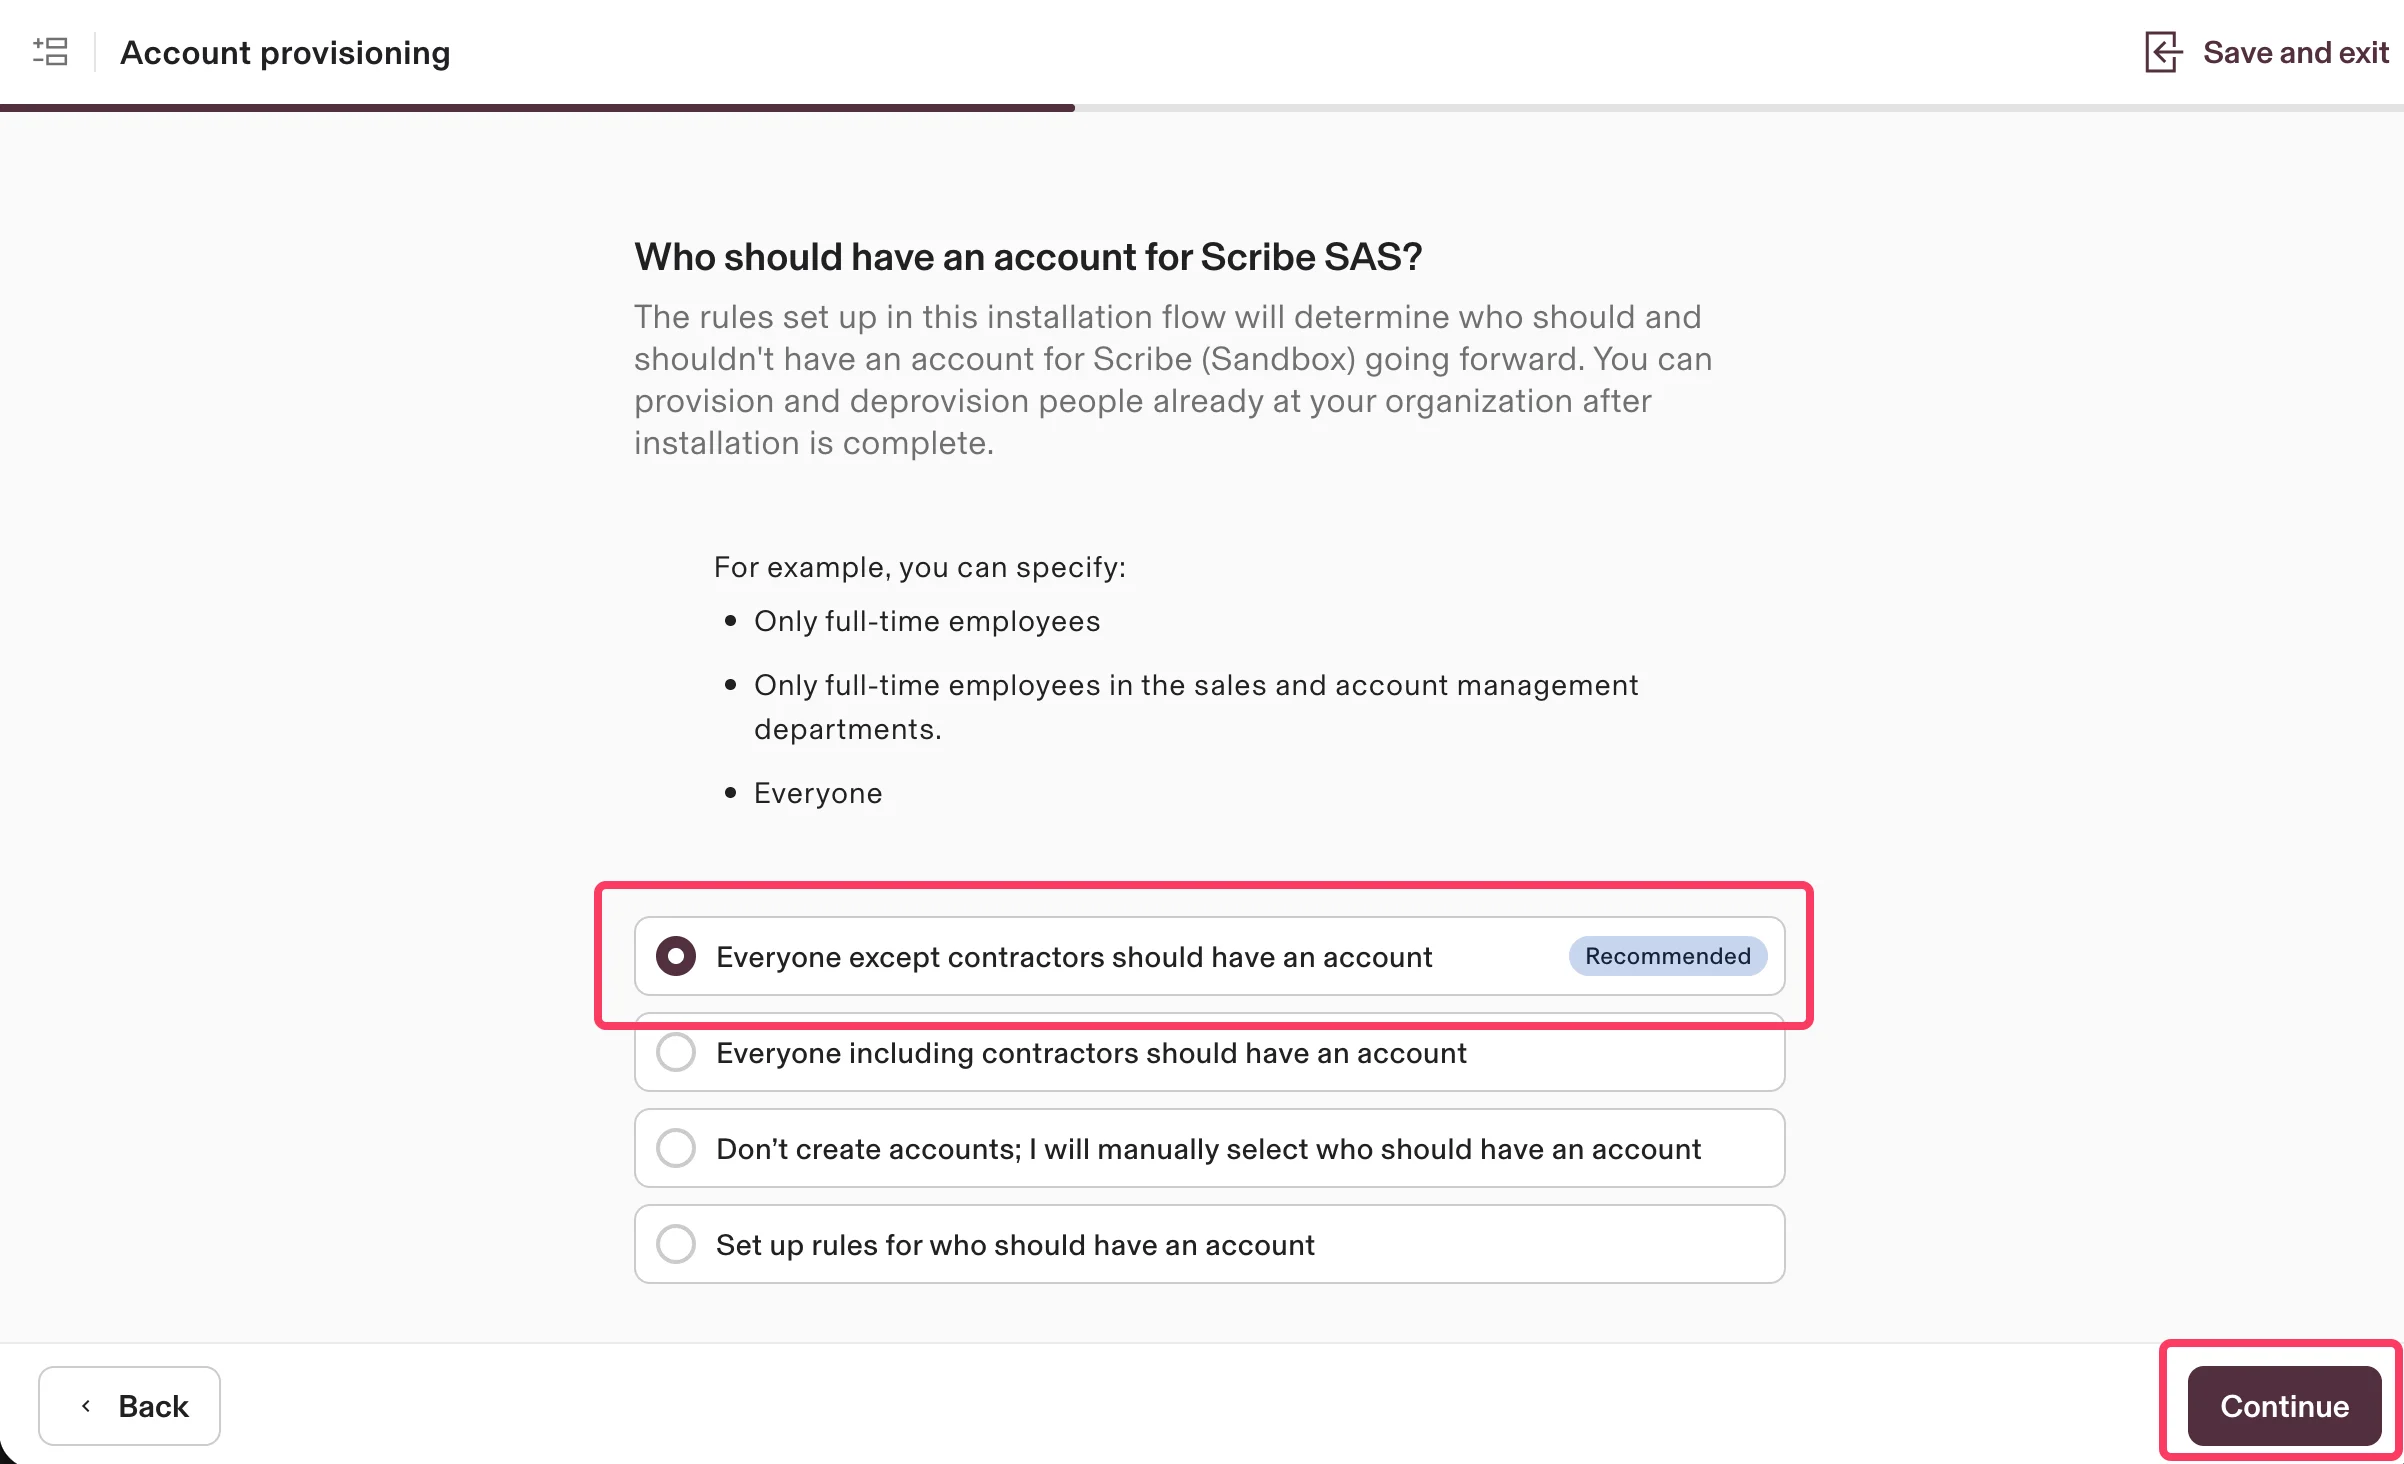
    누구에게 Scribe 계정이 있어야 하는지 선택하세요. 권장 옵션은 **Everyone except contractors should have an account**예요. **Continue**를 클릭하세요.

    <Frame>
      <img src="https://mintcdn.com/scribe/pvZJQ56rCCLLmCwt/integrations/smart-fields/images/rippling-step-6.png?fit=max&auto=format&n=pvZJQ56rCCLLmCwt&q=85&s=f6ef83521cec9e2cb866f776edbe5eaa" alt="Everyone except contractors 옵션이 선택된 계정 프로비저닝 화면" className="mx-auto" style={{ width:"89%" }} width="2404" height="1464" data-path="integrations/smart-fields/images/rippling-step-6.png" />
    </Frame>
  </Step>

  <Step title="첫 번째 옵션을 선택하고 'Continue'를 클릭하세요">
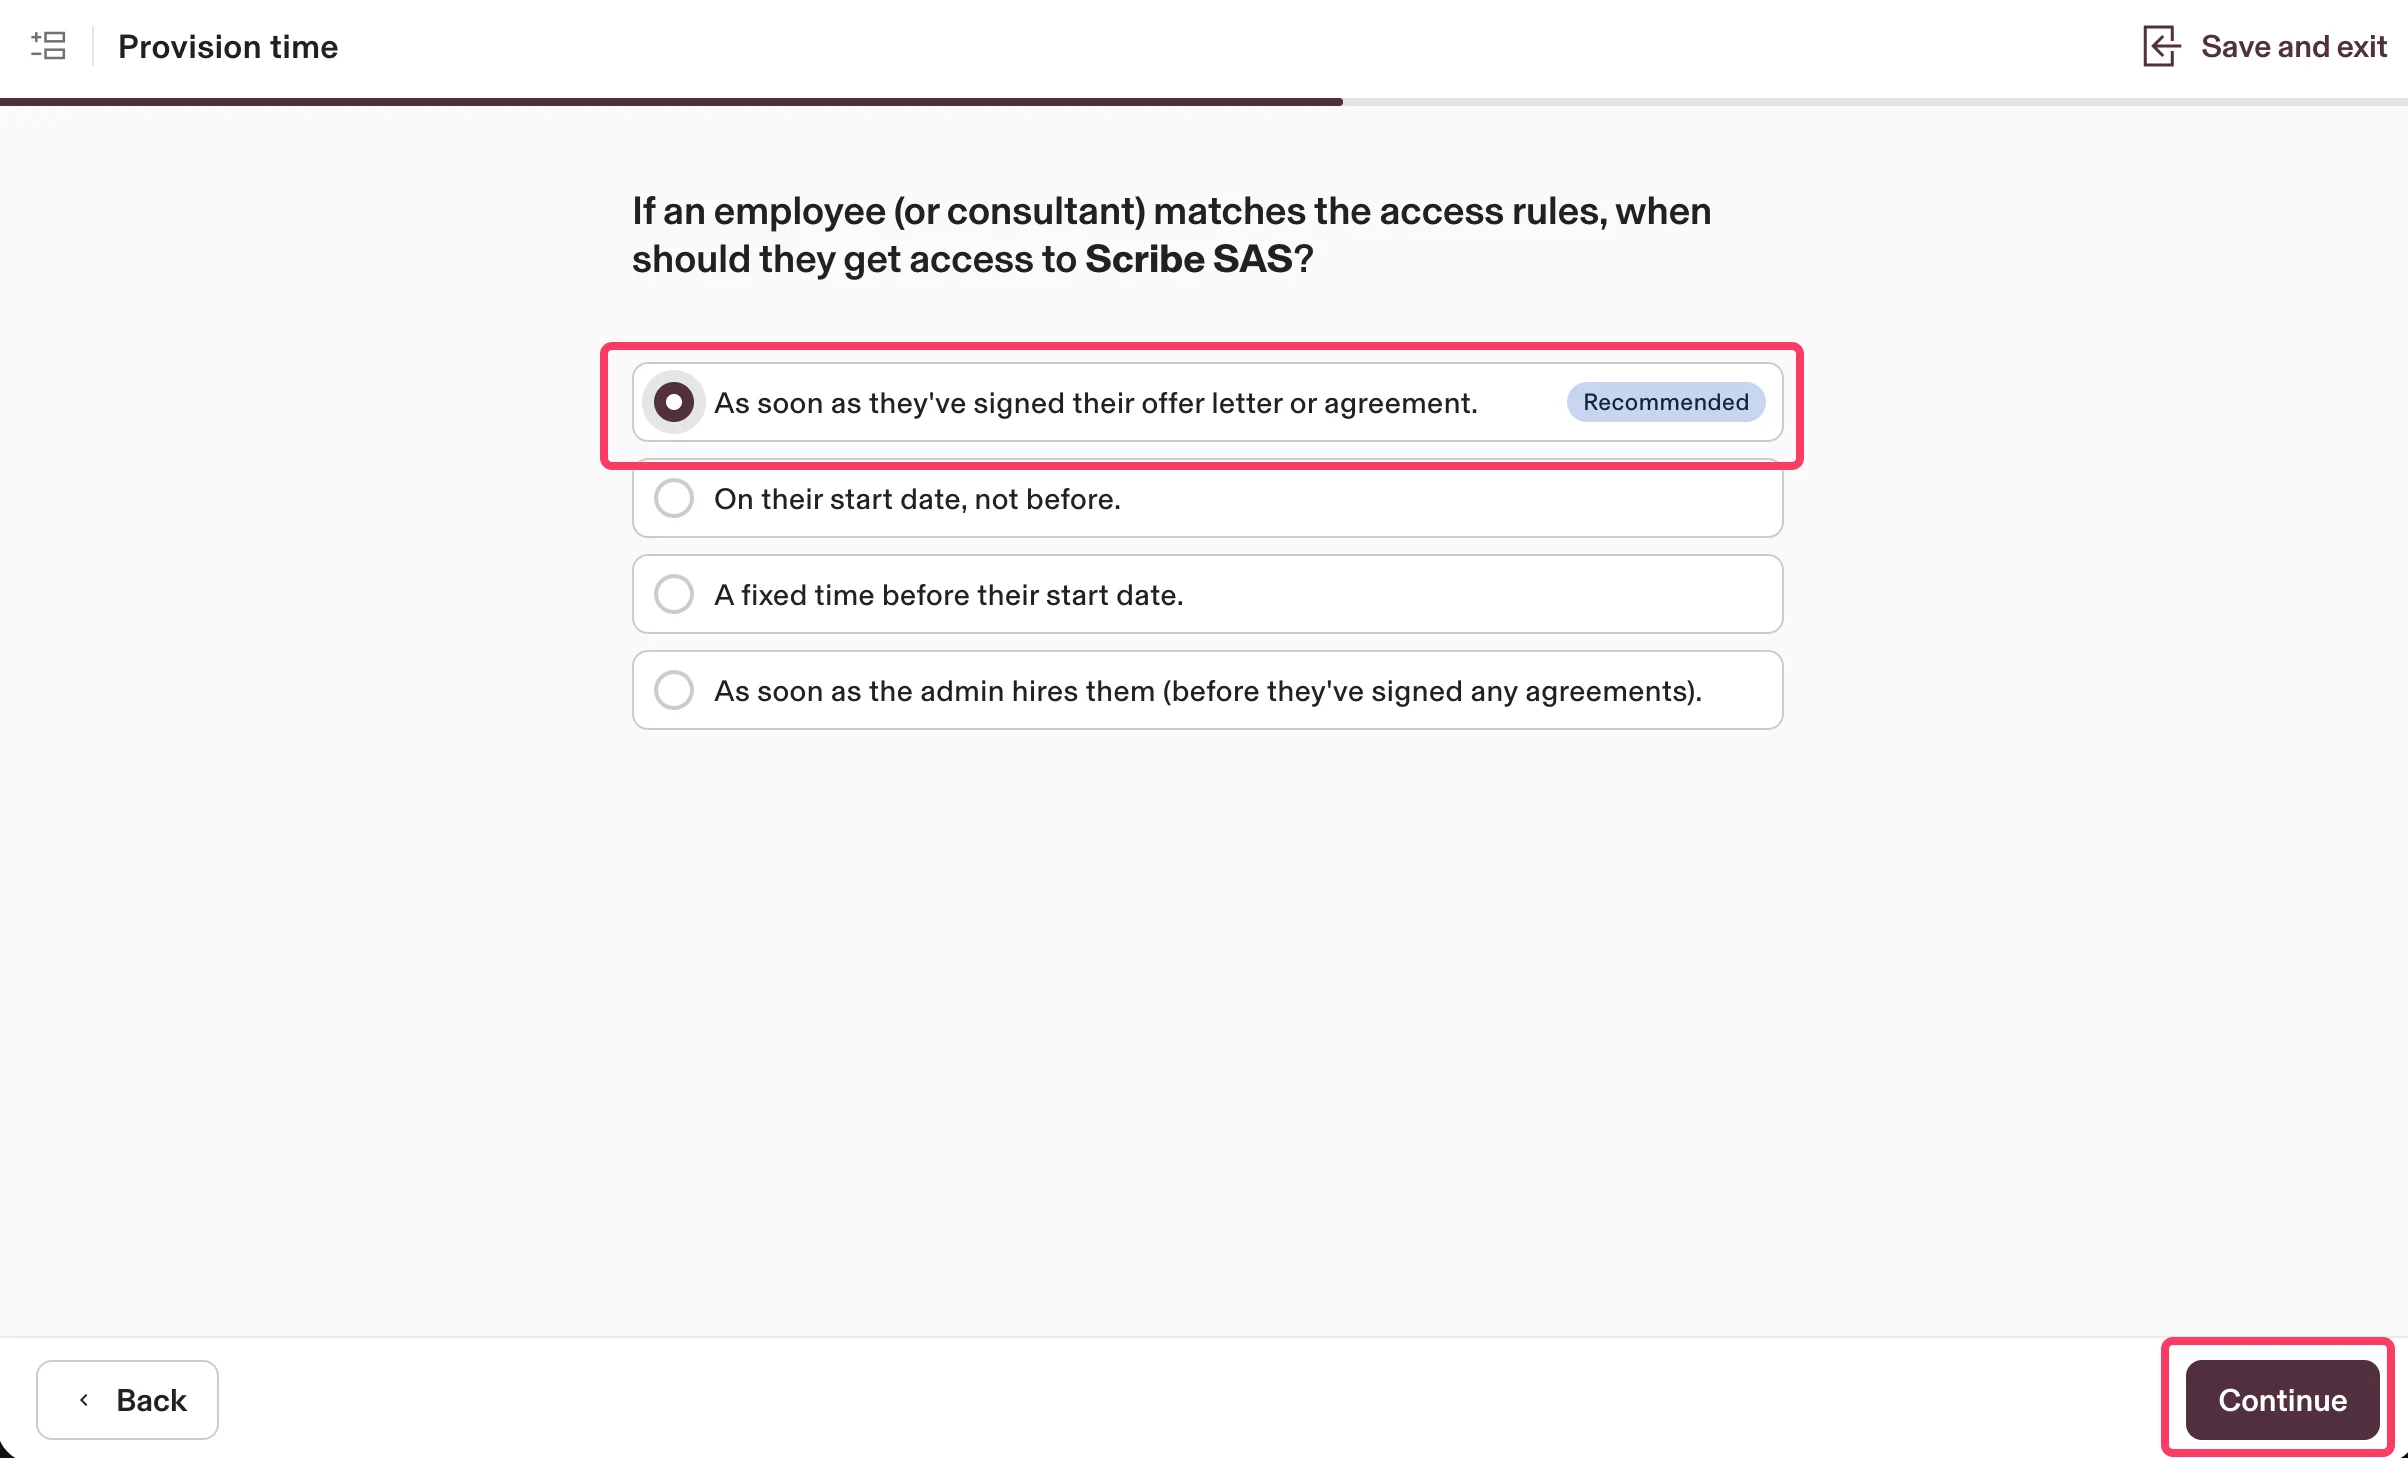
    직원이 언제 Scribe에 액세스할 수 있어야 하는지 선택하세요. 권장 옵션은 **As soon as they've signed their offer letter or agreement**예요. **Continue**를 클릭하세요.

    <Frame>
      <img src="https://mintcdn.com/scribe/pvZJQ56rCCLLmCwt/integrations/smart-fields/images/rippling-step-7.png?fit=max&auto=format&n=pvZJQ56rCCLLmCwt&q=85&s=0f6453b885edb2a8e22e011c3a8318df" alt="권장 옵션이 선택된 프로비저닝 시점 화면" className="mx-auto" style={{ width:"92%" }} width="2408" height="1458" data-path="integrations/smart-fields/images/rippling-step-7.png" />
    </Frame>
  </Step>

  <Step title="거의 끝났어요. 'Continue'만 클릭하세요">
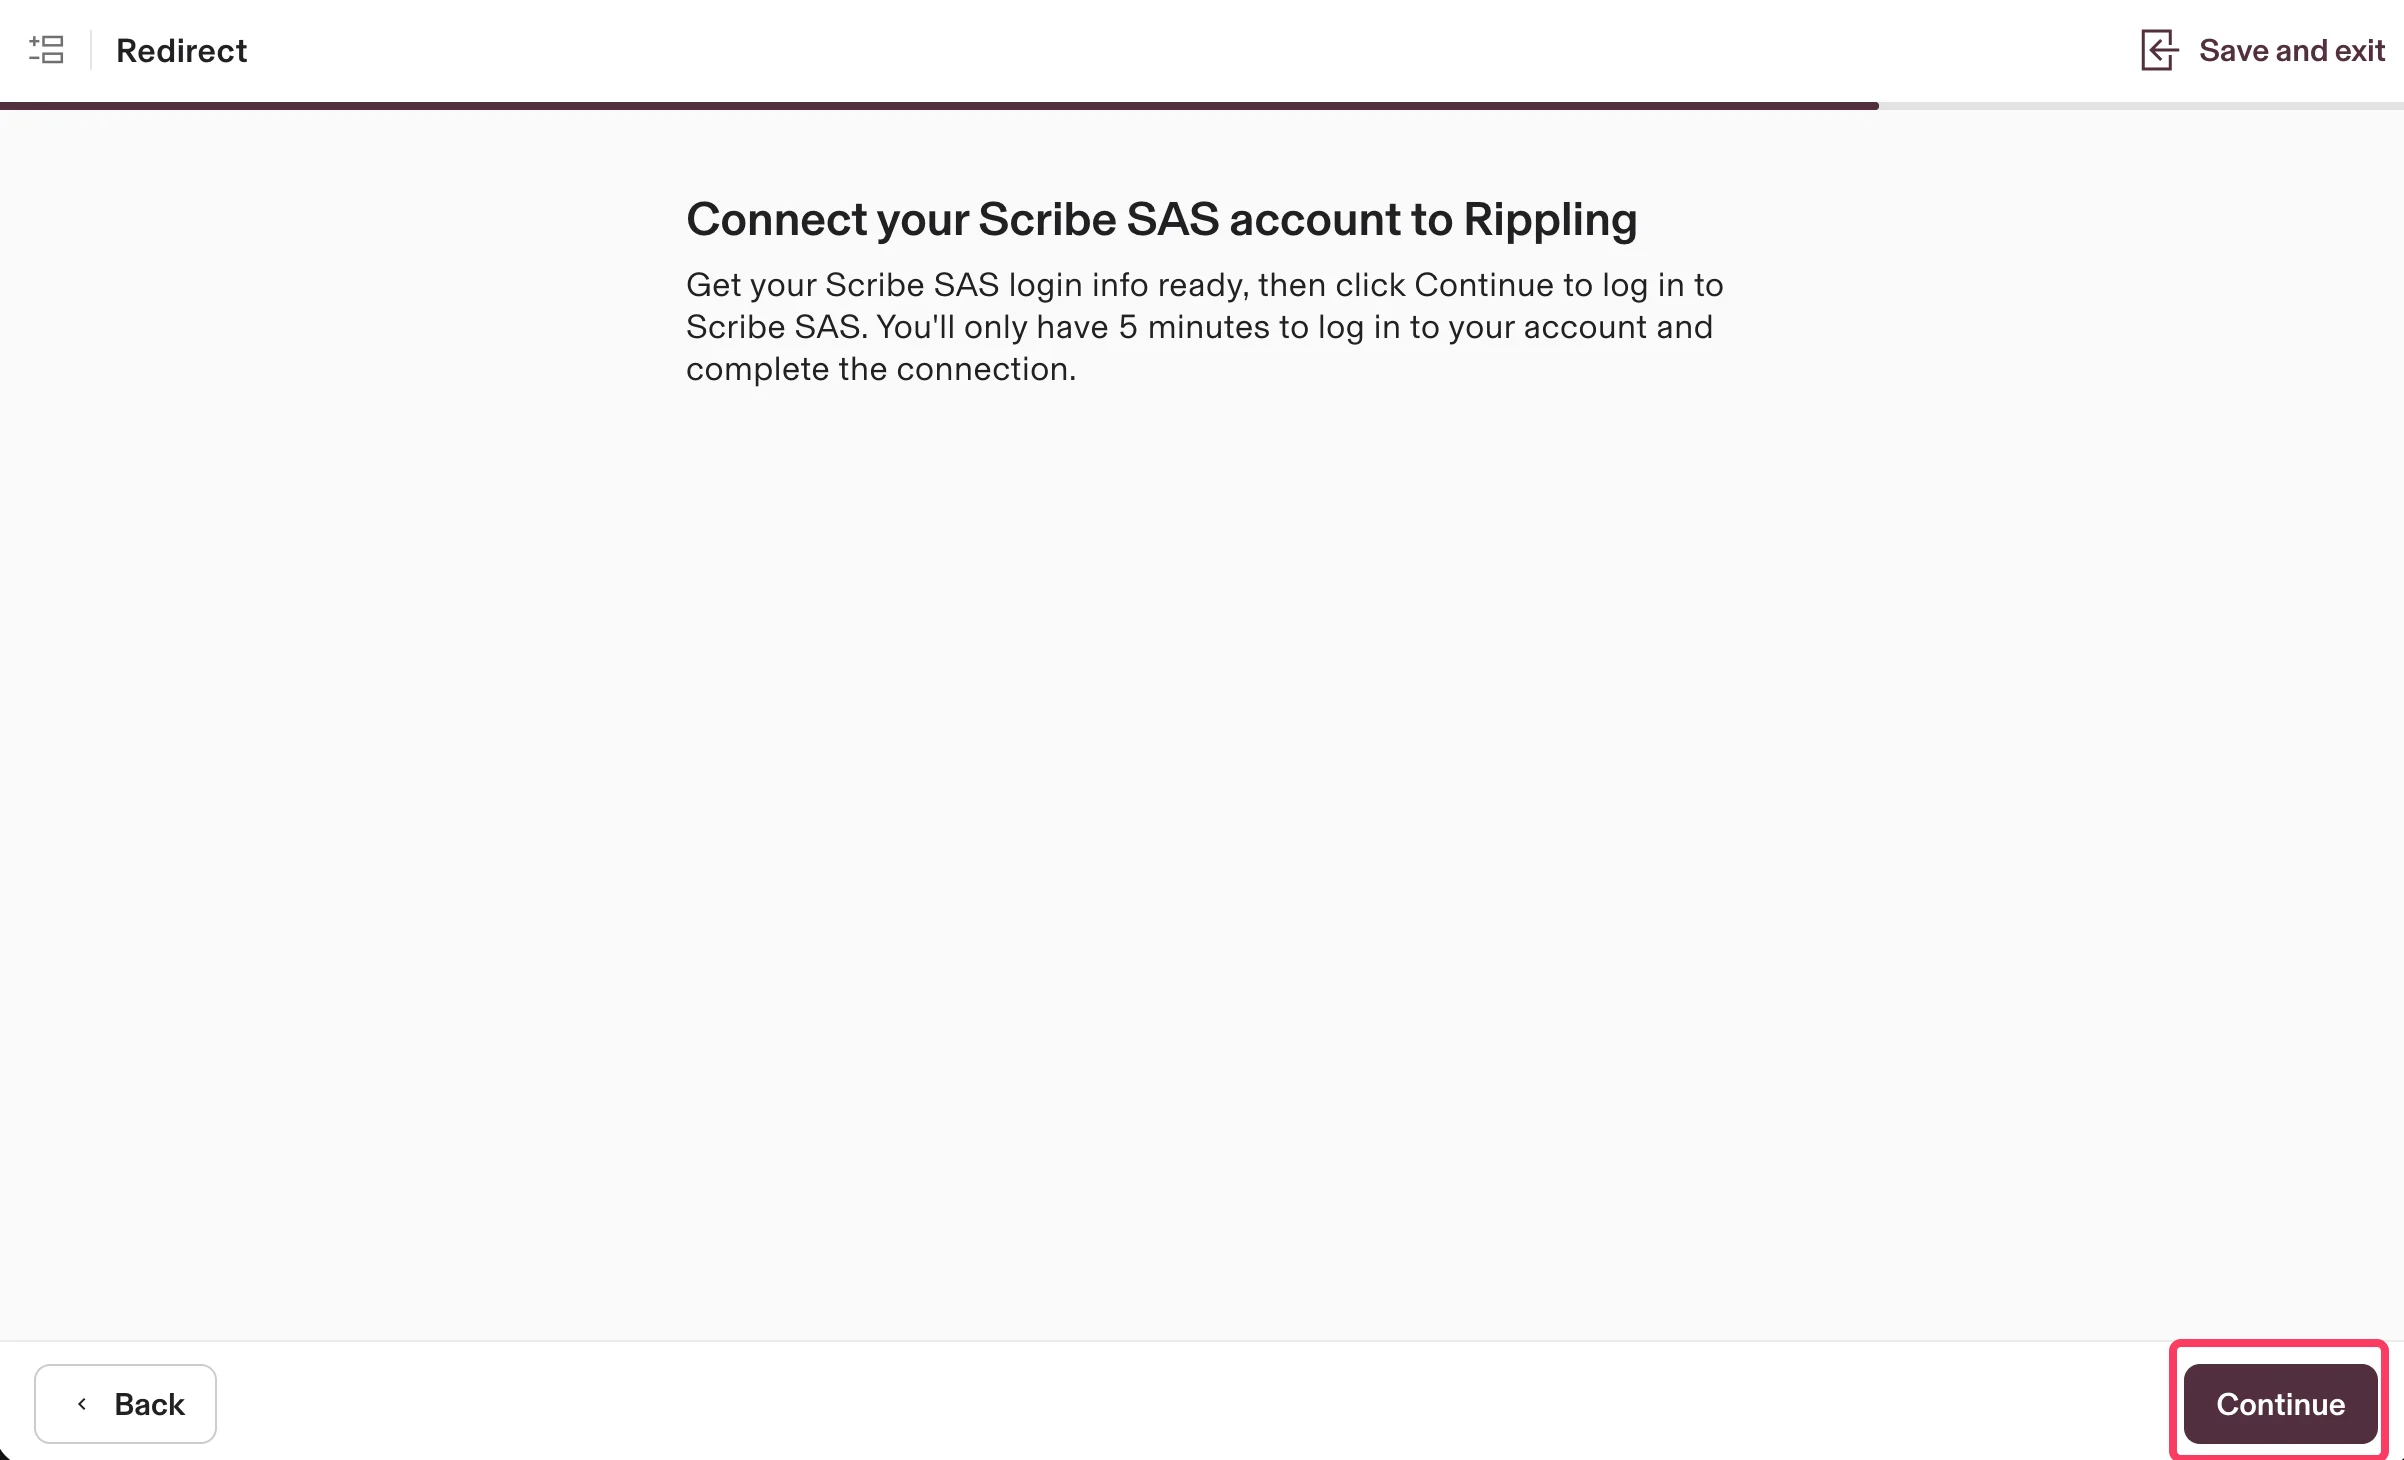
    **Continue**를 클릭해 Scribe 계정을 Rippling에 연결하고 연동을 완료하세요.

    <Frame>
      <img src="https://mintcdn.com/scribe/pvZJQ56rCCLLmCwt/integrations/smart-fields/images/rippling-step-8.png?fit=max&auto=format&n=pvZJQ56rCCLLmCwt&q=85&s=0f5be8140ae551d3744338b3f607a56f" alt="Continue 버튼이 있는, Scribe 계정을 Rippling에 연결하는 리디렉션 화면" className="mx-auto" style={{ width:"91%" }} width="2404" height="1460" data-path="integrations/smart-fields/images/rippling-step-8.png" />
    </Frame>
  </Step>
</Steps>

## 관련 문서

* [UKG](/ko/integrations/smart-fields/ukg-smart-fields): UKG 데이터를 서명에 동기화합니다.
* [Workday](/ko/integrations/smart-fields/workday-smart-fields): Workday 데이터를 서명에 동기화합니다.
* [서명에 팀원 할당](/ko/assign-teammates-to-a-signature): Smartfield 조건을 사용해 서명을 자동으로 할당합니다.
