> ## Documentation Index
> Fetch the complete documentation index at: https://help.scribe-mail.com/llms.txt
> Use this file to discover all available pages before exploring further.
# Google Workspace (server-side)
> Voeg Scribe-handtekeningen automatisch toe aan de Google Workspace-e-mails van je team, op elk apparaat, via de beveiligde servers van Scribe.
**Gecentraliseerde installatie met één klik.** Geen actie van teamleden nodig. Gebruikers zien geen handtekeningen tijdens het opstellen van e-mails. Je e-mails worden via de beveiligde servers van Scribe verwerkt om de handtekening toe te voegen.
**Ondersteunde platforms:** web, desktop, Apple Mail, iOS, Android
## Installatiegids
Dit is een functie voor gevorderde gebruikers. IT-ondersteuning is vereist om deze integratie op te zetten.
* Gebruikers zien geen handtekeningen bij het opstellen van een e-mail.
* Je e-mails worden verwerkt via de beveiligde servers van Scribe om handtekeningen te installeren. Scribe kan je e-mails niet lezen of bewerken.
* Je kunt [cloudgebaseerde integratie](/nl/integrations/signatures/google-workspace-client-side) combineren met server-side integratie. Als beide zijn aangesloten, kiest Scribe standaard voor de cloudgebaseerde integratie, zodat gebruikers hun handtekeningen zien bij het opstellen van e-mails.
Maak een host aan in Google Workspace Gmail om e-mails via de beveiligde servers van Scribe te routeren. Ga in Google Admin naar **Apps → Google Workspace → Gmail** en klik op 'Hosts'.
 Vul het formulier in met de volgende gegevens:
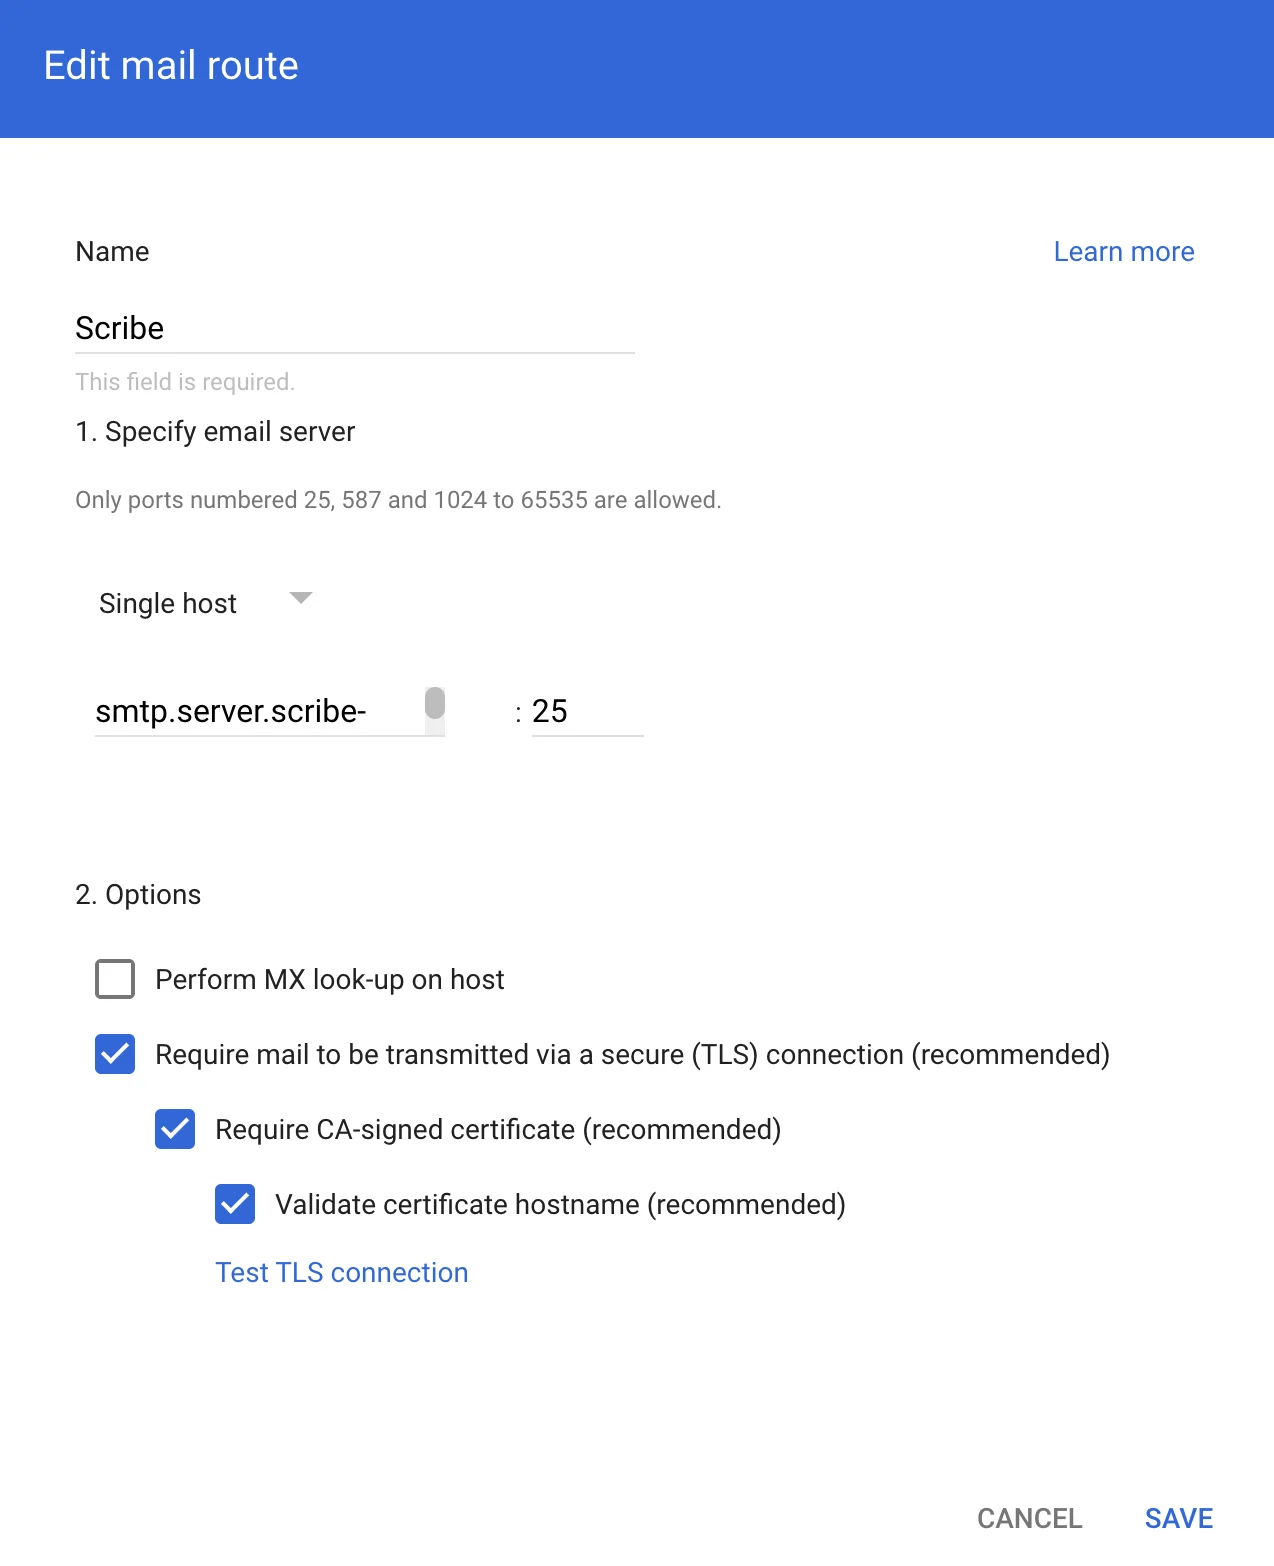
**a. Naam:** Scribe
**b. Selecteer:** "Single host"
**c. Hostnaam of IP:**
```text theme={null}
smtp.server.scribe-mail.com
```
**d. Poort:** 25
**e. Selecteer:** de opties zoals in de screenshot hieronder
Vul het formulier in met de volgende gegevens:
**a. Naam:** Scribe
**b. Selecteer:** "Single host"
**c. Hostnaam of IP:**
```text theme={null}
smtp.server.scribe-mail.com
```
**d. Poort:** 25
**e. Selecteer:** de opties zoals in de screenshot hieronder
 Ga in Google Admin naar **Apps → Google Workspace → Gmail** en klik op 'Routing' om e-mails terug te ontvangen van Scribe voor routering naar ontvangers.
 Klik op de volgende pagina op **Configureren** onder "SMTP relay service".
 Vul het formulier in met de volgende gegevens:
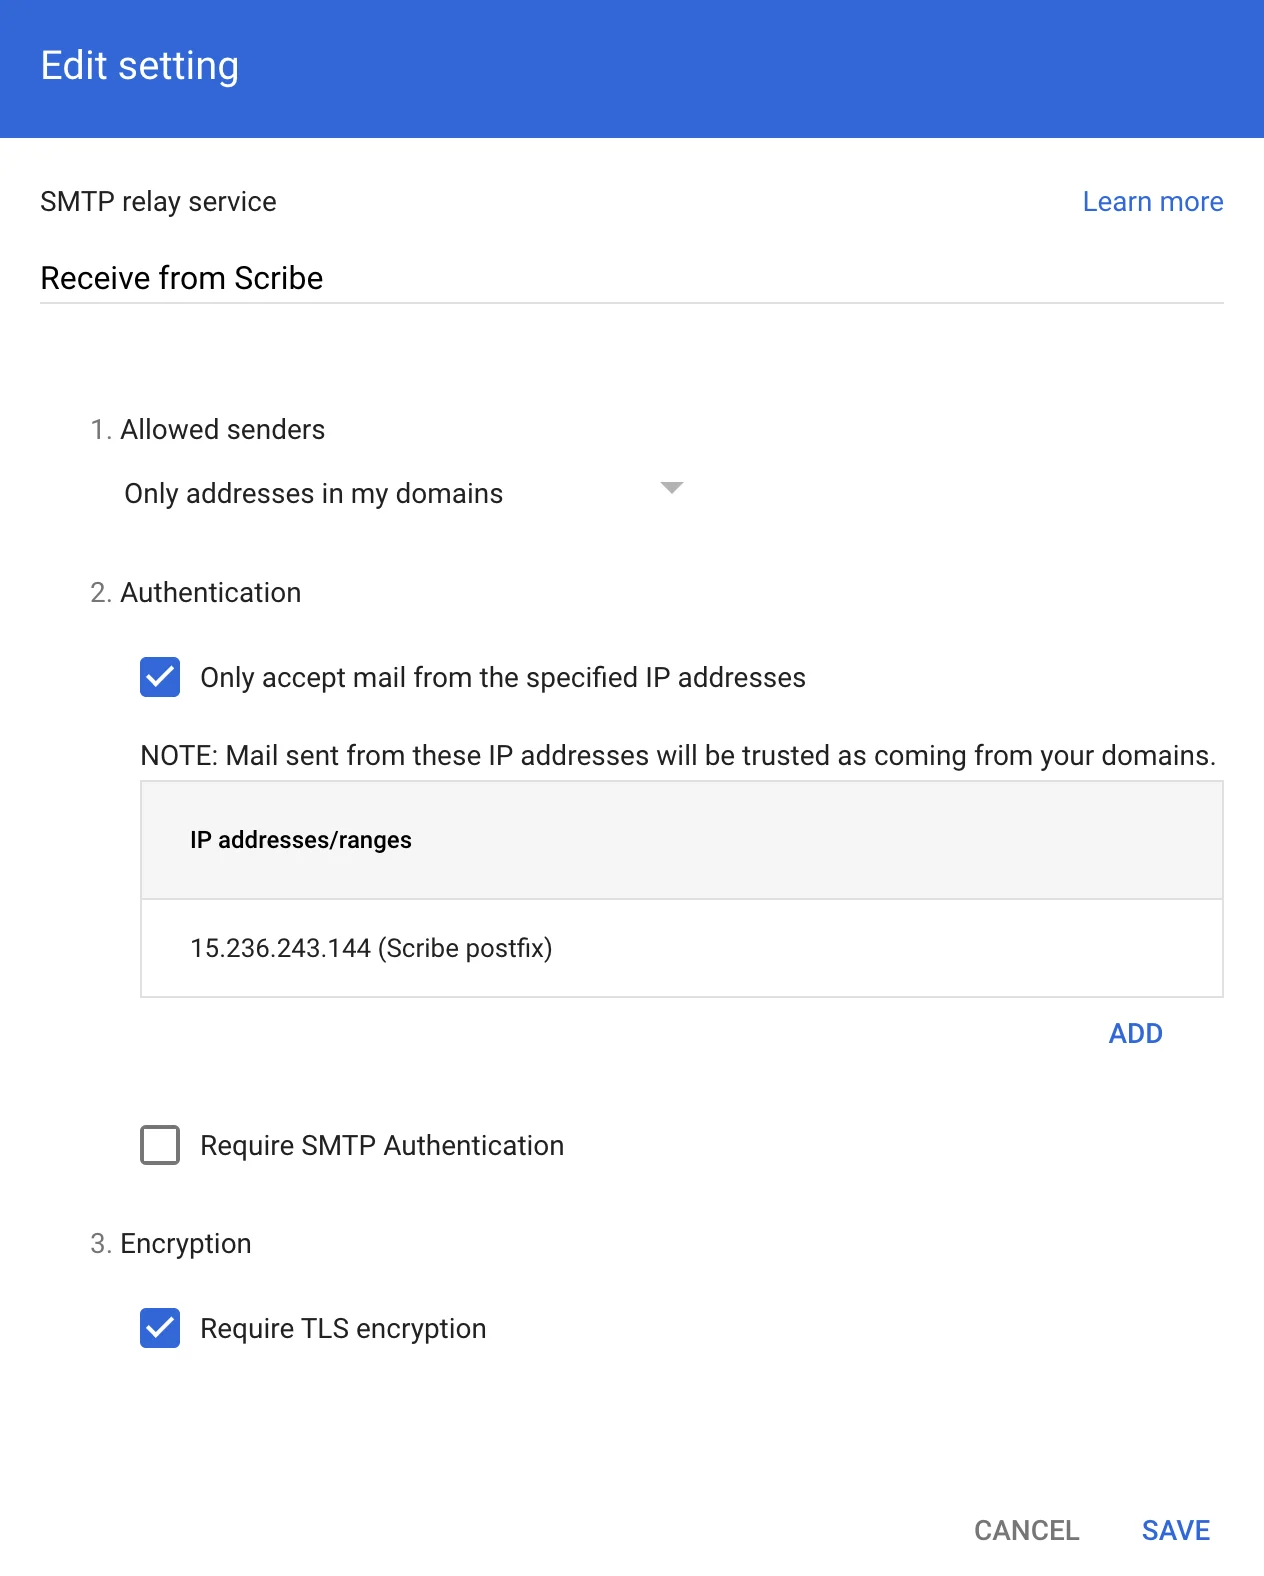
**a. Description:** Receive from Scribe
**b. Authentication:** Vink "Only accept mail from the specified IP addresses" aan en voeg toe:
```text theme={null}
15.236.243.144
```
en
```text theme={null}
51.44.50.107
```
**c. Selecteer:** "Require TLS encryption"
**d. Klik op:** "Save"
Vul het formulier in met de volgende gegevens:
**a. Description:** Receive from Scribe
**b. Authentication:** Vink "Only accept mail from the specified IP addresses" aan en voeg toe:
```text theme={null}
15.236.243.144
```
en
```text theme={null}
51.44.50.107
```
**c. Selecteer:** "Require TLS encryption"
**d. Klik op:** "Save"
 Ga in Google Admin naar **Apps → Google Workspace → Gmail** en klik vervolgens op 'Compliance'.
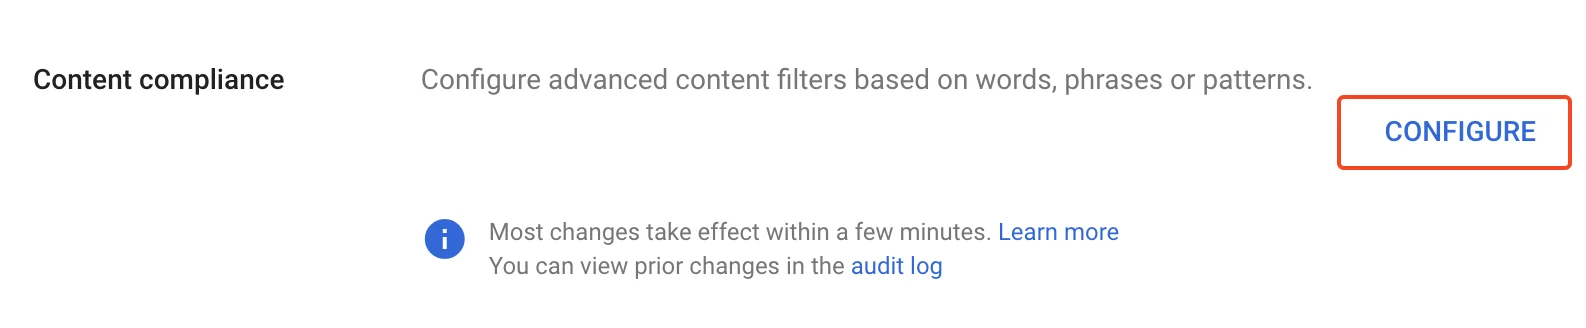
 Klik op de volgende pagina op **Configureren** onder "Content compliance".
 Vul het formulier in zoals weergegeven in de schermafbeelding:
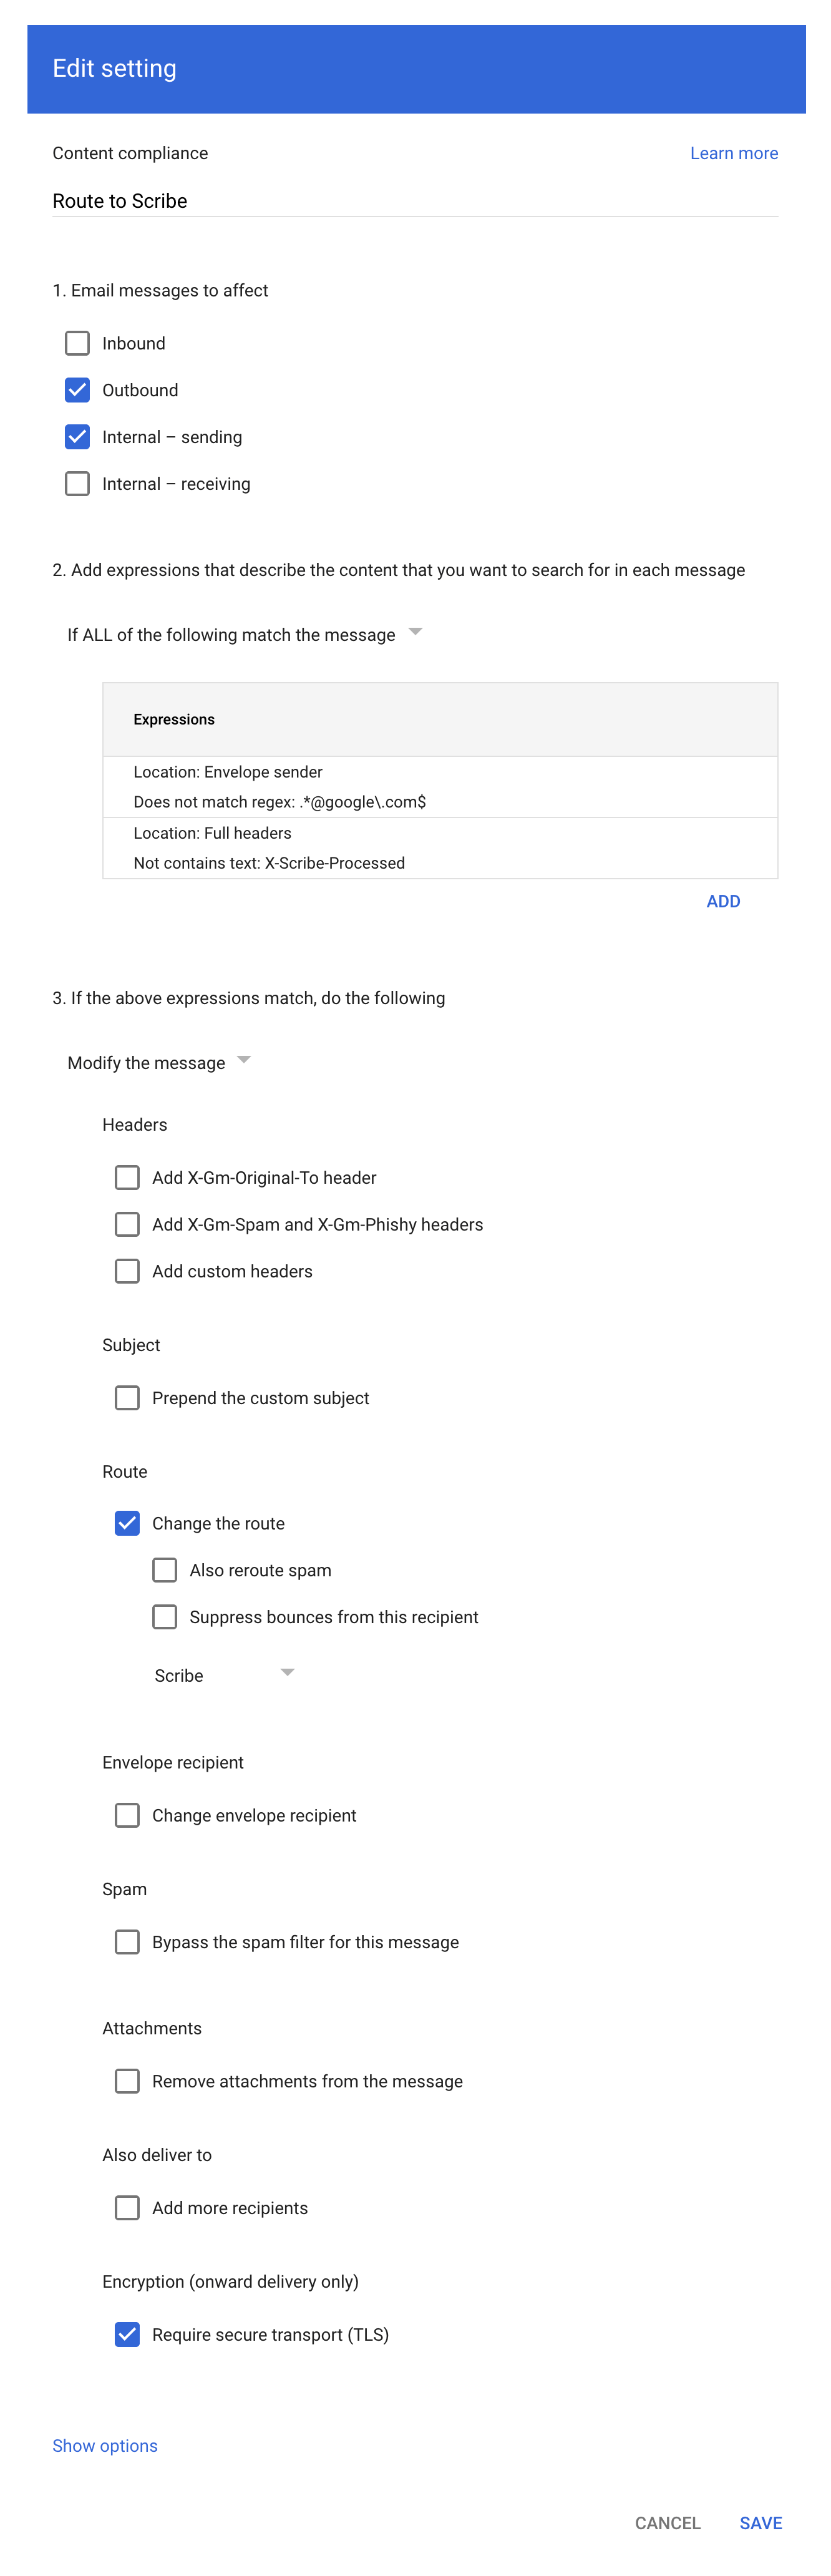
**a. Description:** Route to Scribe
**b. Selecteer:** "Outbound" en "Internal - sending" bij "Email messages to affect"
**c. Stel in het tweede configuratie-item ("Add expressions…")** de matching in op **"If ALL of the following match the message"**, klik vervolgens op **ADD** en voeg deze twee Advanced content match-expressies toe:
* Location: Full headers, Match type: Does not contain text, Content: `X-Scribe-Processed` — voorkomt dat je e-mail meerdere keren wordt verwerkt.
* Location: Envelope sender, Match type: Does not match regex, Regexp: `.*@google\.com$` — sluit systeemmail uit zoals Google Forms-ontvangstbevestigingen (van [forms-receipts-noreply@google.com](mailto:forms-receipts-noreply@google.com)), die Google's SMTP-relay weigert als ze via Scribe worden gerouteerd.
**d. Wijzig in het derde configuratie-item** de route naar de host die je in deel 1 van deze handleiding hebt aangemaakt.
**e. Selecteer:** "Require secure transport (TLS)"
**f. Klik op:** "Save"
Vul het formulier in zoals weergegeven in de schermafbeelding:
**a. Description:** Route to Scribe
**b. Selecteer:** "Outbound" en "Internal - sending" bij "Email messages to affect"
**c. Stel in het tweede configuratie-item ("Add expressions…")** de matching in op **"If ALL of the following match the message"**, klik vervolgens op **ADD** en voeg deze twee Advanced content match-expressies toe:
* Location: Full headers, Match type: Does not contain text, Content: `X-Scribe-Processed` — voorkomt dat je e-mail meerdere keren wordt verwerkt.
* Location: Envelope sender, Match type: Does not match regex, Regexp: `.*@google\.com$` — sluit systeemmail uit zoals Google Forms-ontvangstbevestigingen (van [forms-receipts-noreply@google.com](mailto:forms-receipts-noreply@google.com)), die Google's SMTP-relay weigert als ze via Scribe worden gerouteerd.
**d. Wijzig in het derde configuratie-item** de route naar de host die je in deel 1 van deze handleiding hebt aangemaakt.
**e. Selecteer:** "Require secure transport (TLS)"
**f. Klik op:** "Save"
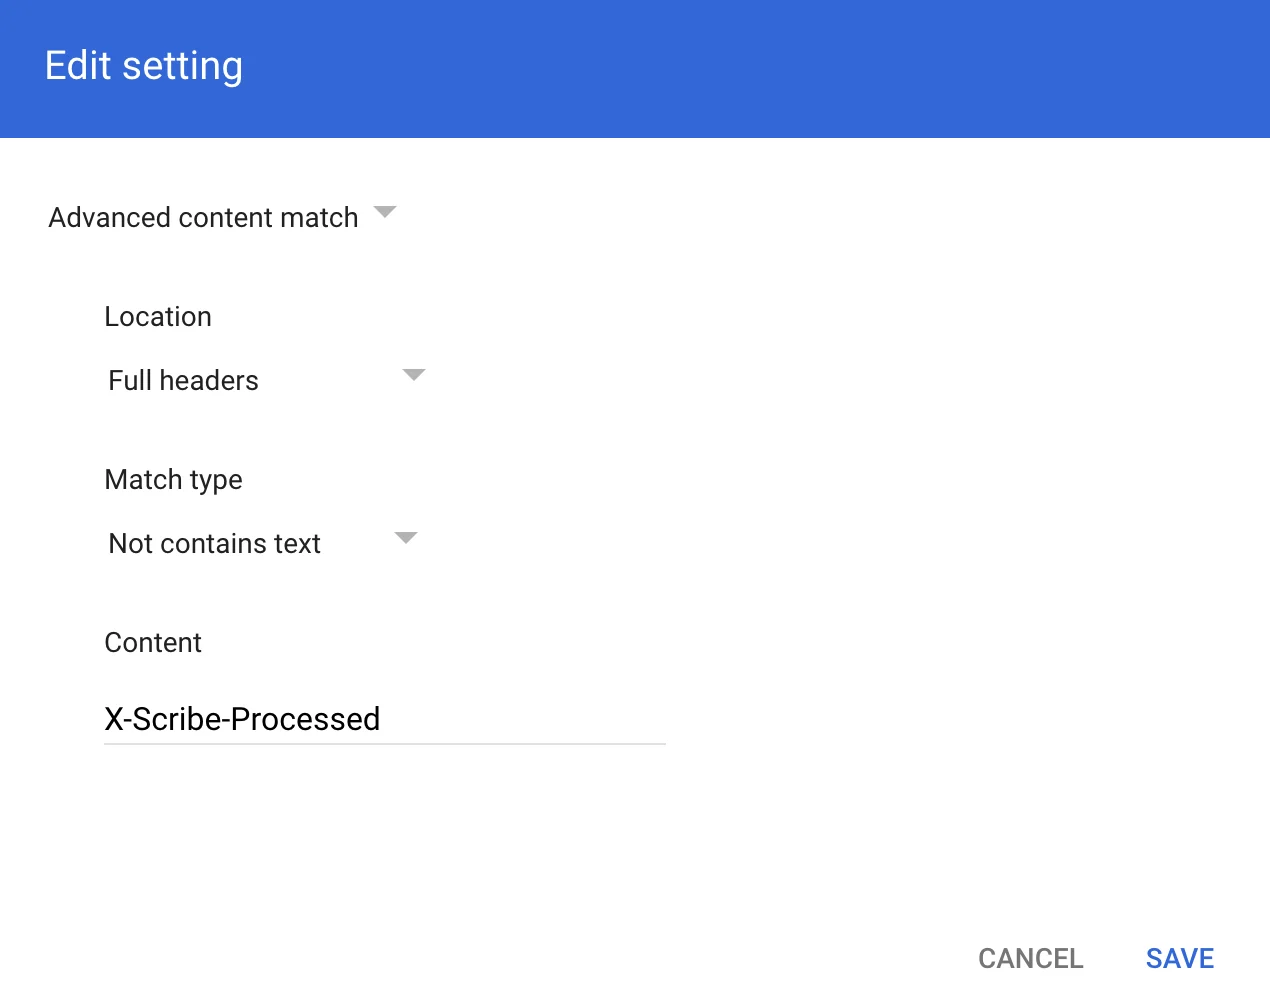
 Voeg in de Compliance rule expression-modal de informatie toe zoals weergegeven in de schermafbeelding:
Advanced content match:
* **Location:** Full headers
* **Match type:** Not contains text
* **Content:** X-Scribe-Processed
Voeg in de Compliance rule expression-modal de informatie toe zoals weergegeven in de schermafbeelding:
Advanced content match:
* **Location:** Full headers
* **Match type:** Not contains text
* **Content:** X-Scribe-Processed
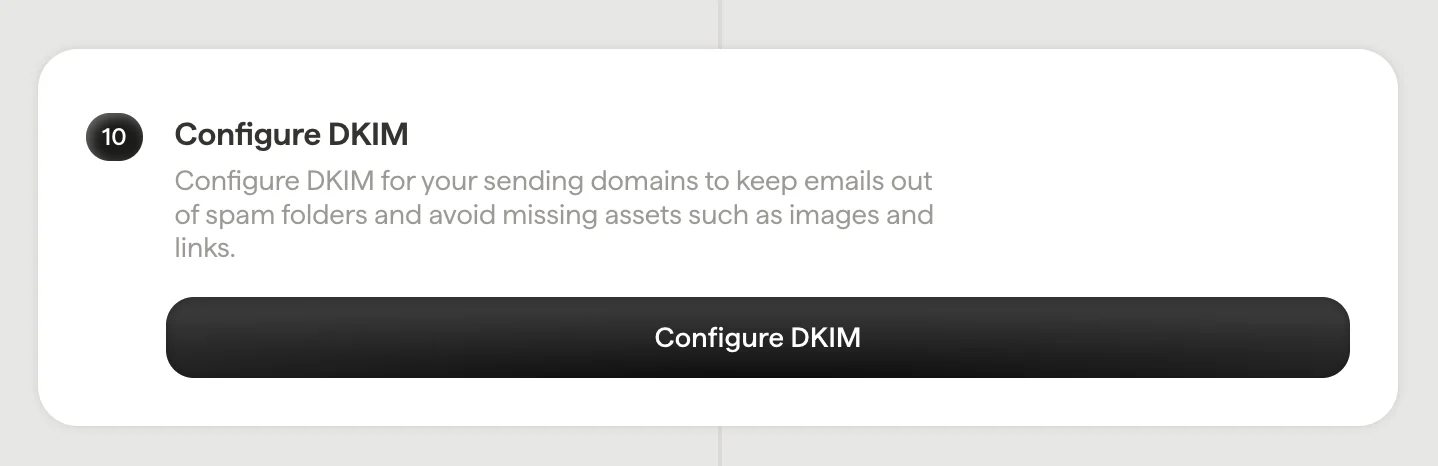
 Configureer DKIM voor je [verzenddomeinen](/nl/configure-your-sending-domain) om e-mails uit spamfolders te houden en te voorkomen dat onderdelen zoals afbeeldingen en links ontbreken.
Klik op **Configure DKIM** in Scribe om de configuratie te starten.
Configureer DKIM voor je [verzenddomeinen](/nl/configure-your-sending-domain) om e-mails uit spamfolders te houden en te voorkomen dat onderdelen zoals afbeeldingen en links ontbreken.
Klik op **Configure DKIM** in Scribe om de configuratie te starten.
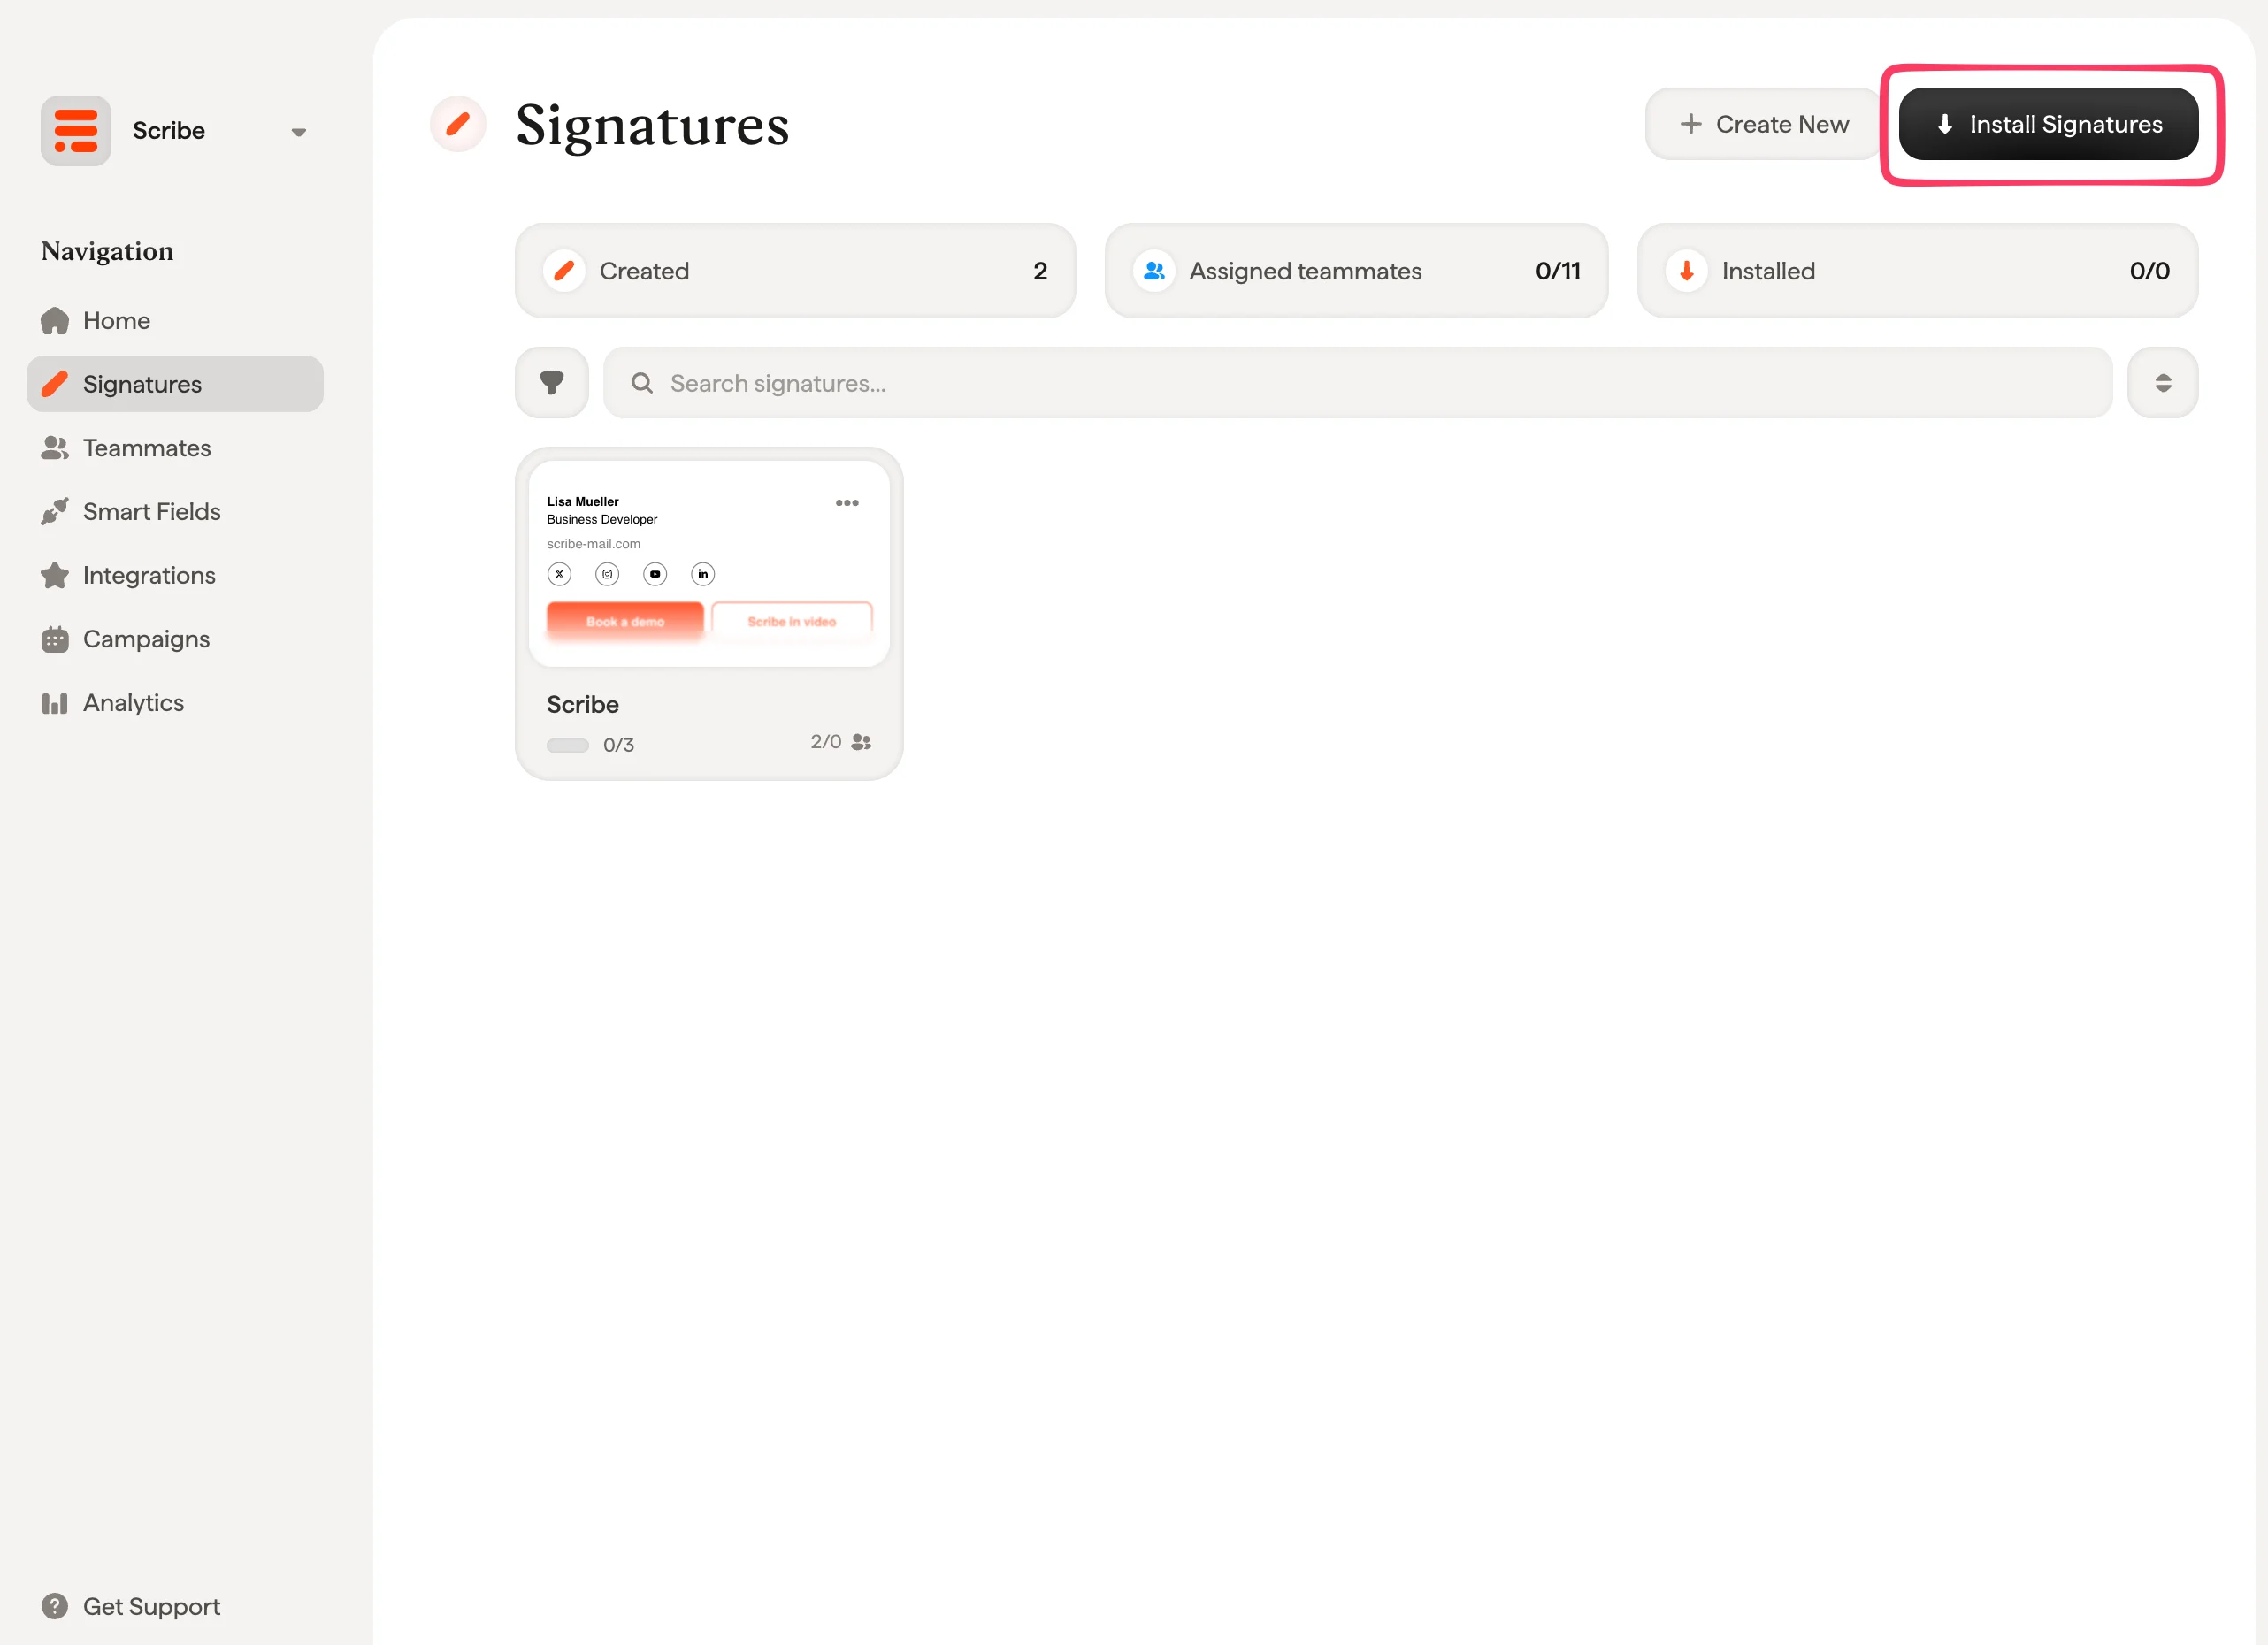
 Vanuit je handtekeningenlijst kun je [alle handtekeningen tegelijk installeren voor je teamleden](/nl/install-signatures) of ze één voor één installeren voor een geleidelijke uitrol.
 ## Gerelateerde artikelen
* [Overzicht van integraties](/nl/integrations-overview): alle manieren om Scribe-handtekeningen uit te rollen, in de cloud of server-side.
* [Microsoft 365 (server-side)](/nl/integrations/signatures/microsoft-365-server-side): route je mail via Scribe voor dekking op alle apparaten.
* [Handtekening-varianten](/nl/signature-variants): varianten voor antwoorden en interne mail voor Outlook en server-side.
## Gerelateerde artikelen
* [Overzicht van integraties](/nl/integrations-overview): alle manieren om Scribe-handtekeningen uit te rollen, in de cloud of server-side.
* [Microsoft 365 (server-side)](/nl/integrations/signatures/microsoft-365-server-side): route je mail via Scribe voor dekking op alle apparaten.
* [Handtekening-varianten](/nl/signature-variants): varianten voor antwoorden en interne mail voor Outlook en server-side.