> ## Documentation Index
> Fetch the complete documentation index at: https://help.scribe-mail.com/llms.txt
> Use this file to discover all available pages before exploring further.
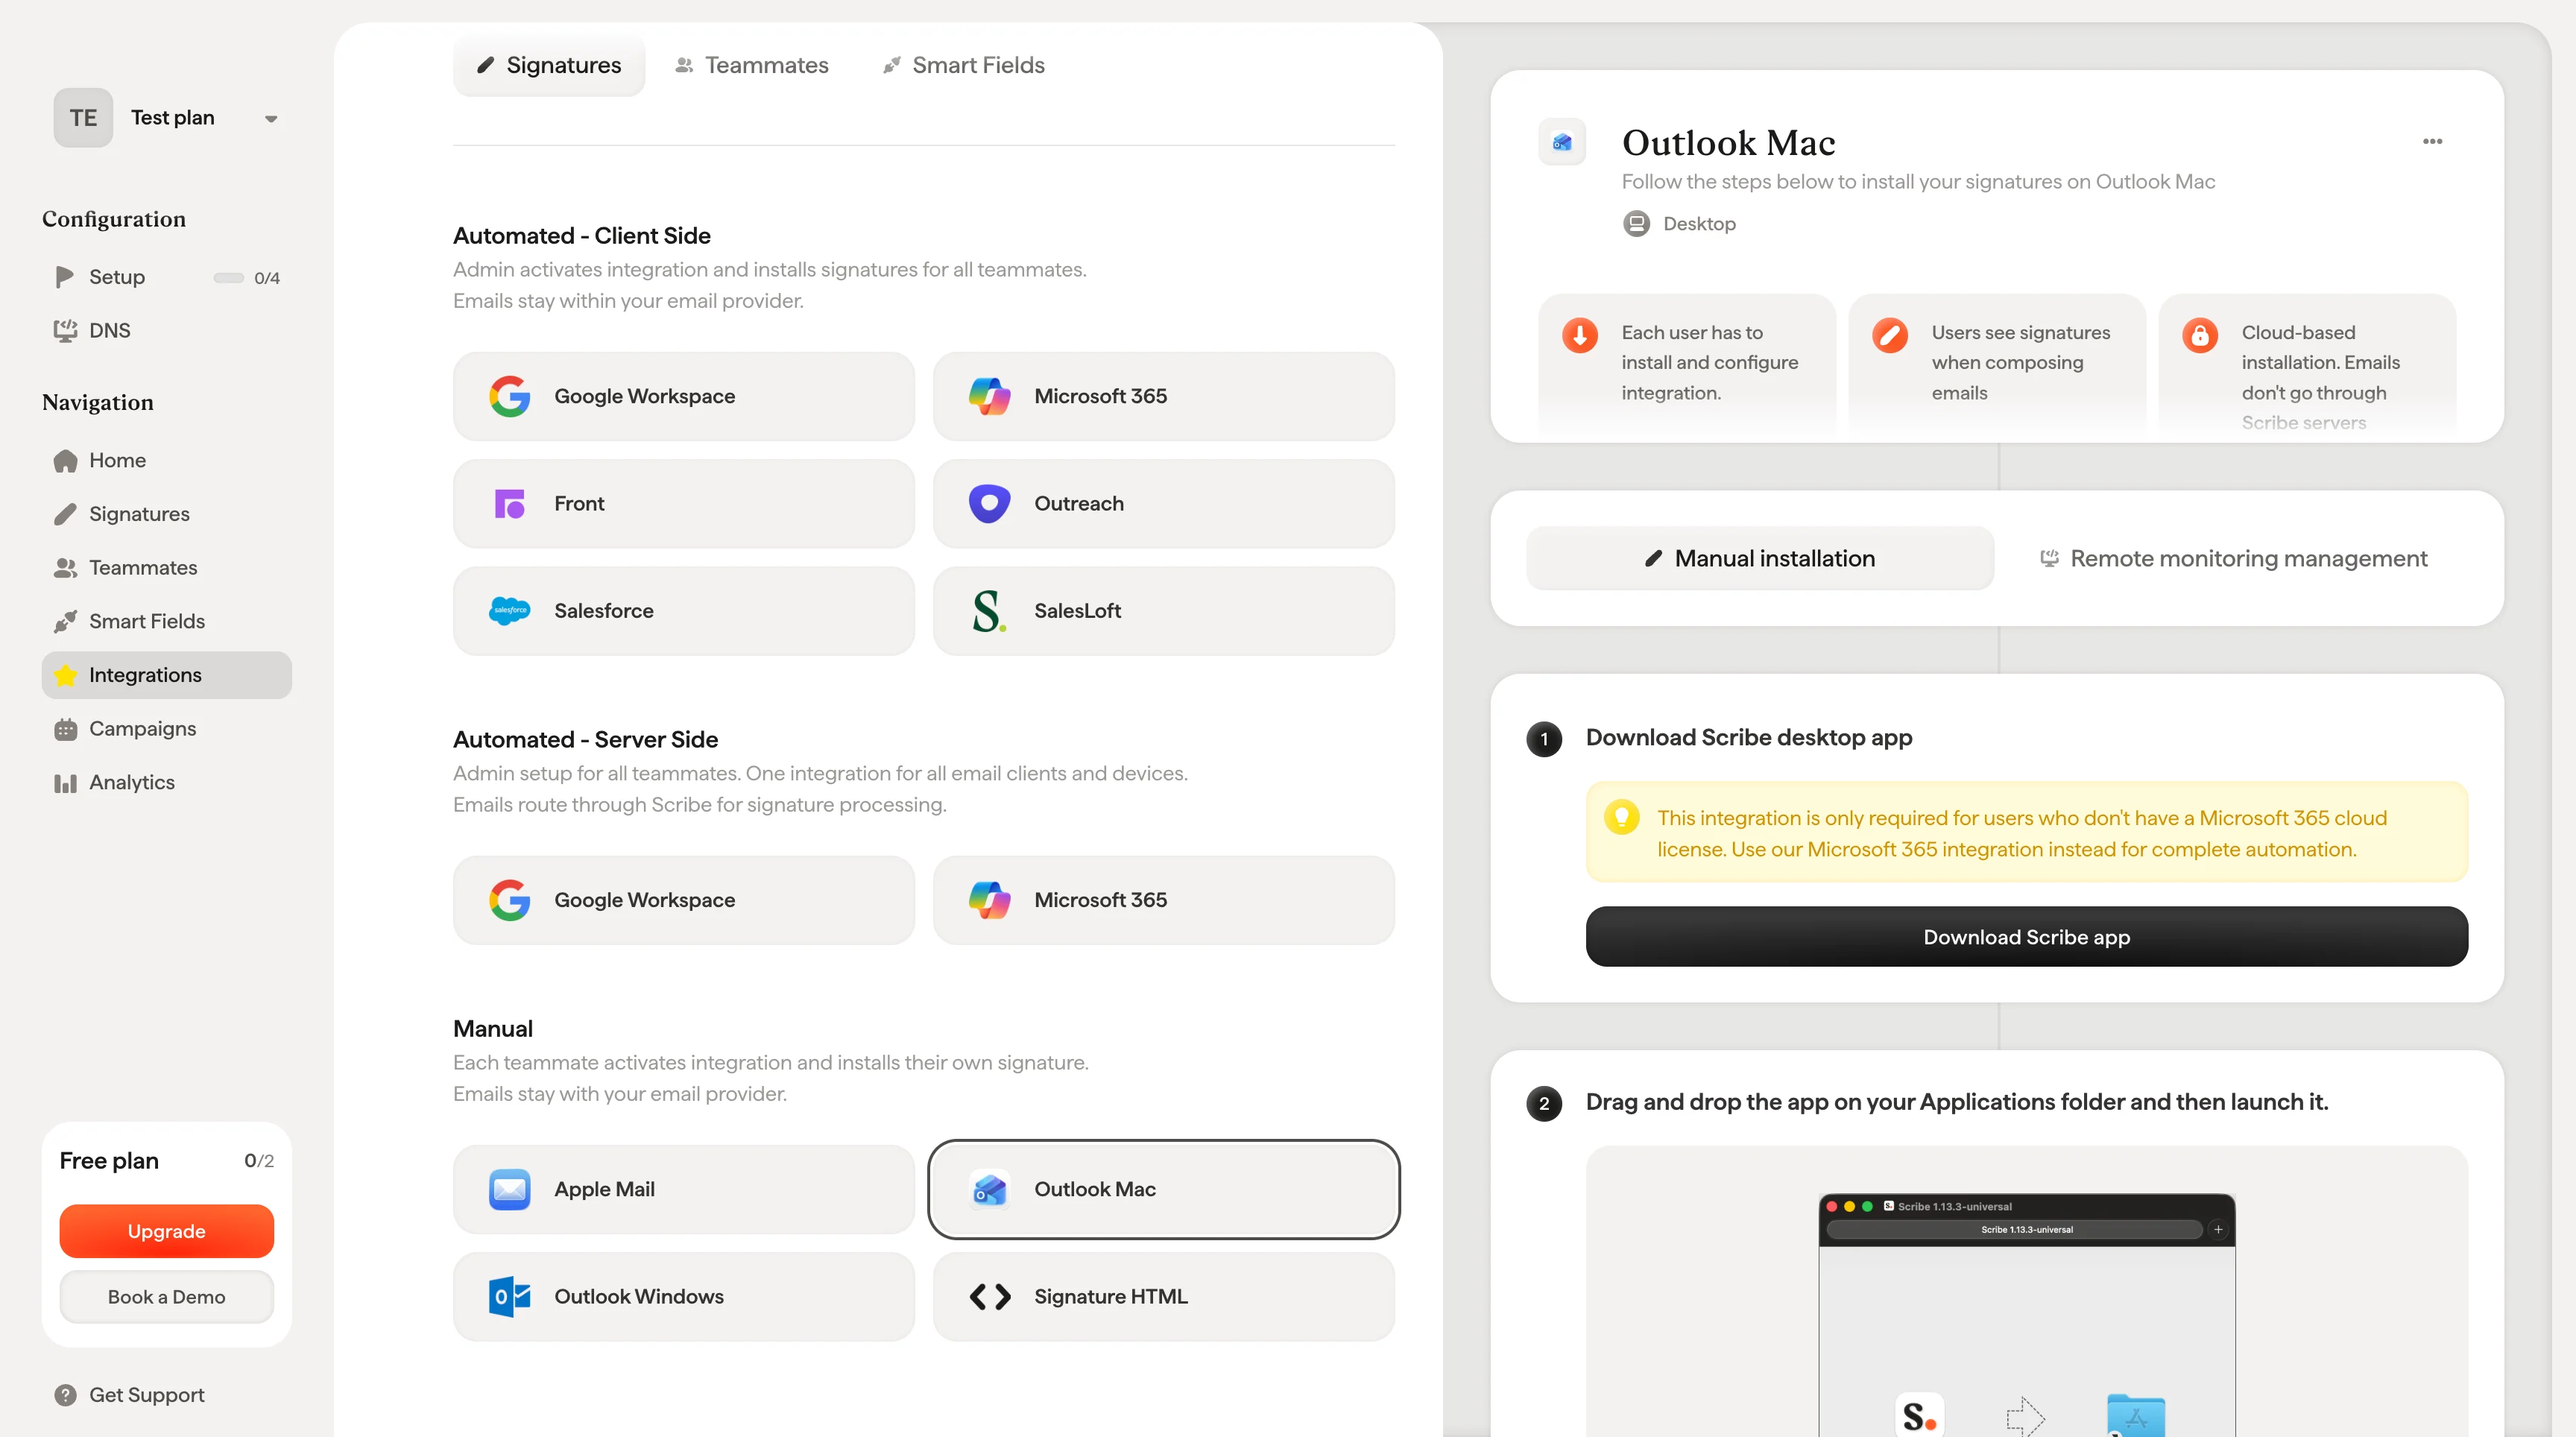
# Outlook Mac

> Installeer Scribe-e-mailhandtekeningen op Outlook voor Mac door de Scribe-desktopapp te downloaden, gemaakt voor gebruikers zonder een Microsoft 365-cloudlicentie.

Volg de onderstaande stappen om je handtekeningen te installeren op Outlook Mac.

<Info>
  **Elke gebruiker moet de integratie zelf installeren en configureren.**
</Info>

<Info>
  **Gebruikers zien handtekeningen tijdens het opstellen van e-mails.**
</Info>

<Info>
  **Cloudgebaseerde installatie.** E-mails gaan niet via de servers van Scribe.
</Info>

## Installatiehandleiding

### Vereisten

* Een Scribe-account
* Minstens één handtekening aangemaakt in Scribe
* macOS met Outlook geïnstalleerd

<Steps>
  <Step title="Scribe-desktopapp downloaden">
    <Warning>
      Deze integratie is alleen nodig voor gebruikers zonder Microsoft 365-cloudlicentie. Gebruik in plaats daarvan onze [Microsoft 365-integratie](/nl/integrations/signatures/microsoft-365-client-side) voor volledige automatisering.
    </Warning>

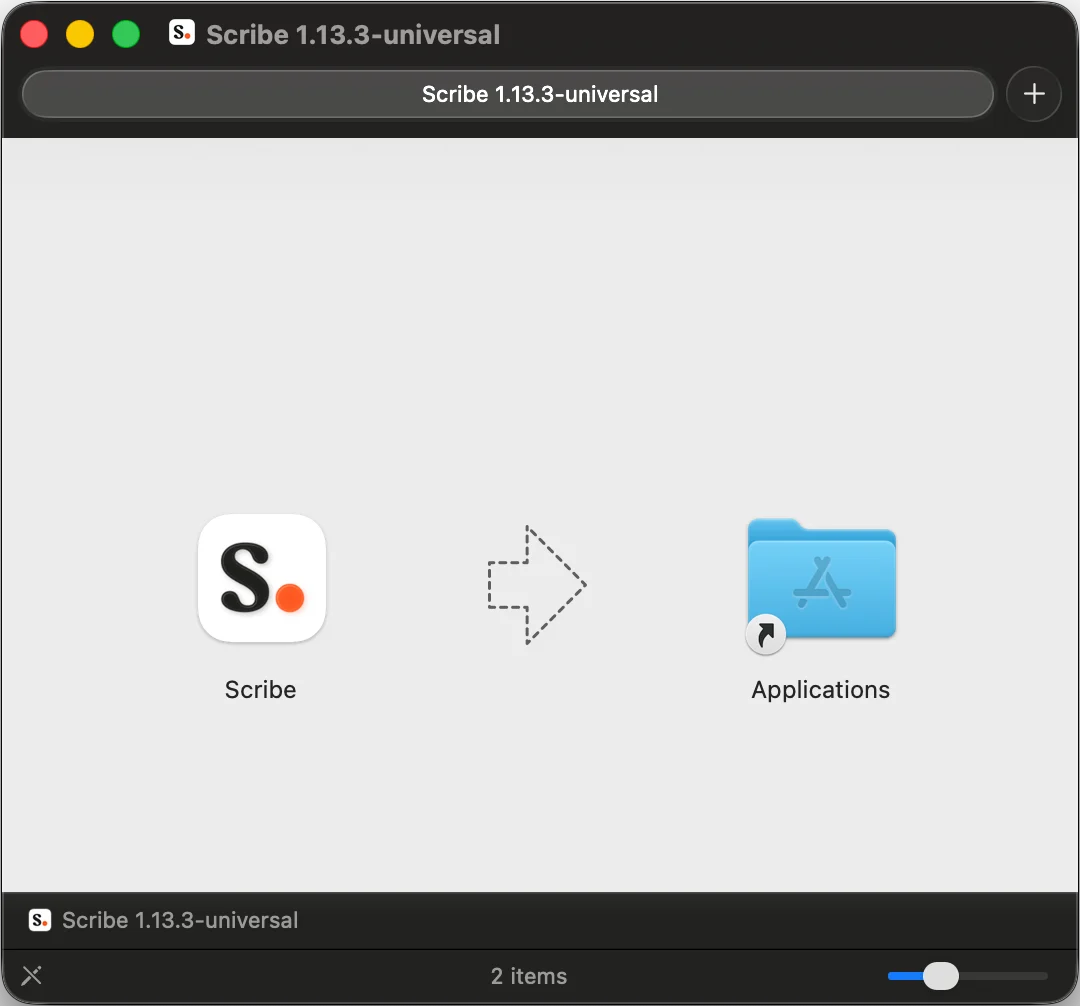
    Download de Scribe-desktopapp via de integratiepagina.

    <Frame>
      <img src="https://mintcdn.com/scribe/xbQhr3JjkYildsKM/images/outlook-mac-download-scribe-app.png?fit=max&auto=format&n=xbQhr3JjkYildsKM&q=85&s=02626a4d06fd9ffa93cb59cdd513f0f0" alt="Scribe-desktopapp downloaden via de integratiepagina" width="3456" height="1928" data-path="images/outlook-mac-download-scribe-app.png" />
    </Frame>
  </Step>

  <Step title="Sleep de app naar je map Programma's en start hem vervolgens">
    <Frame>
      <img src="https://mintcdn.com/scribe/I5V9iTucPI_EY3nq/integrations/signatures/images/outlook-mac-step-2.png?fit=max&auto=format&n=I5V9iTucPI_EY3nq&q=85&s=6ceb4998576ebef9f2e270880833ef97" alt="Scribe naar de map Programma's slepen" width="1080" height="1006" data-path="integrations/signatures/images/outlook-mac-step-2.png" />
    </Frame>
  </Step>

  <Step title="Inloggen met je Scribe-gegevens">
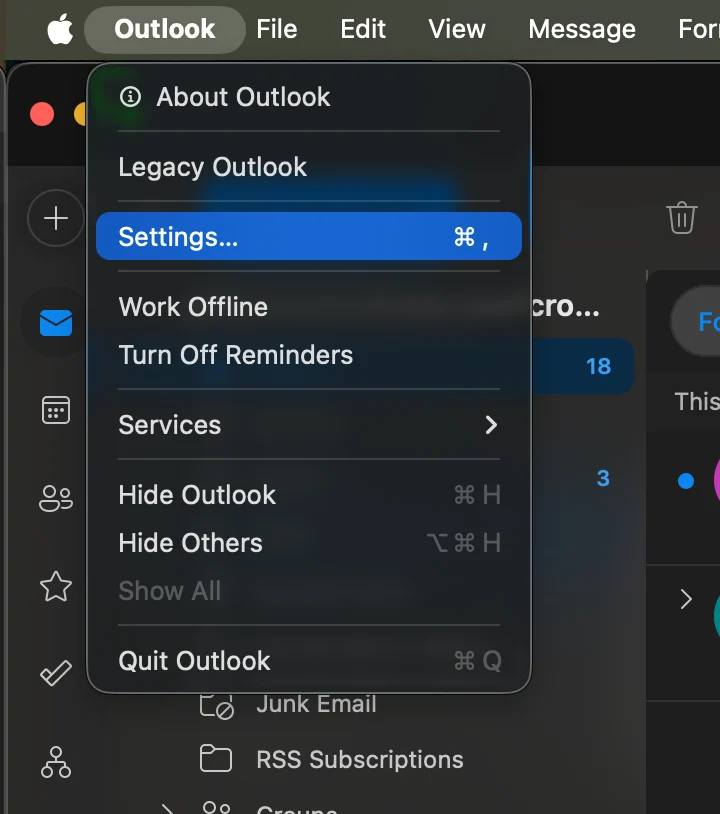
    Log in op de Scribe-app zoals je dat ook op de website van Scribe doet.

    <Frame>
      <img src="https://mintcdn.com/scribe/xbQhr3JjkYildsKM/images/scribe-app-login.png?fit=max&auto=format&n=xbQhr3JjkYildsKM&q=85&s=5f5ded1413970e4830f850a1a55d7388" alt="Inlogscherm van de Scribe-desktopapp" title="Inlogscherm van de Scribe-desktopapp" className="mx-auto" style={{ width:"56%" }} width="810" height="1232" data-path="images/scribe-app-login.png" />
    </Frame>
  </Step>

  <Step title="Outlook-installatie inschakelen">
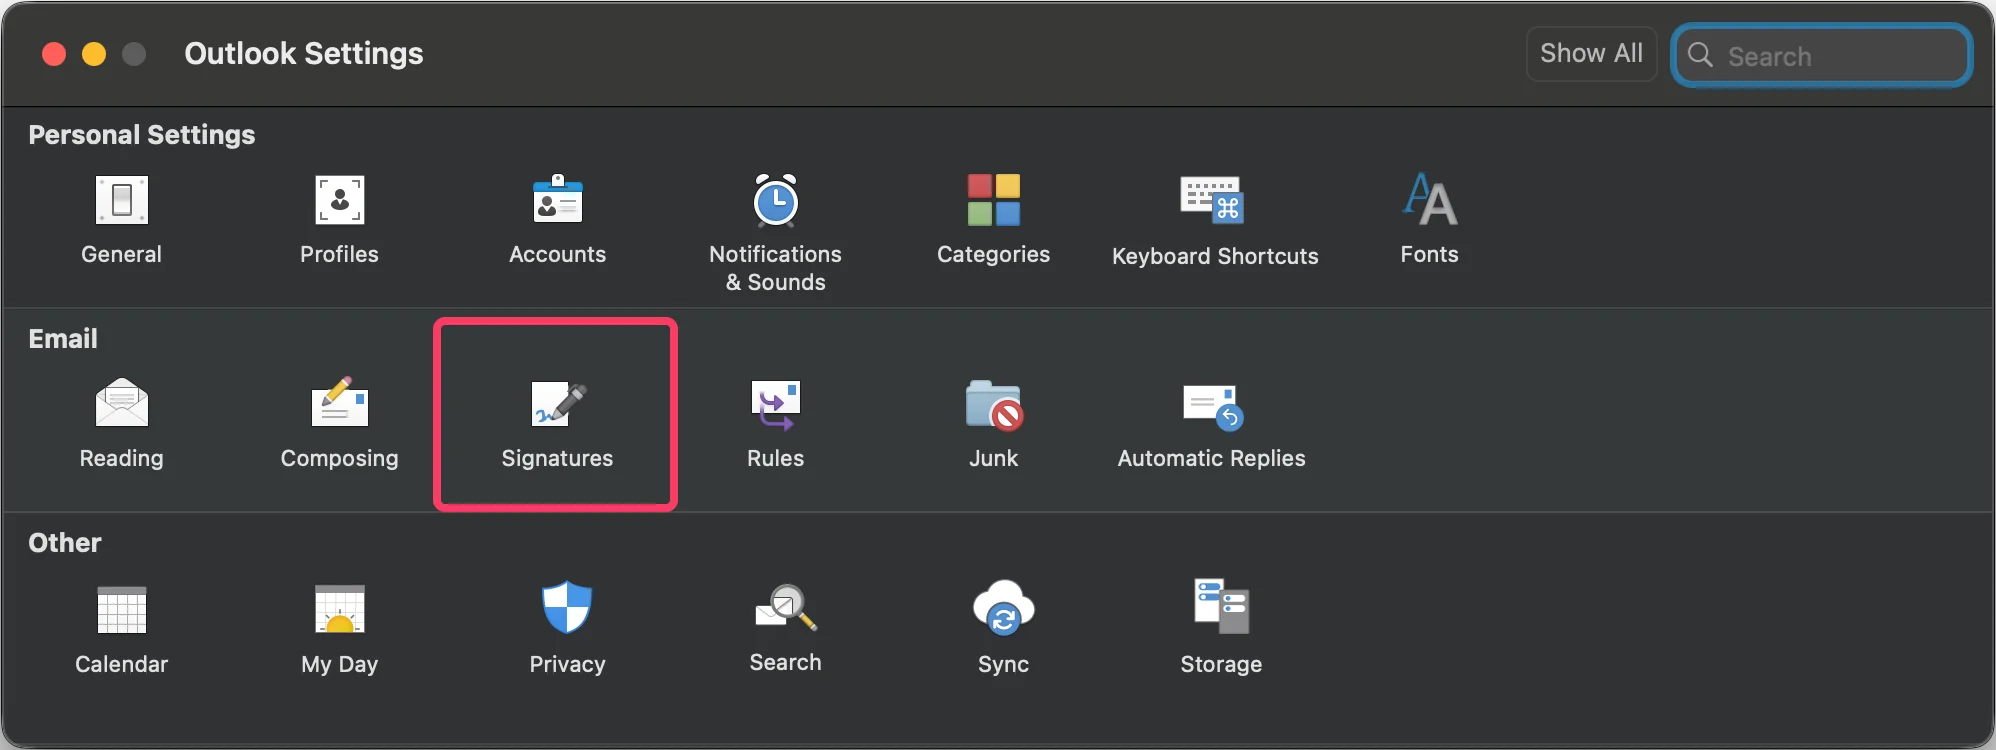
    Klik op het instellingenwieltje en activeer Outlook.

    <Frame>
      <img src="https://mintcdn.com/scribe/xbQhr3JjkYildsKM/images/scribe-app-activate-email-client.png?fit=max&auto=format&n=xbQhr3JjkYildsKM&q=85&s=5d8407f7903c0031672a5d20f452bf1f" alt="E-mailclient activeren in de instellingen van de Scribe-app" title="E-mailclient activeren in de instellingen van de Scribe-app" className="mx-auto" style={{ width:"68%" }} width="798" height="1230" data-path="images/scribe-app-activate-email-client.png" />
    </Frame>
  </Step>

  <Step title="Outlook Mac starten en naar de instellingen gaan">
    <Frame>
      <img src="https://mintcdn.com/scribe/I5V9iTucPI_EY3nq/integrations/signatures/images/outlook-mac-step-5.png?fit=max&auto=format&n=I5V9iTucPI_EY3nq&q=85&s=f1768e7d731355d42e2b89ac4be332c1" alt="Instellingenmenu van Outlook Mac" className="mx-auto" style={{ width:"69%" }} width="720" height="814" data-path="integrations/signatures/images/outlook-mac-step-5.png" />
    </Frame>
  </Step>

  <Step title="Naar handtekeninginstellingen gaan">
    <Frame>
      <img src="https://mintcdn.com/scribe/I5V9iTucPI_EY3nq/integrations/signatures/images/outlook-mac-step-6.png?fit=max&auto=format&n=I5V9iTucPI_EY3nq&q=85&s=9d1d11d2da92156676690ff6672a449f" alt="Outlook-instellingen met Handtekeningen gemarkeerd" width="1996" height="750" data-path="integrations/signatures/images/outlook-mac-step-6.png" />
    </Frame>
  </Step>

  <Step title="Standaardhandtekening configureren">
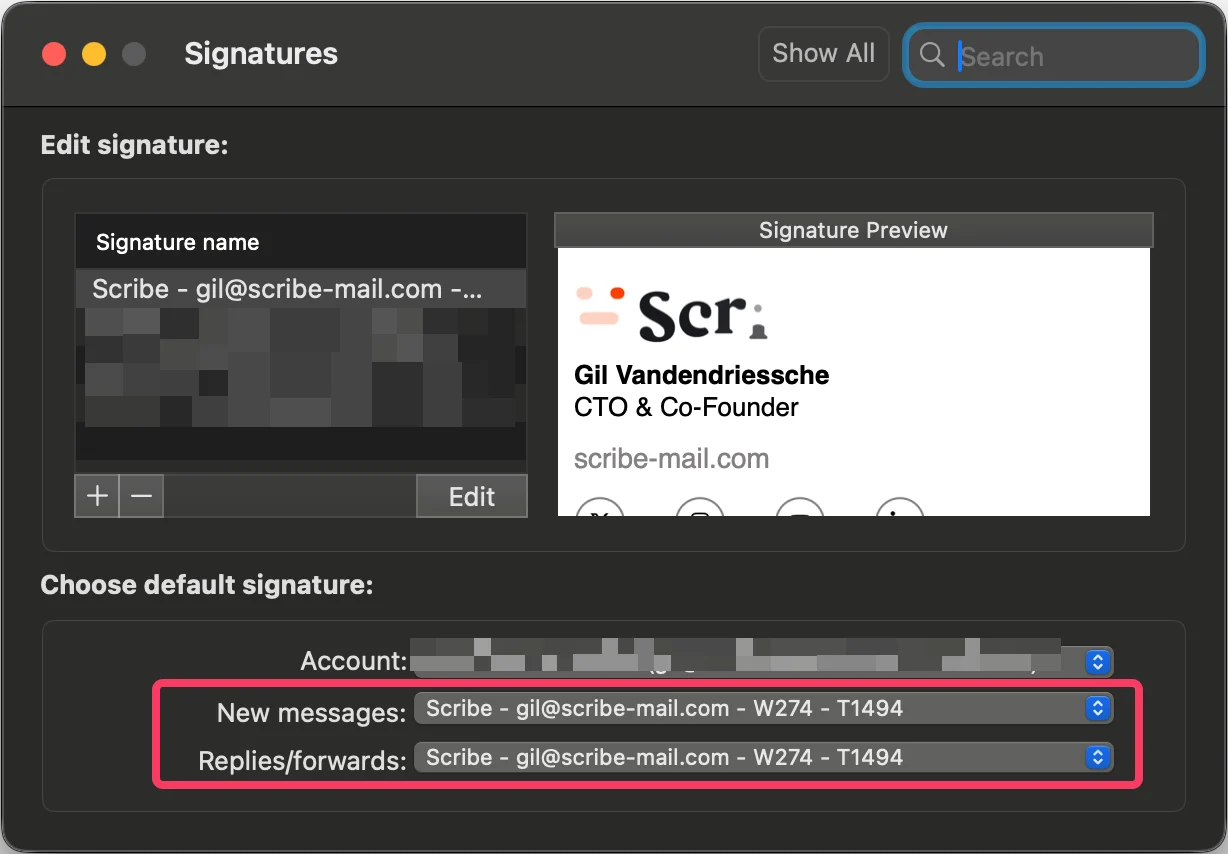
    Stel de Scribe-handtekening in als standaard voor nieuwe berichten en antwoorden/doorsturen.

    <Frame>
      <img src="https://mintcdn.com/scribe/I5V9iTucPI_EY3nq/integrations/signatures/images/outlook-mac-step-7.png?fit=max&auto=format&n=I5V9iTucPI_EY3nq&q=85&s=d3b8981845f7927b21c0ee0dbc73978c" alt="Scribe-handtekening instellen als standaard voor nieuwe berichten en antwoorden/doorsturen" width="1228" height="854" data-path="integrations/signatures/images/outlook-mac-step-7.png" />
    </Frame>
  </Step>

  <Step title="Teamhandtekeningen installeren">
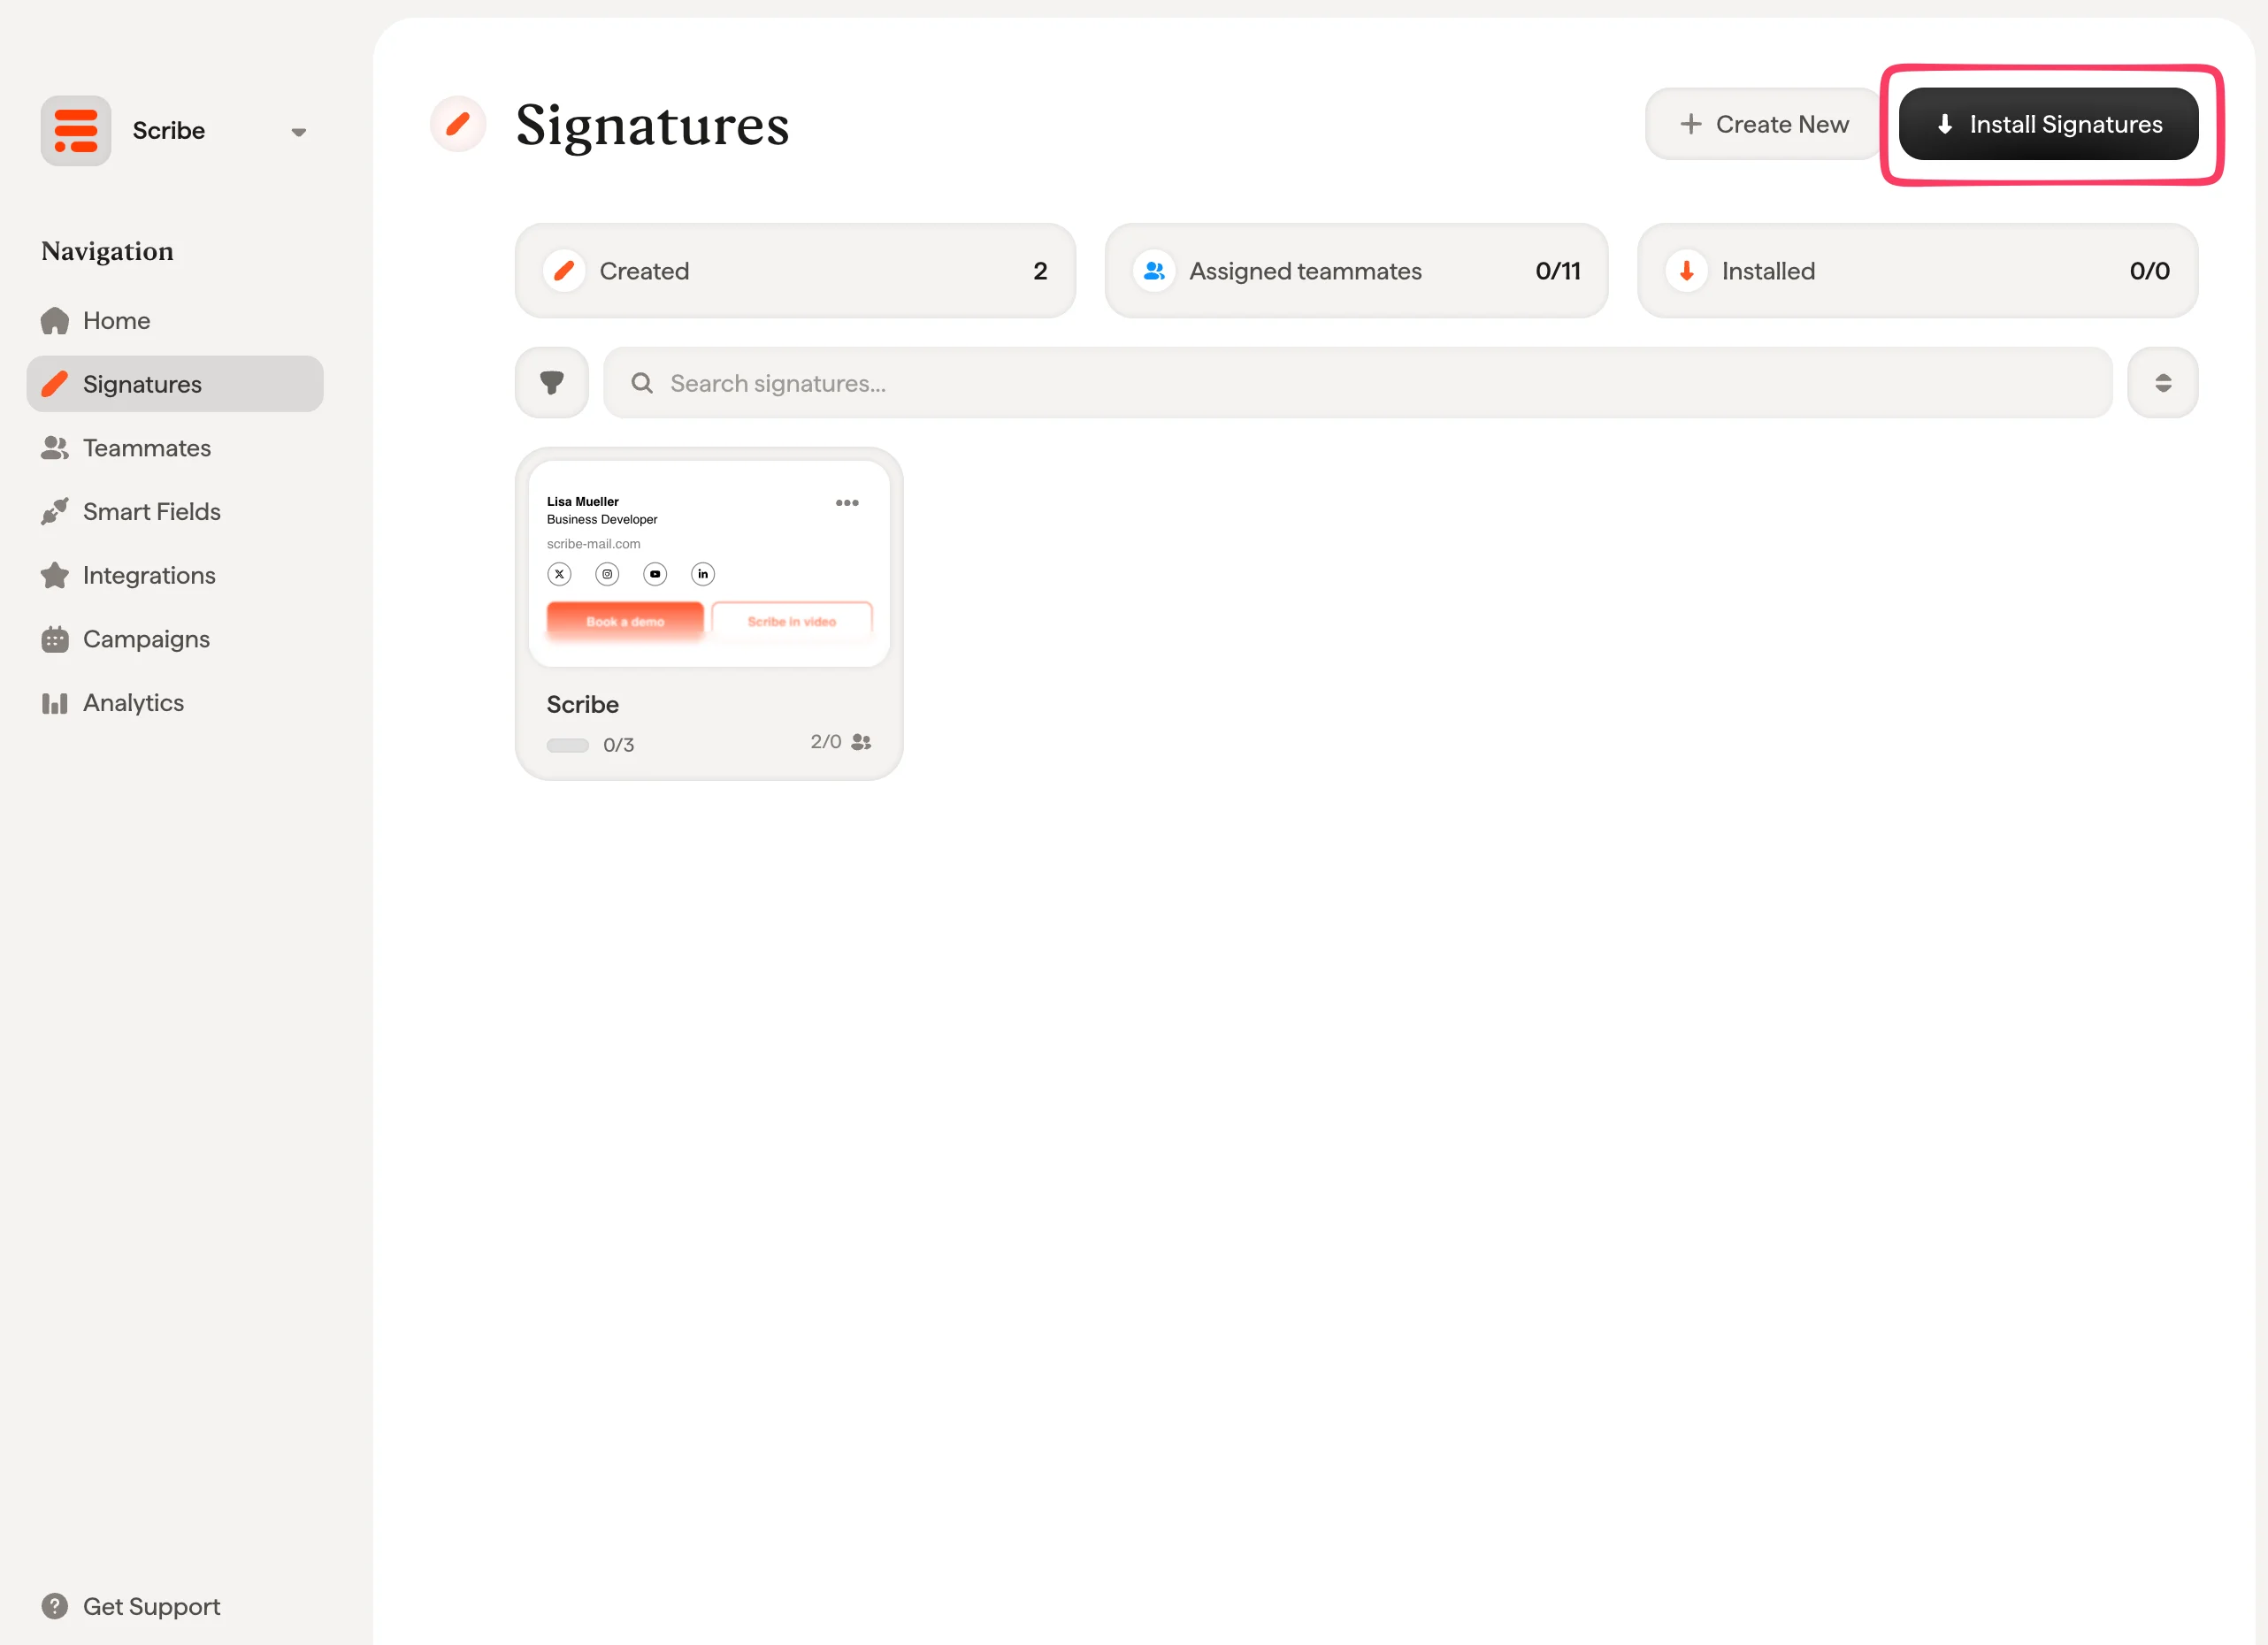
    Vanuit je handtekeningenlijst kun je [alle handtekeningen in één keer installeren voor je teamleden](/nl/install-signatures) of ze één voor één installeren voor een geleidelijke uitrol.

    <Frame>
      <img src="https://mintcdn.com/scribe/I5V9iTucPI_EY3nq/integrations/signatures/images/outlook-mac-step-8.png?fit=max&auto=format&n=I5V9iTucPI_EY3nq&q=85&s=c0dcc36e9e89bce4e3c7a0c020079dcd" alt="Handtekeningen installeren voor teamleden" width="2564" height="1860" data-path="integrations/signatures/images/outlook-mac-step-8.png" />
    </Frame>
  </Step>
</Steps>

## Gerelateerde artikelen

* [Overzicht van integraties](/nl/integrations-overview): alle manieren om Scribe-handtekeningen uit te rollen, in de cloud of aan de serverzijde.
* [Outlook Mac (Remote Monitoring)](/nl/integrations/signatures/outlook-mac-rmm): rol de Outlook Mac-installatie uit via je RMM-tool.
* [Overstappen naar de nieuwe Outlook](/nl/troubleshooting/switch-to-new-outlook-version): verplaats handtekeningen naar de nieuwe Outlook.
