> ## Documentation Index
> Fetch the complete documentation index at: https://help.scribe-mail.com/llms.txt
> Use this file to discover all available pages before exploring further.

# Okta

> Utrzymuj podpisy e-mailowe aktualne i poprawne dzięki synchronizacji danych z profili użytkowników z Okta — twojego dostawcy tożsamości — takich jak imię i nazwisko, stanowisko i dział.

Wykonaj poniższe kroki, aby [automatycznie wypełnić podpisy członków swojego zespołu](/pl/smart-fields), używając Okta jako źródła danych.

<Info>
  **Członkowie zespołu nie muszą nic robić.**
</Info>

<Info>
  **Zmiany w Okta automatycznie synchronizują się ze Scribe.**
</Info>

<Info>
  **Certyfikat SOC 2 Type II.** [Twoje dane są bezpieczne](/pl/security/data-collection/okta).
</Info>

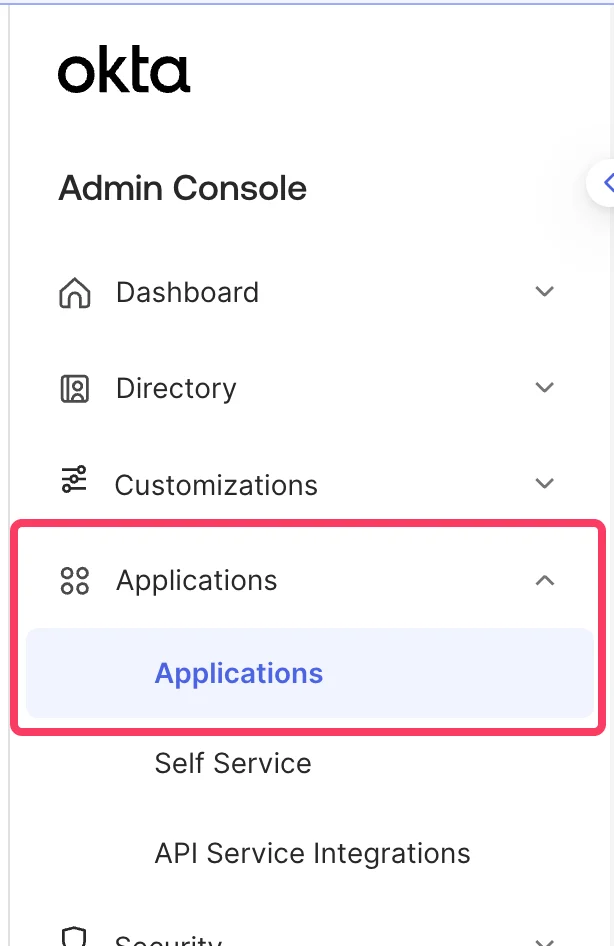
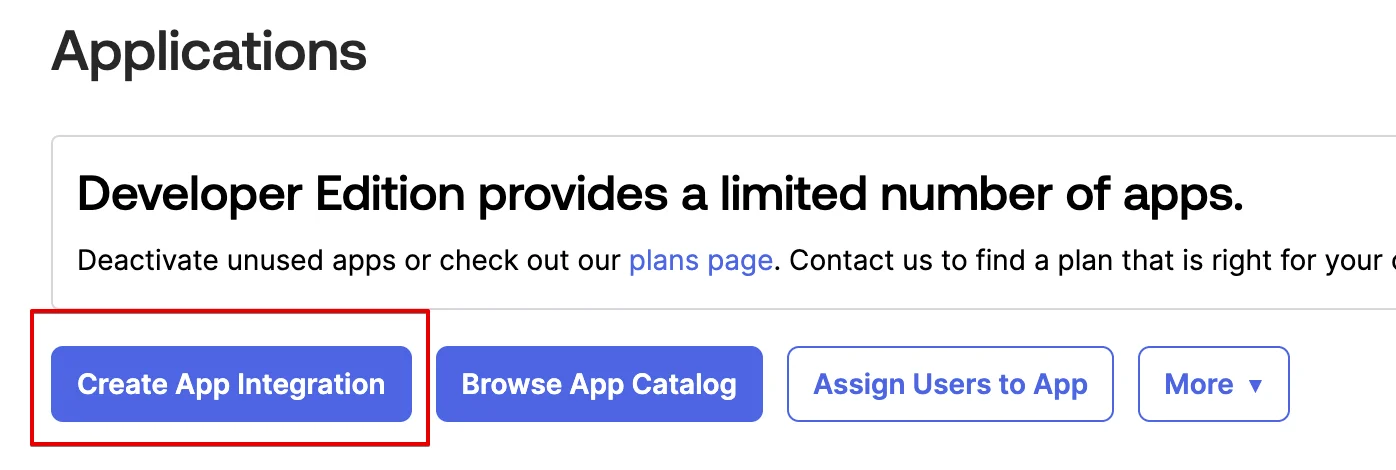
## Przewodnik instalacji

### Wymagania wstępne

* Dostęp administratora do konsoli administracyjnej Okta
* Konto Scribe z dostępem administratora

<Steps>
  <Step title="Przejdź do konsoli administracyjnej Okta i wybierz Menu > Applications > Applications">
    <Frame>
      <img src="https://mintcdn.com/scribe/pvZJQ56rCCLLmCwt/integrations/smart-fields/images/okta-step-1.png?fit=max&auto=format&n=pvZJQ56rCCLLmCwt&q=85&s=ff2517c303603b7a8ee43c864a190021" alt="Menu konsoli administracyjnej Okta z wyróżnioną pozycją Applications" className="mx-auto" style={{ width:"44%" }} width="614" height="946" data-path="integrations/smart-fields/images/okta-step-1.png" />
    </Frame>
  </Step>

  <Step title="Kliknij Create App Integration">
    <Frame>
      <img src="https://mintcdn.com/scribe/pvZJQ56rCCLLmCwt/integrations/smart-fields/images/okta-step-2.png?fit=max&auto=format&n=pvZJQ56rCCLLmCwt&q=85&s=e104123b9975c8d53c9cf25bac8d1920" alt="Strona Applications w Okta z wyróżnionym przyciskiem Create App Integration" className="mx-auto" style={{ width:"76%" }} width="1396" height="470" data-path="integrations/smart-fields/images/okta-step-2.png" />
    </Frame>
  </Step>

  <Step title="Wybierz 'OIDC - OpenID Connect' i 'Single-Page Application', a następnie kliknij 'Next'">
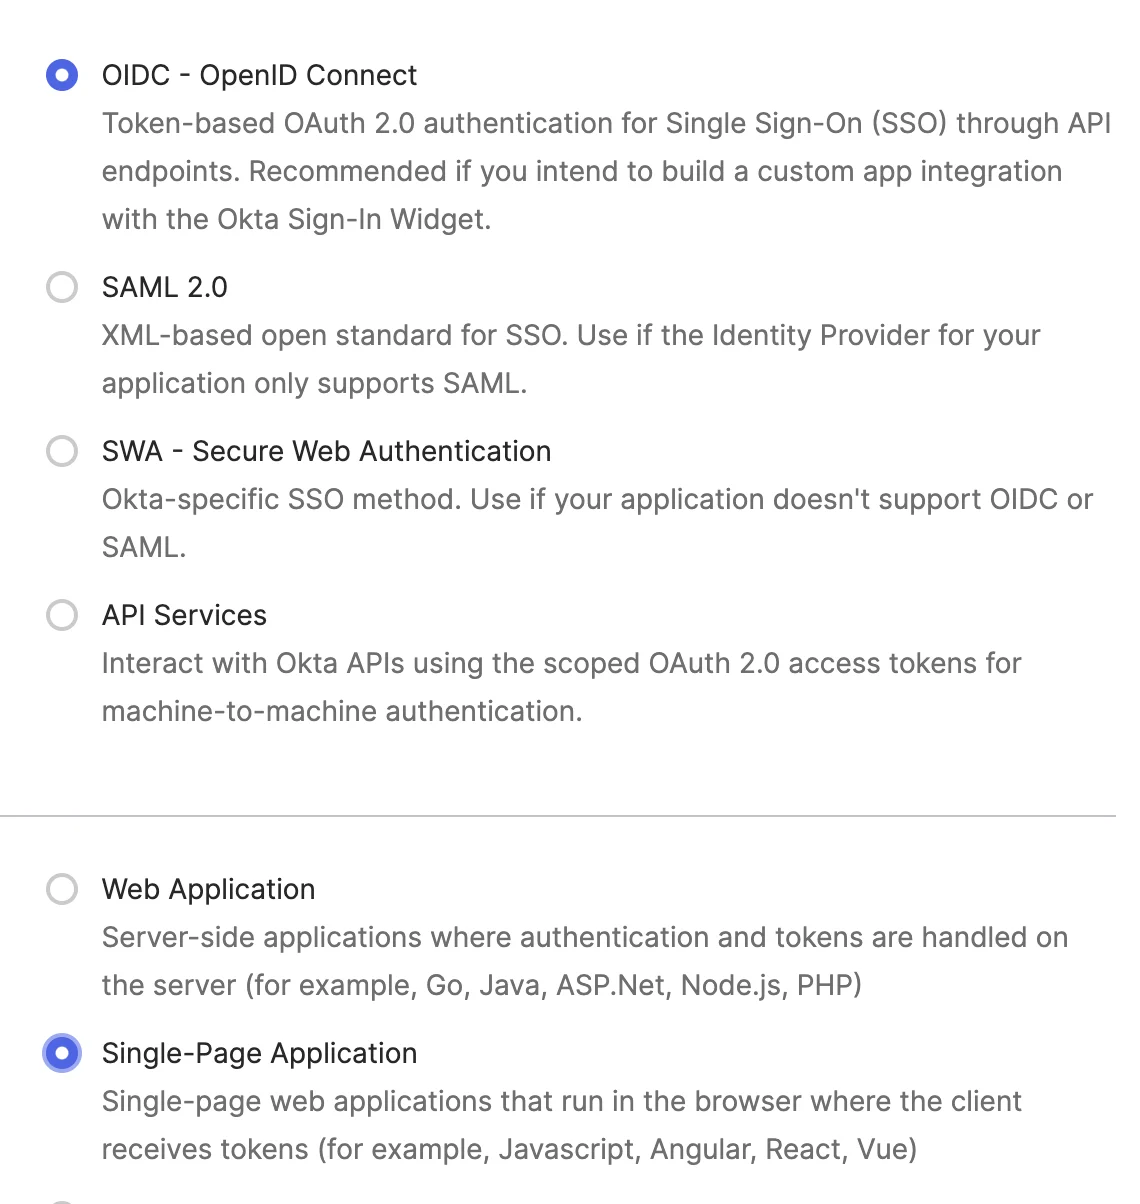
    Wybierz **OIDC - OpenID Connect** jako metodę logowania oraz **Single-Page Application** jako typ aplikacji.

    <Frame>
      <img src="https://mintcdn.com/scribe/pvZJQ56rCCLLmCwt/integrations/smart-fields/images/okta-step-3.png?fit=max&auto=format&n=pvZJQ56rCCLLmCwt&q=85&s=5fd49d96bd05f7435efdb25dae391324" alt="Okno Create App Integration z zaznaczonymi opcjami OIDC i Single-Page Application" className="mx-auto" style={{ width:"64%" }} width="1140" height="1204" data-path="integrations/smart-fields/images/okta-step-3.png" />
    </Frame>
  </Step>

  <Step title="W sekcji 'General Settings' nadaj nazwę aplikacji i włącz opcję 'Refresh Token'">
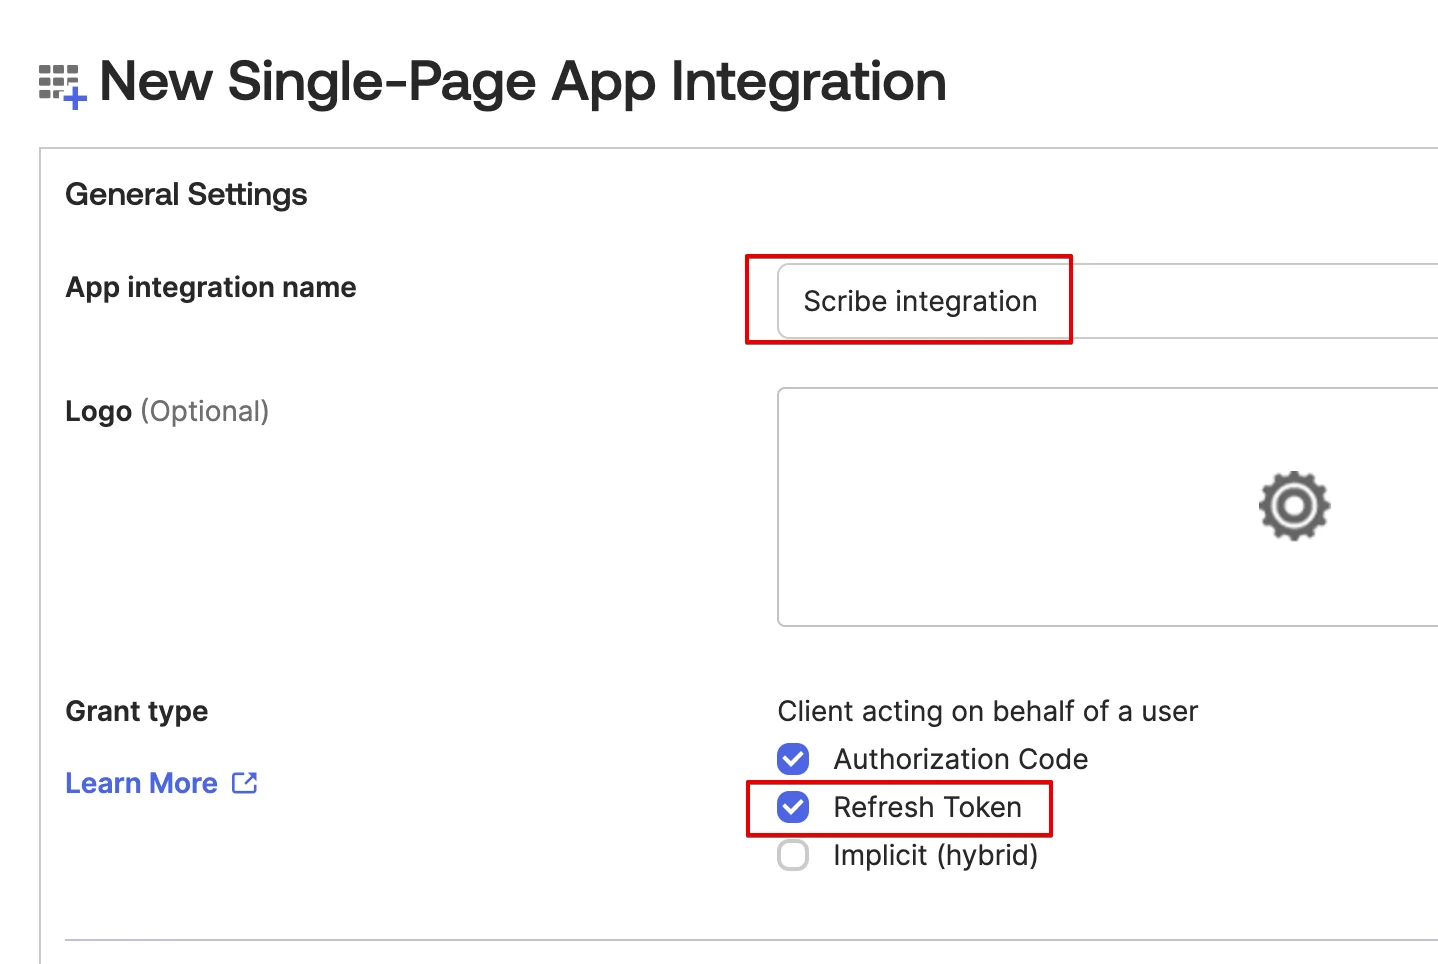
    Wpisz nazwę, np. `Scribe integration`, i zaznacz typ uprawnień **Refresh Token**.

    <Frame>
      <img src="https://mintcdn.com/scribe/pvZJQ56rCCLLmCwt/integrations/smart-fields/images/okta-step-4.png?fit=max&auto=format&n=pvZJQ56rCCLLmCwt&q=85&s=a322fac129afc0dccfb6009e8ae48704" alt="Sekcja General Settings z wyróżnioną nazwą aplikacji i opcją Refresh Token" className="mx-auto" style={{ width:"70%" }} width="1438" height="964" data-path="integrations/smart-fields/images/okta-step-4.png" />
    </Frame>
  </Step>

  <Step title="W sekcji 'Sign-in redirect URIs' skopiuj adres zwrotny Scribe">
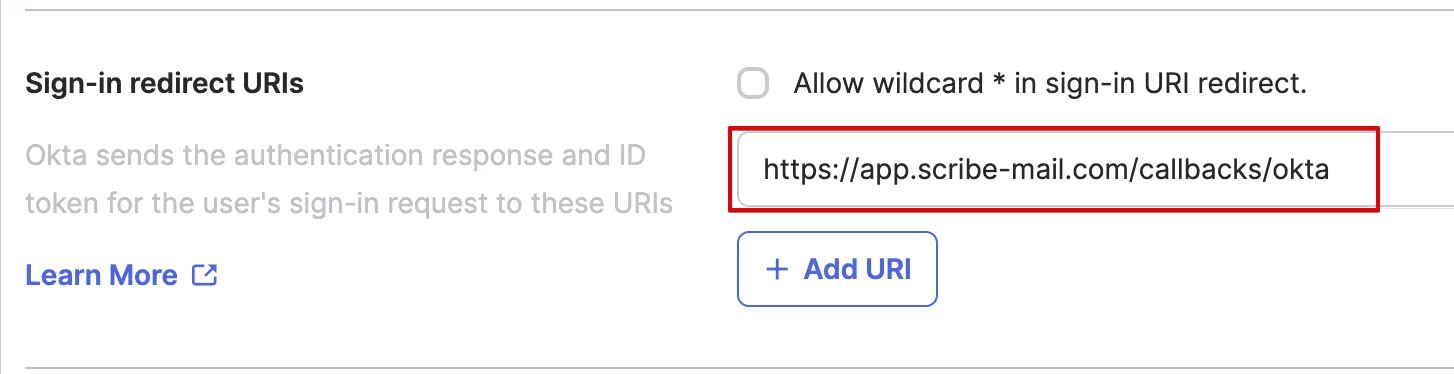
    Skopiuj poniższy adres URL i wklej go w polu **Sign-in redirect URIs** w Okta.

    ```text theme={null}
    https://app.scribe-mail.com/callbacks/okta
    ```

    <Frame>
      <img src="https://mintcdn.com/scribe/pvZJQ56rCCLLmCwt/integrations/smart-fields/images/okta-step-5.png?fit=max&auto=format&n=pvZJQ56rCCLLmCwt&q=85&s=b154965d8cc00cbecb93b5e680e51f36" alt="Pole identyfikatorów URI przekierowania logowania z adresem URL wywołania zwrotnego Scribe" className="mx-auto" style={{ width:"86%" }} width="1454" height="374" data-path="integrations/smart-fields/images/okta-step-5.png" />
    </Frame>
  </Step>

  <Step title="W sekcji 'Assignments' wybierz 'Allow everyone in your organization to access', a następnie kliknij 'Save'">
    <Frame>
      <img src="https://mintcdn.com/scribe/pvZJQ56rCCLLmCwt/integrations/smart-fields/images/okta-step-6.png?fit=max&auto=format&n=pvZJQ56rCCLLmCwt&q=85&s=670066f0a6ae3eb71f80dfcf35a529cd" alt="Sekcja Assignments z zaznaczoną opcją Allow everyone" className="mx-auto" style={{ width:"85%" }} width="1496" height="374" data-path="integrations/smart-fields/images/okta-step-6.png" />
    </Frame>
  </Step>

  <Step title="Skopiuj i wklej poniżej Client ID">
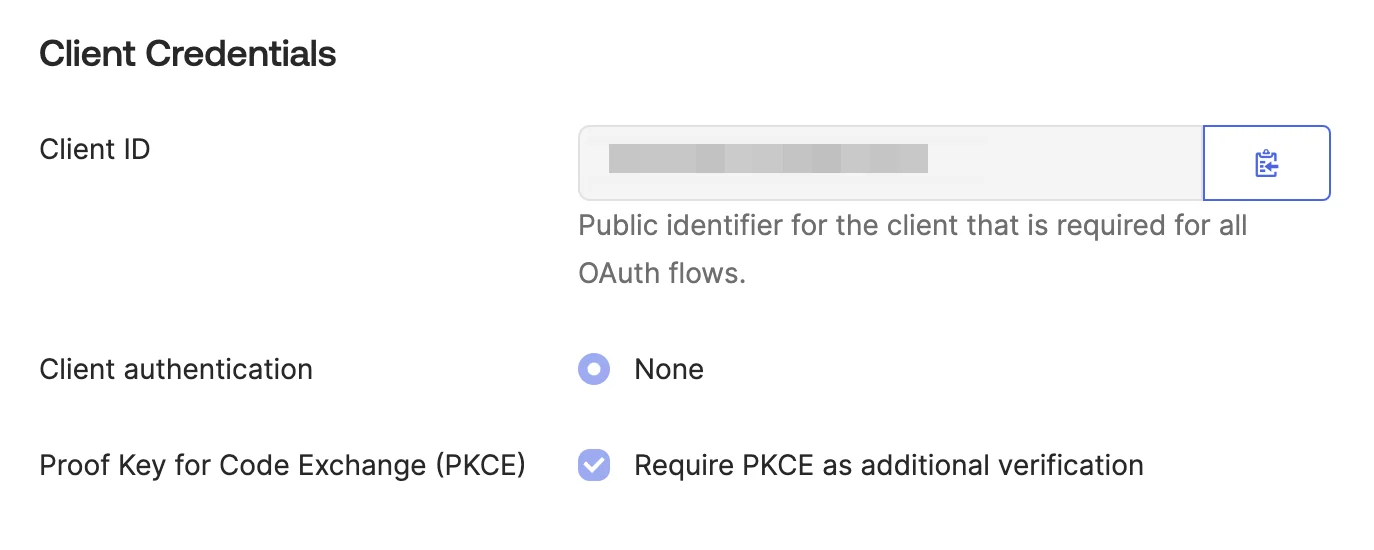
    W sekcji **Client Credentials** skopiuj **Client ID** i wklej go w odpowiednie pole w Scribe.

    <Frame>
      <img src="https://mintcdn.com/scribe/pvZJQ56rCCLLmCwt/integrations/smart-fields/images/okta-step-7.png?fit=max&auto=format&n=pvZJQ56rCCLLmCwt&q=85&s=6c9f393987ed5f0904ab508f235c6a25" alt="Sekcja Client Credentials z widocznym Client ID" className="mx-auto" style={{ width:"75%" }} width="1374" height="550" data-path="integrations/smart-fields/images/okta-step-7.png" />
    </Frame>
  </Step>

  <Step title="Skopiuj i wklej swoją domenę Okta w Scribe">
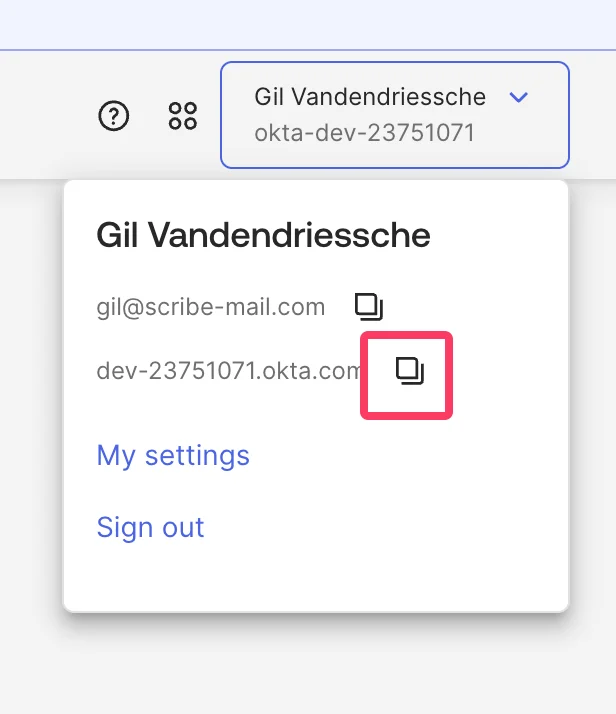
    Kliknij swój profil w prawym górnym rogu konsoli administracyjnej Okta, aby znaleźć swoją domenę Okta (np. `dev-12345678.okta.com`). Skopiuj ją i wklej w pole **Domena** w Scribe.

    <Frame>
      <img src="https://mintcdn.com/scribe/pvZJQ56rCCLLmCwt/integrations/smart-fields/images/okta-step-8.png?fit=max&auto=format&n=pvZJQ56rCCLLmCwt&q=85&s=b25633aff4c4351299767018a8eee320" alt="Rozwijane menu profilu Okta z widoczną domeną Okta" className="mx-auto" style={{ width:"58%" }} width="616" height="714" data-path="integrations/smart-fields/images/okta-step-8.png" />
    </Frame>
  </Step>

  <Step title="Przyznaj dostęp do zakresów okta.users.read i okta.schemas.read">
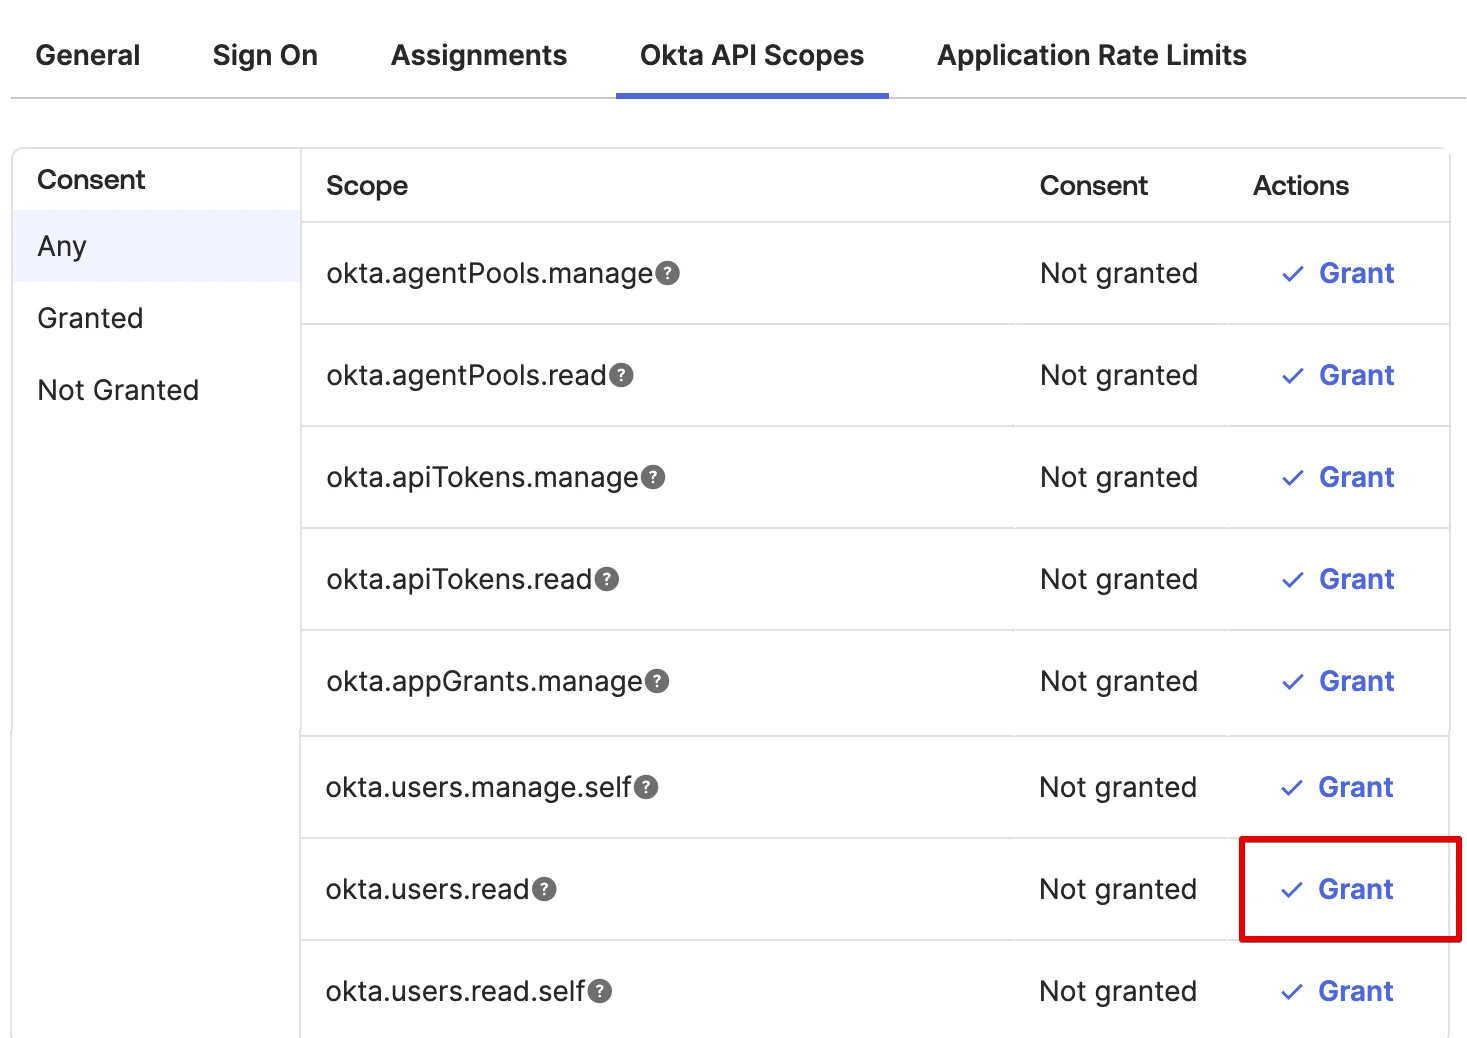
    W swojej aplikacji Okta przejdź do zakładki **Okta API Scopes** i kliknij **Grant** obok `okta.users.read` oraz `okta.schemas.read`.

    <Frame>
      <img src="https://mintcdn.com/scribe/pvZJQ56rCCLLmCwt/integrations/smart-fields/images/okta-step-9.png?fit=max&auto=format&n=pvZJQ56rCCLLmCwt&q=85&s=4d96c026697de4bb987b1c21fbc922d1" alt="Zakładka Okta API Scopes z wyróżnionym przyciskiem Grant przy okta.users.read" className="mx-auto" style={{ width:"81%" }} width="1467" height="1038" data-path="integrations/smart-fields/images/okta-step-9.png" />
    </Frame>
  </Step>

  <Step title="Kliknij 'Connect Okta' poniżej i postępuj zgodnie z instrukcjami w wyskakującym oknie">
    <Frame>
      <img src="https://mintcdn.com/scribe/xbQhr3JjkYildsKM/images/okta-connect-button-in-scribe.png?fit=max&auto=format&n=xbQhr3JjkYildsKM&q=85&s=7841f68b05894b34d2ba074b4bd5cb67" alt="Przycisk Connect Okta w Scribe z monitem instrukcji w wyskakującym oknie" width="1440" height="366" data-path="images/okta-connect-button-in-scribe.png" />
    </Frame>
  </Step>
</Steps>

## Powiązane artykuły

* [Payfit](/pl/integrations/smart-fields/payfit-smart-fields): synchronizuj dane z Payfit ze swoimi podpisami.
* [Rippling](/pl/integrations/smart-fields/rippling-smart-fields): synchronizuj dane z Rippling ze swoimi podpisami.
* [Przypisz członków zespołu do podpisu](/pl/assign-teammates-to-a-signature): użyj warunków Smartfield, aby automatycznie przypisywać podpisy.
