> ## Documentation Index
> Fetch the complete documentation index at: https://help.scribe-mail.com/llms.txt
> Use this file to discover all available pages before exploring further.
# Google Workspace (server-sida)
> Lägg automatiskt till Scribe-signaturer i ditt teams Google Workspace-e-post från alla enheter genom att dirigera utgående post via Scribes säkra servrar.
**Central enklicksinstallation.** Ingen åtgärd krävs av teammedlemmarna. Användarna ser inte signaturerna när de skriver e-post. Dina e-postmeddelanden bearbetas via Scribes säkra servrar för signaturinjektion.
**Plattformar som stöds:** webb, dator, Apple Mail, iOS, Android
## Installationsguide
Det här är en funktion för avancerade användare. IT-support krävs för att konfigurera den här integrationen.
* Användare ser inte signaturer när de skriver ett e-postmeddelande.
* Dina e-postmeddelanden bearbetas via Scribes säkra servrar för att installera signaturer. Scribe kan inte läsa eller redigera dina e-postmeddelanden.
* Du kan kombinera [molnbaserad integration](/sv/integrations/signatures/google-workspace-client-side) med integration på serversidan. Om båda är anslutna använder Scribe som standard molnbaserad integration så att användarna kan se sina signaturer när de skriver e-post.
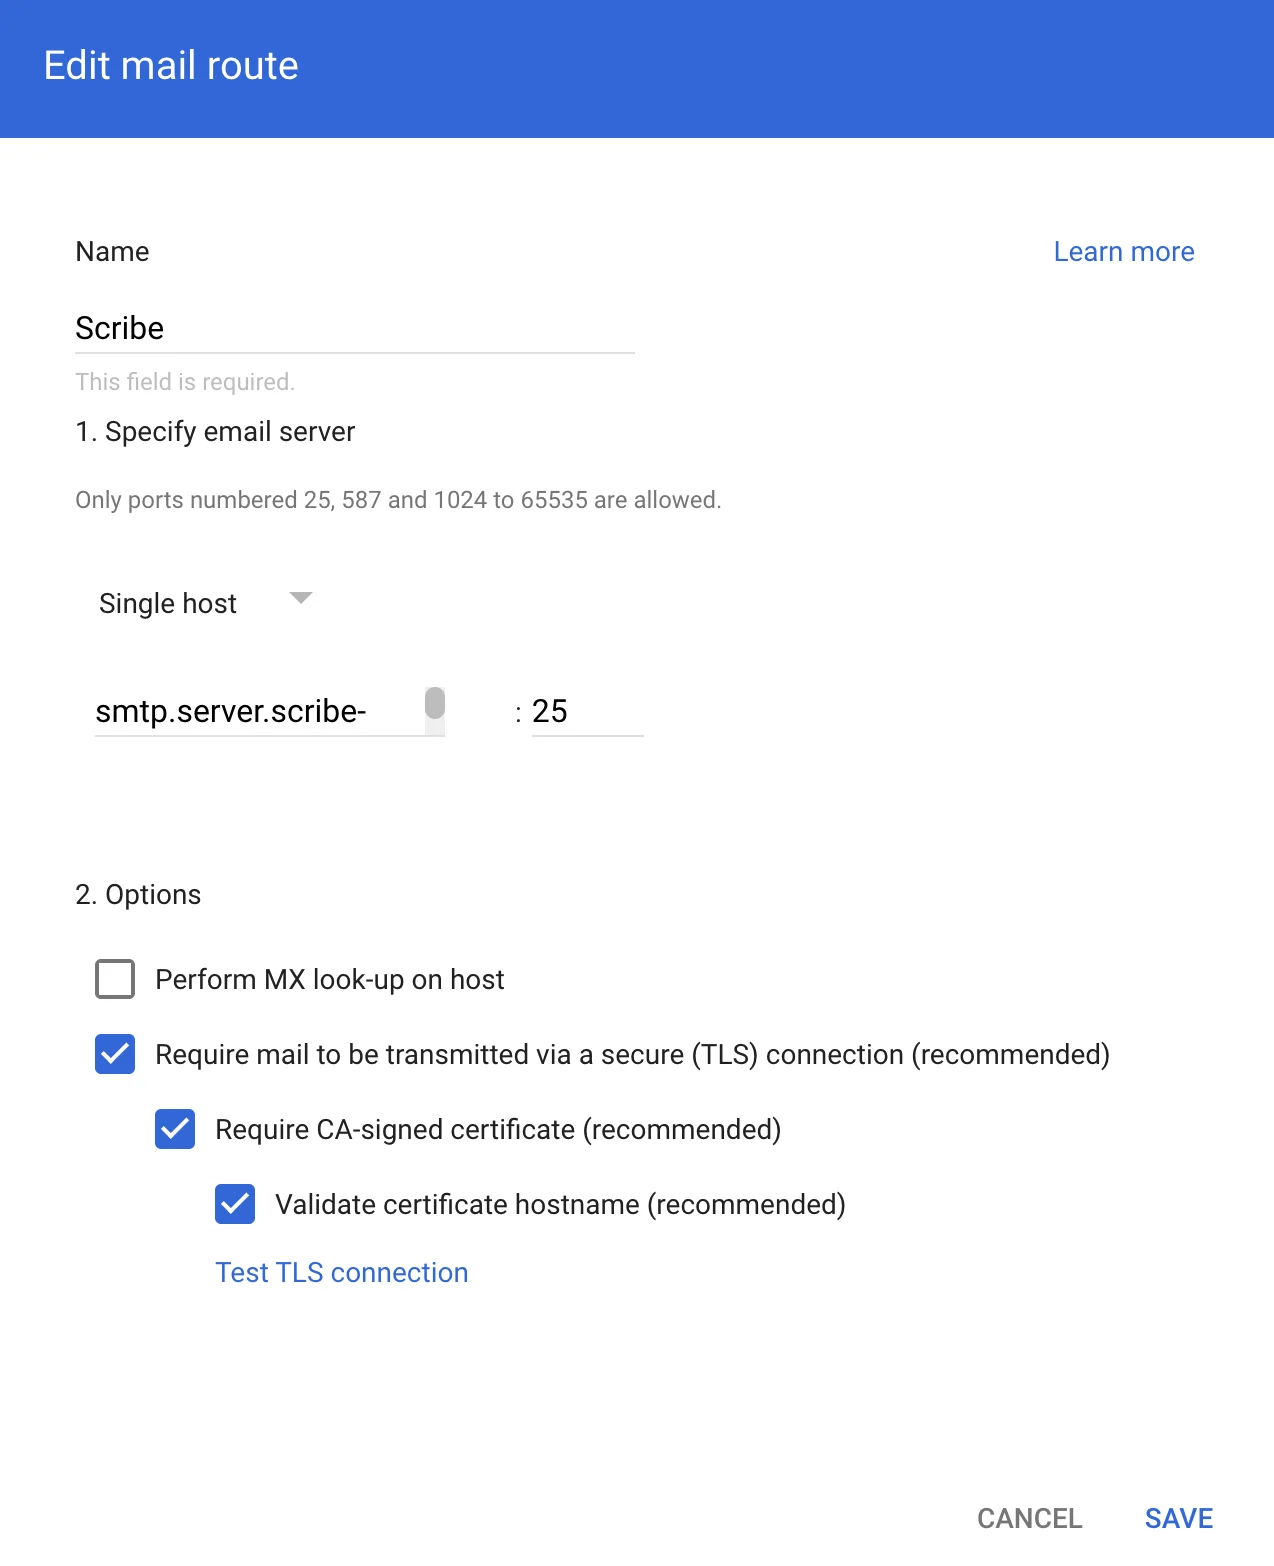
För att dirigera e-post via Scribes säkra servrar, skapa en värd i Google Workspace Gmail. I Google Admin, gå till **Appar → Google Workspace → Gmail** och klicka sedan på 'Hosts'.
 Fyll i formuläret med följande uppgifter:
**a. Namn:** Scribe
**b. Välj:** "Single host"
**c. Värdnamn eller IP:**
```text theme={null}
smtp.server.scribe-mail.com
```
**d. Port:** 25
**e. Välj:** alternativen som på skärmbilden nedan
Fyll i formuläret med följande uppgifter:
**a. Namn:** Scribe
**b. Välj:** "Single host"
**c. Värdnamn eller IP:**
```text theme={null}
smtp.server.scribe-mail.com
```
**d. Port:** 25
**e. Välj:** alternativen som på skärmbilden nedan
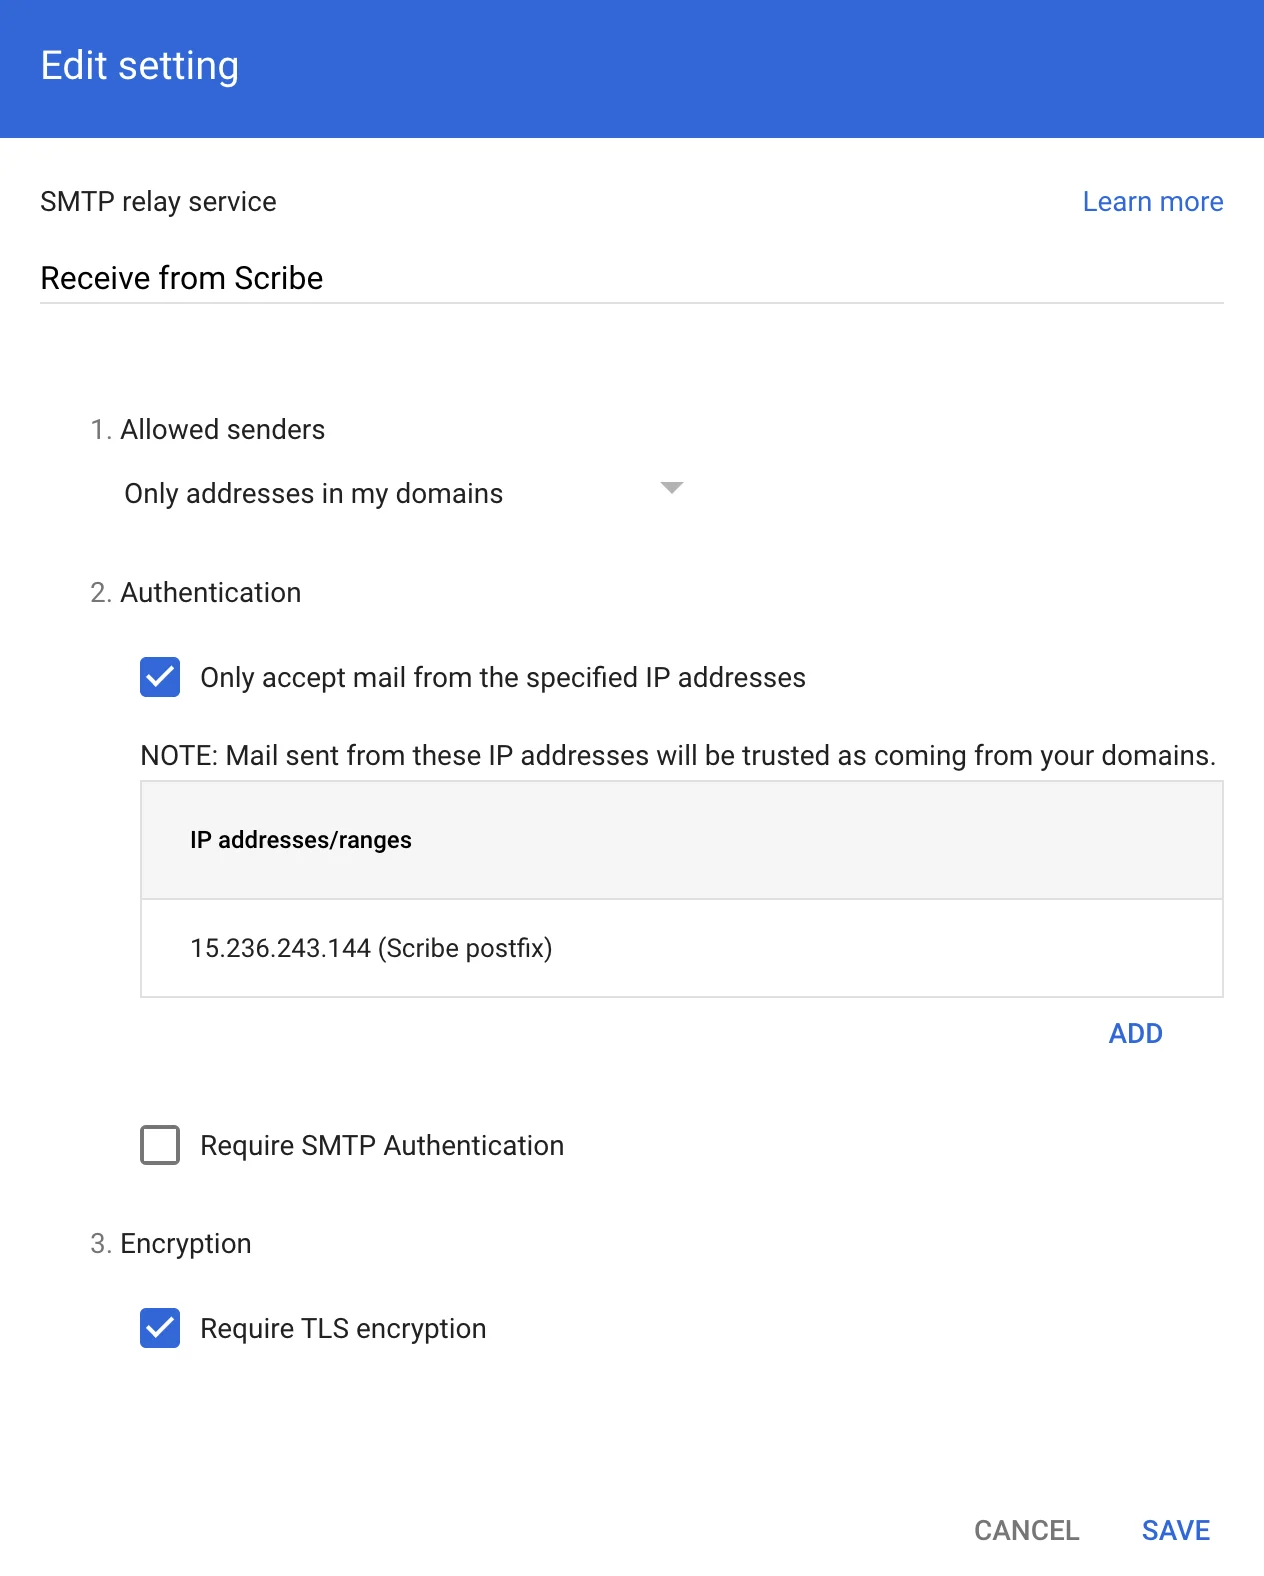
 För att ta emot e-post tillbaka från Scribe för vidarebefordran till mottagarna, gå till **Appar → Google Workspace → Gmail** i Google Admin och klicka sedan på 'Routing'.
 På nästa sida klickar du på **Configure** under "SMTP relay service".
 Fyll i formuläret med följande information:
**a. Description:** Receive from Scribe
**b. Authentication:** Markera "Only accept mail from the specified IP addresses" och lägg till:
```text theme={null}
15.236.243.144
```
och
```text theme={null}
51.44.50.107
```
**c. Markera:** "Require TLS encryption"
**d. Klicka på:** "Save"
Fyll i formuläret med följande information:
**a. Description:** Receive from Scribe
**b. Authentication:** Markera "Only accept mail from the specified IP addresses" och lägg till:
```text theme={null}
15.236.243.144
```
och
```text theme={null}
51.44.50.107
```
**c. Markera:** "Require TLS encryption"
**d. Klicka på:** "Save"
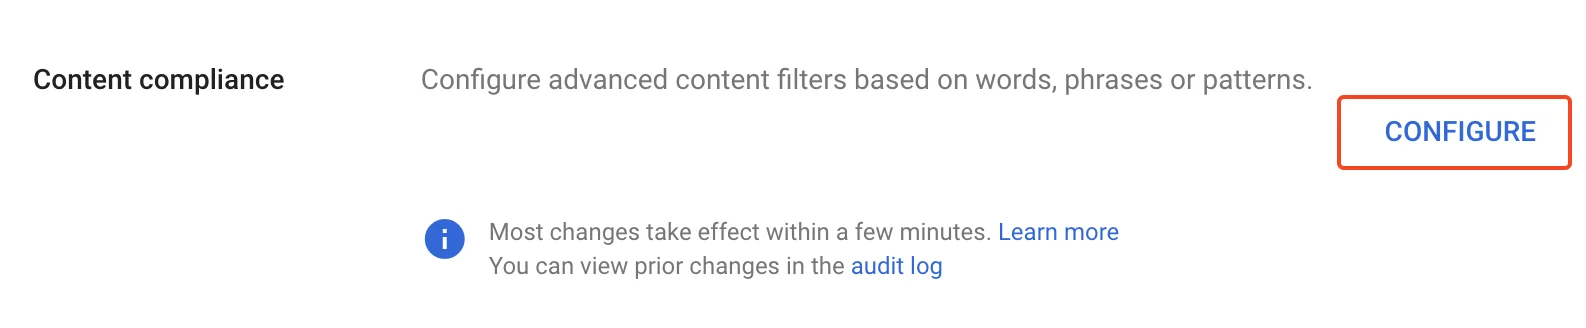
 I Google Admin går du till **Apps → Google Workspace → Gmail** och klickar sedan på 'Compliance'.
 På nästa sida klickar du på **Configure** under "Content compliance".
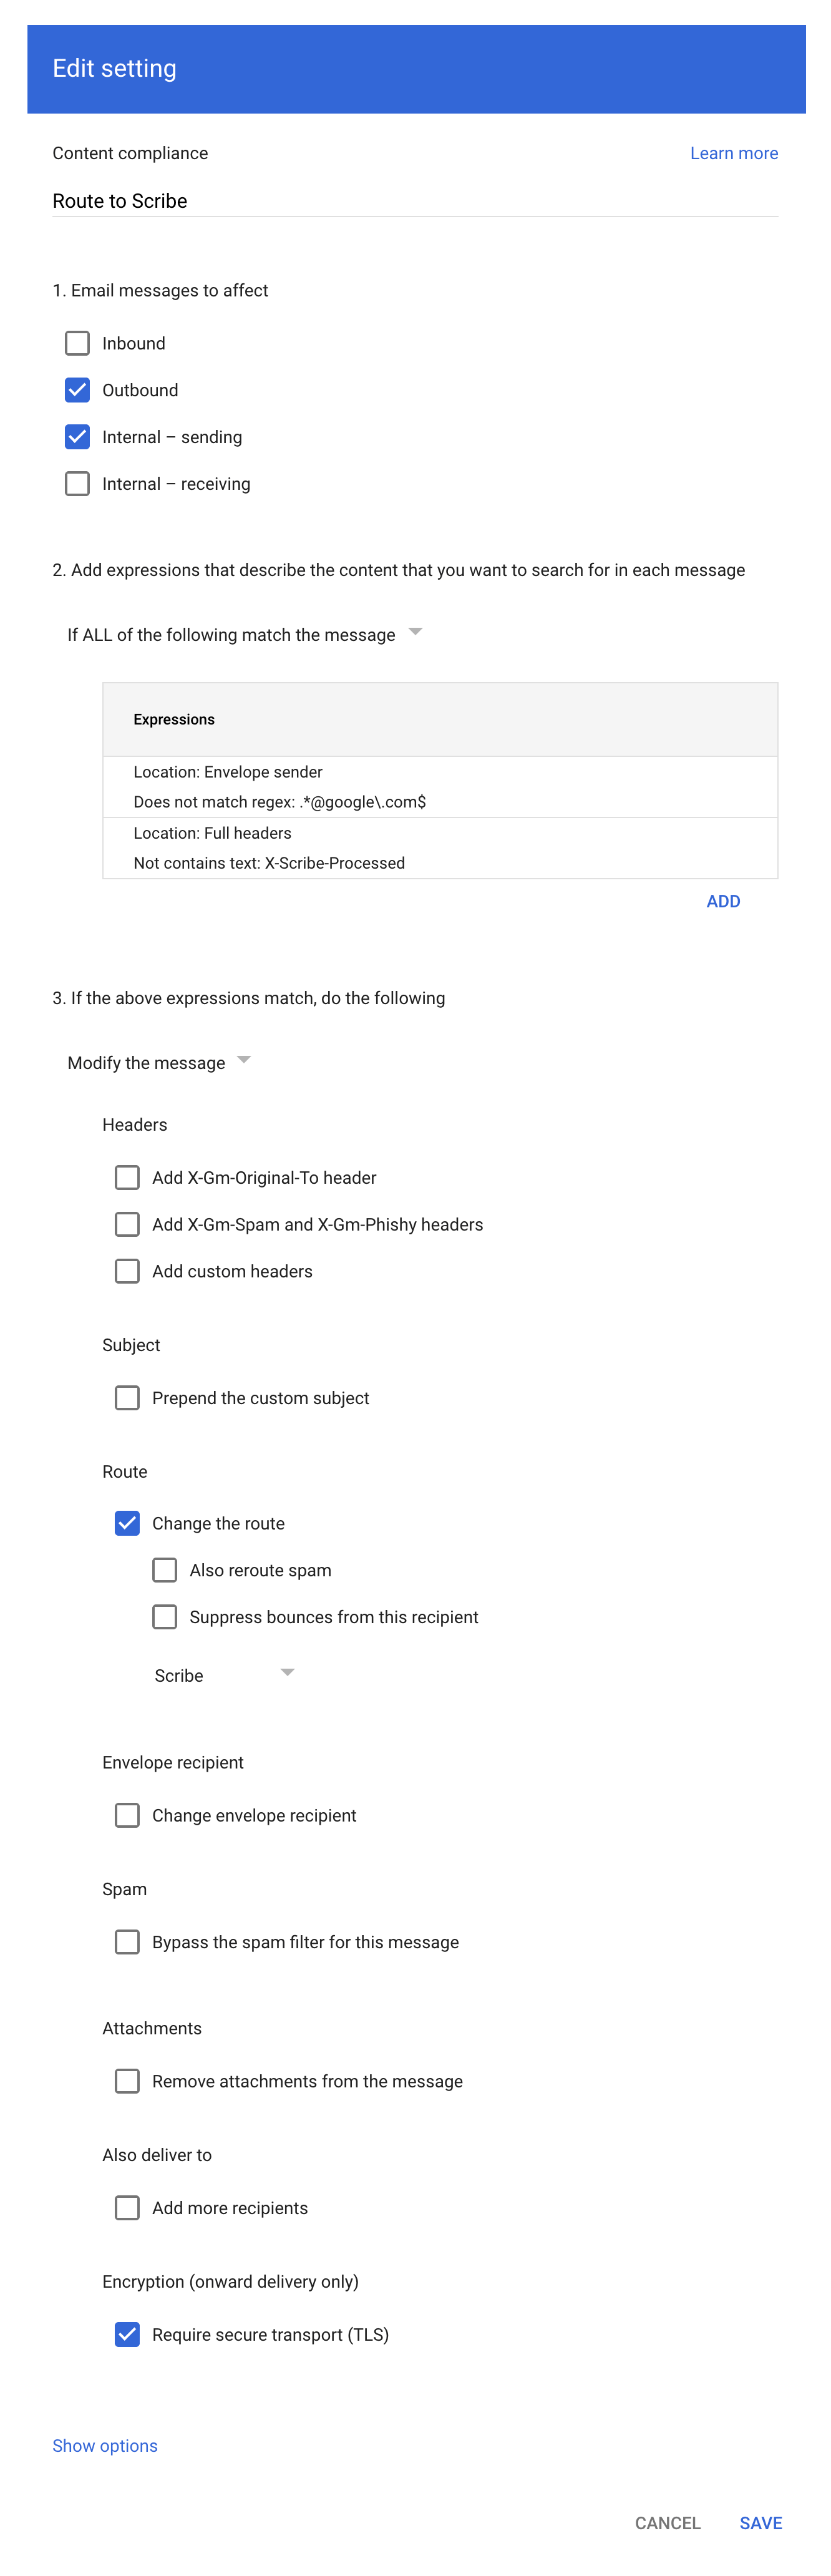
 Fyll i formuläret enligt skärmbilden:
**a. Description:** Route to Scribe
**b. Markera:** "Outbound" och "Internal - sending" under "Email messages to affect"
**c. I den andra konfigurationsposten ("Add expressions…"),** ställ in matchningen till **"If ALL of the following match the message"**, klicka sedan på **ADD** och lägg till dessa två Advanced content match-uttryck:
* Location: Full headers, Match type: Does not contain text, Content: `X-Scribe-Processed` — förhindrar att din e-post bearbetas flera gånger.
* Location: Envelope sender, Match type: Does not match regex, Regexp: `.*@google\.com$` — utesluter systemmeddelanden som kvitton från Google Forms (från [forms-receipts-noreply@google.com](mailto:forms-receipts-noreply@google.com)), vilka Googles SMTP-relä avvisar om de dirigeras genom Scribe.
**d. I den tredje konfigurationsposten** ändrar du rutten till värden som du skapade i del 1 av den här guiden.
**e. Välj:** "Require secure transport (TLS)"
**f. Klicka:** "Save"
Fyll i formuläret enligt skärmbilden:
**a. Description:** Route to Scribe
**b. Markera:** "Outbound" och "Internal - sending" under "Email messages to affect"
**c. I den andra konfigurationsposten ("Add expressions…"),** ställ in matchningen till **"If ALL of the following match the message"**, klicka sedan på **ADD** och lägg till dessa två Advanced content match-uttryck:
* Location: Full headers, Match type: Does not contain text, Content: `X-Scribe-Processed` — förhindrar att din e-post bearbetas flera gånger.
* Location: Envelope sender, Match type: Does not match regex, Regexp: `.*@google\.com$` — utesluter systemmeddelanden som kvitton från Google Forms (från [forms-receipts-noreply@google.com](mailto:forms-receipts-noreply@google.com)), vilka Googles SMTP-relä avvisar om de dirigeras genom Scribe.
**d. I den tredje konfigurationsposten** ändrar du rutten till värden som du skapade i del 1 av den här guiden.
**e. Välj:** "Require secure transport (TLS)"
**f. Klicka:** "Save"
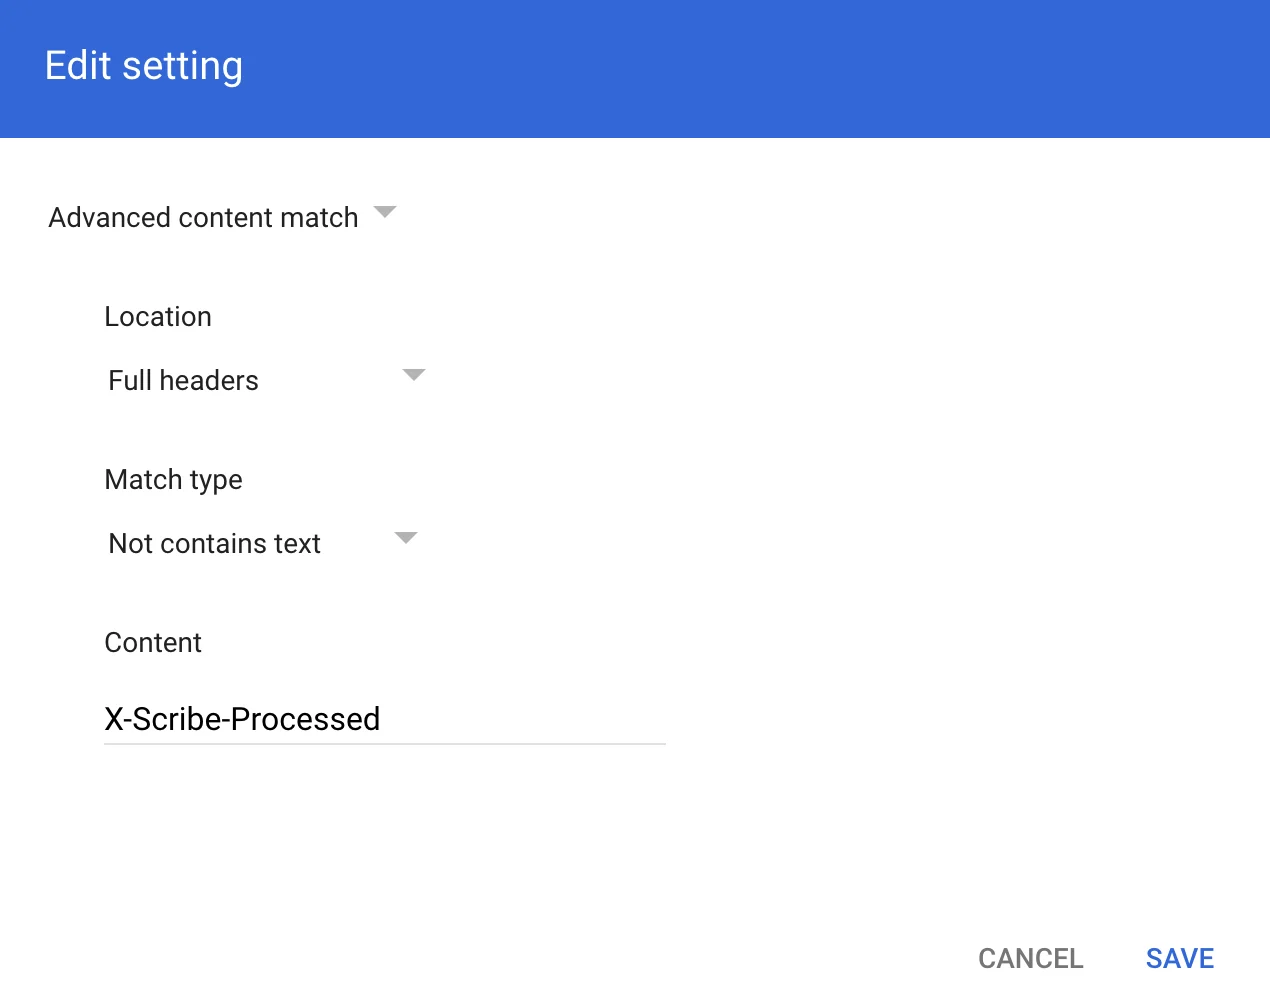
 I dialogrutan Compliance rule expression lägger du till informationen enligt skärmbilden:
Advanced content match:
* **Location:** Full headers
* **Match type:** Not contains text
* **Content:** X-Scribe-Processed
I dialogrutan Compliance rule expression lägger du till informationen enligt skärmbilden:
Advanced content match:
* **Location:** Full headers
* **Match type:** Not contains text
* **Content:** X-Scribe-Processed
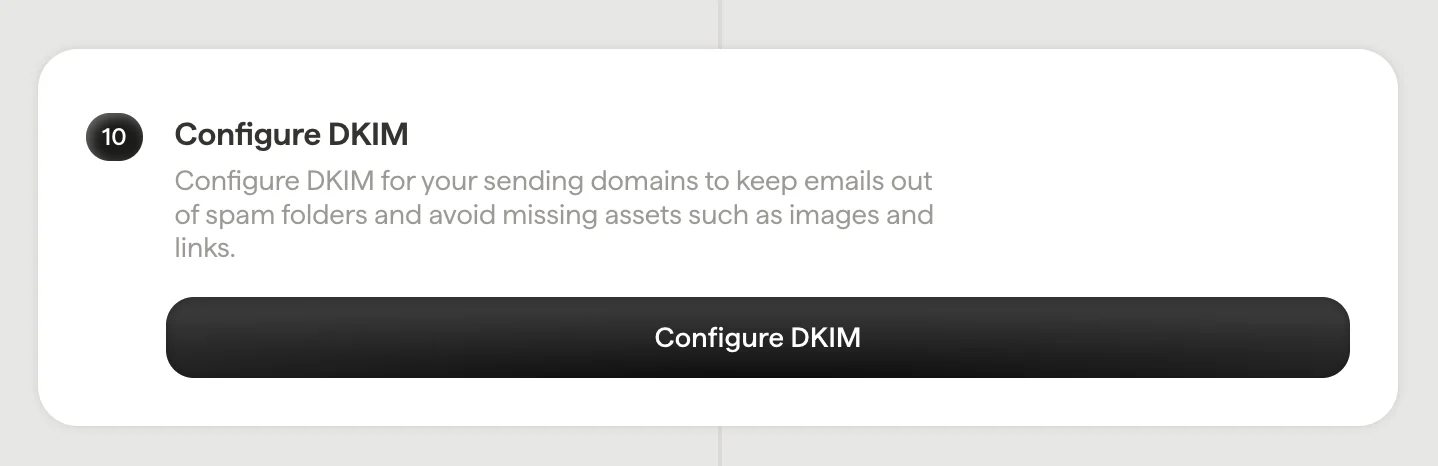
 Konfigurera DKIM för dina [avsändardomäner](/sv/configure-your-sending-domain) så att e-postmeddelanden inte hamnar i skräppostmappen och så att resurser som bilder och länkar inte saknas.
Klicka på **Konfigurera DKIM** i Scribe för att starta konfigurationen.
Konfigurera DKIM för dina [avsändardomäner](/sv/configure-your-sending-domain) så att e-postmeddelanden inte hamnar i skräppostmappen och så att resurser som bilder och länkar inte saknas.
Klicka på **Konfigurera DKIM** i Scribe för att starta konfigurationen.
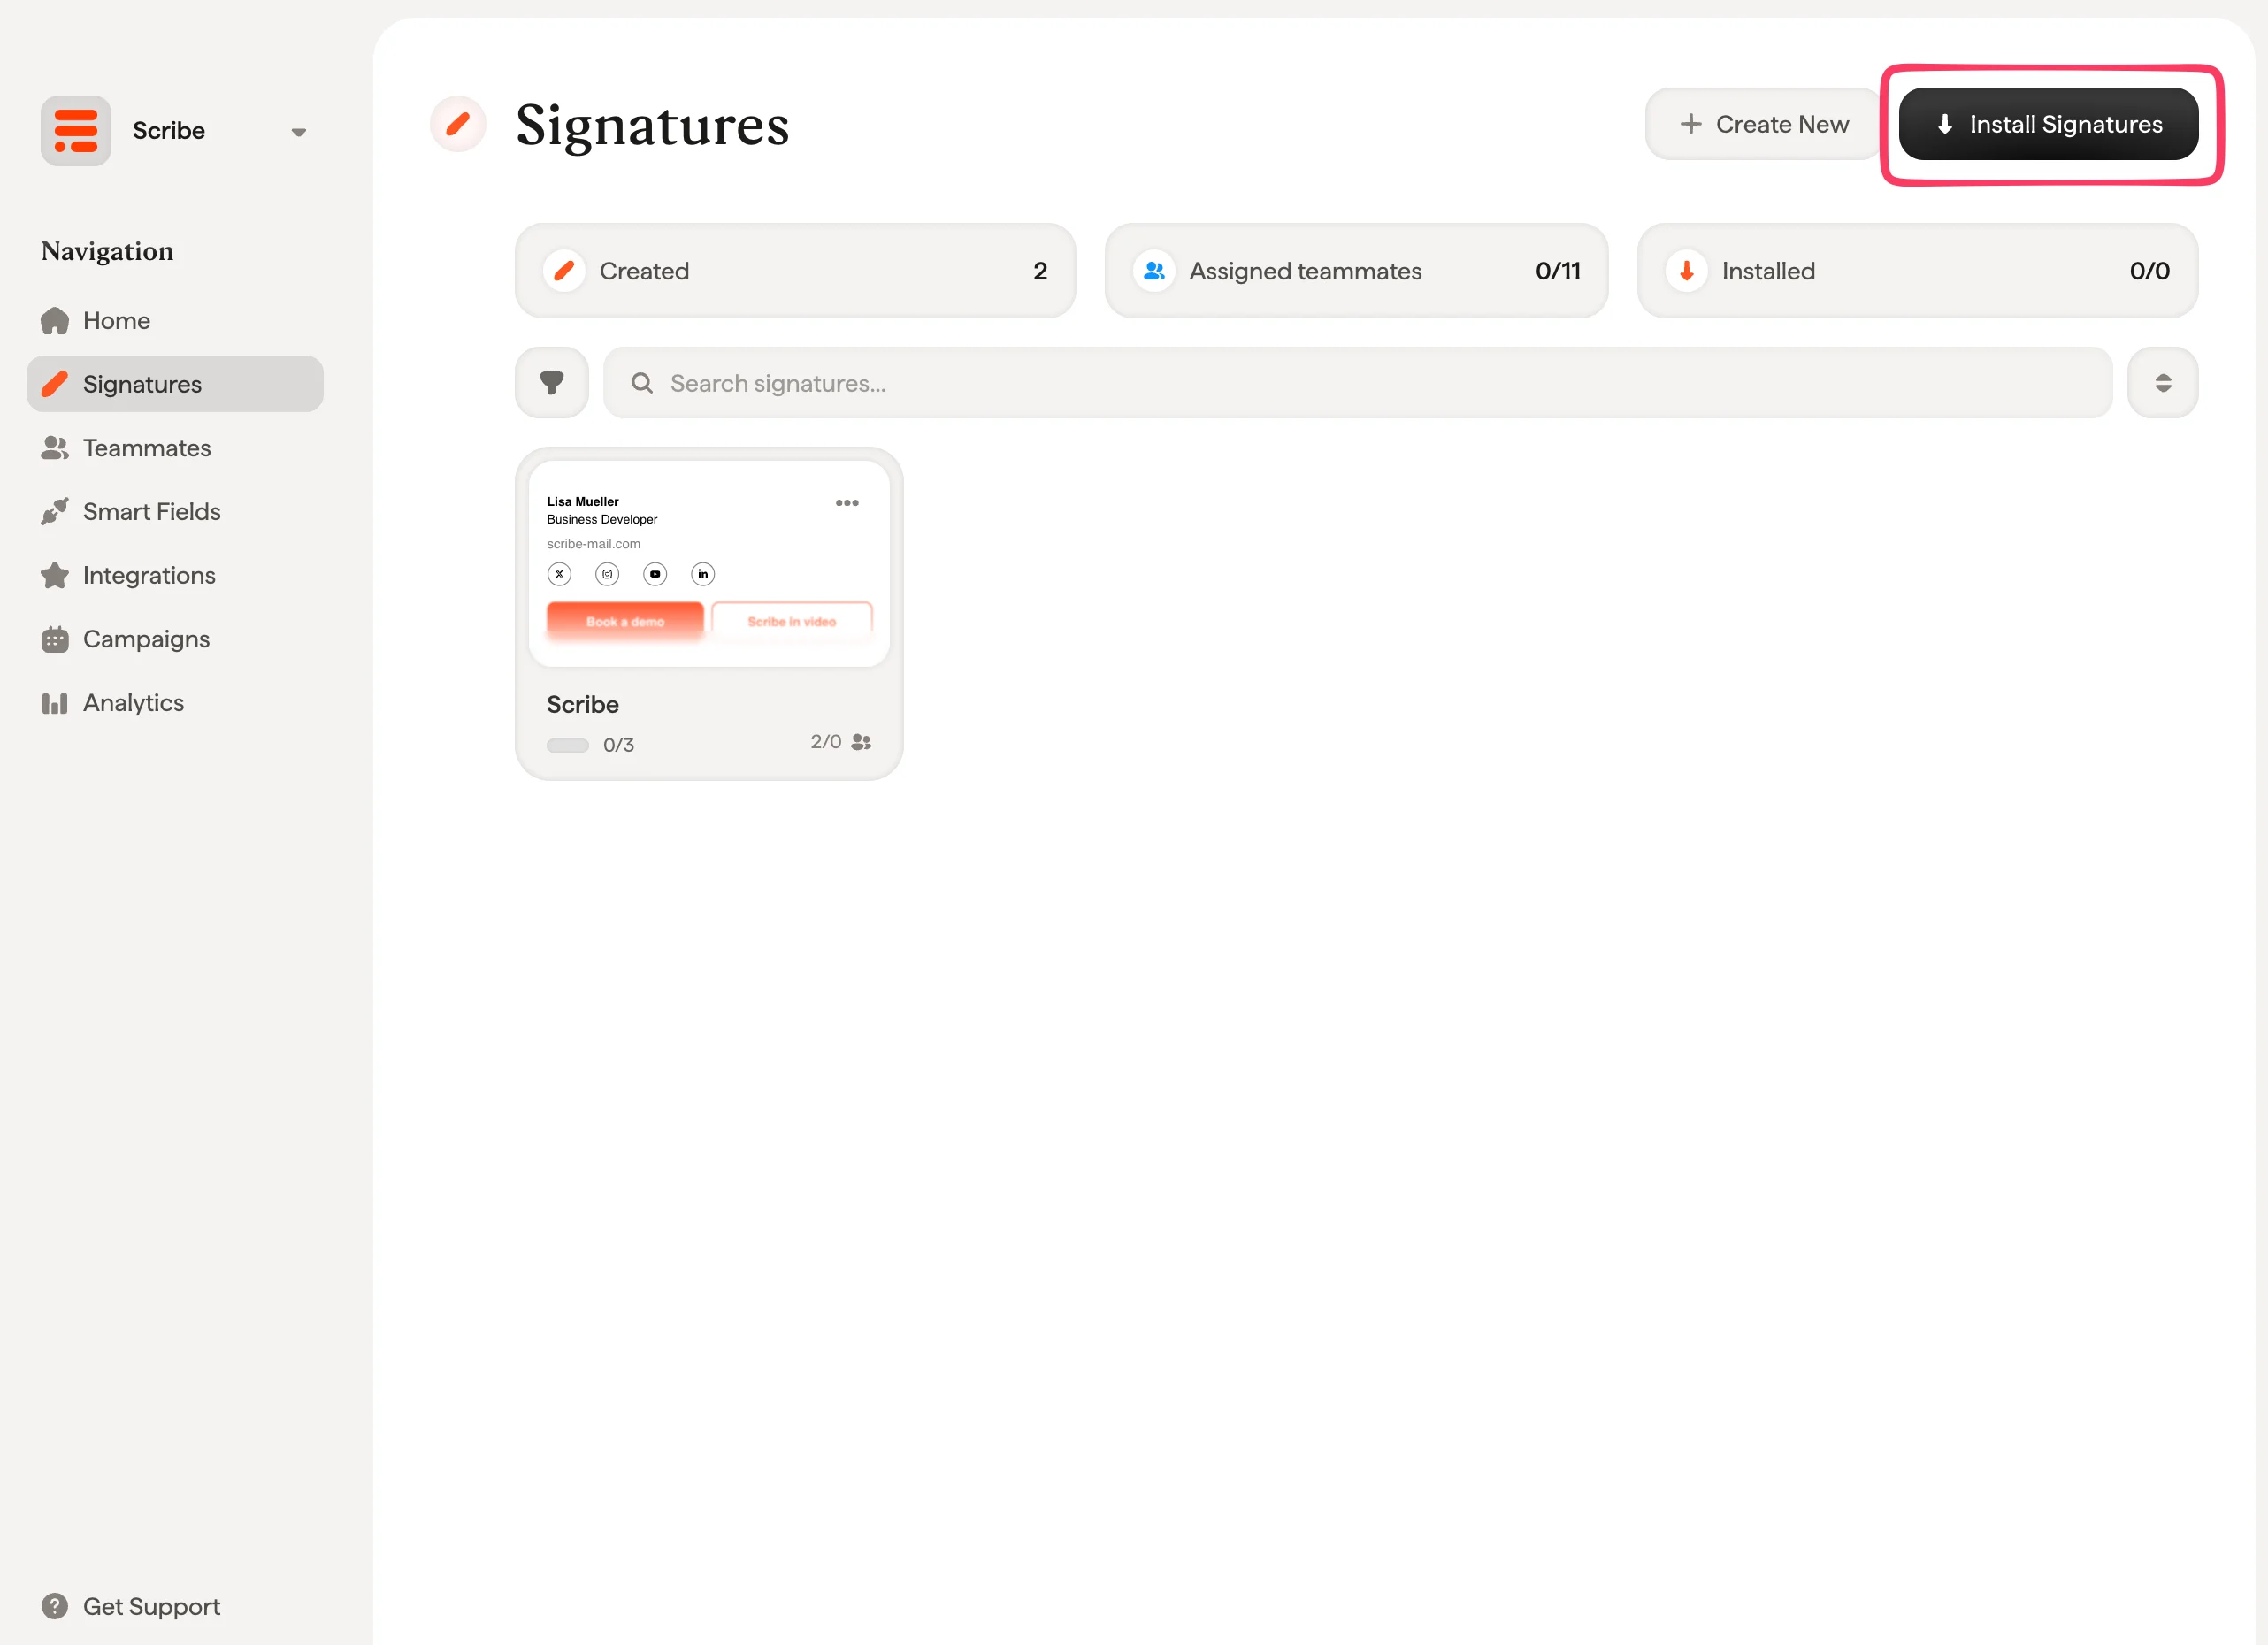
 Från din signaturlista kan du [installera alla signaturer på en gång för dina teammedlemmar](/sv/install-signatures) eller installera dem en i taget för en stegvis utrullning.
 ## Relaterade artiklar
* [Översikt över integrationer](/sv/integrations-overview): alla sätt att distribuera Scribe-signaturer, i molnet eller på serversidan.
* [Microsoft 365 (serversidan)](/sv/integrations/signatures/microsoft-365-server-side): dirigera e-post via Scribe för täckning på alla enheter.
* [Signaturvarianter](/sv/signature-variants): svars- och interna varianter för Outlook och serversidan.
## Relaterade artiklar
* [Översikt över integrationer](/sv/integrations-overview): alla sätt att distribuera Scribe-signaturer, i molnet eller på serversidan.
* [Microsoft 365 (serversidan)](/sv/integrations/signatures/microsoft-365-server-side): dirigera e-post via Scribe för täckning på alla enheter.
* [Signaturvarianter](/sv/signature-variants): svars- och interna varianter för Outlook och serversidan.