

一元化されたワンクリックインストール。 チームメンバーの操作は不要です。ユーザーがメール作成中に署名を確認することはありません。メールはScribeのセキュアなサーバーを経由して署名が挿入されます。
対応プラットフォーム: Web、デスクトップ、Apple Mail、iOS、Android
仕組み
サーバーサイドのインストールは、メールのルーティングを変更するもので、チームメンバーのメールボックスには手を加えません。各自の端末には何もインストールされず、メールクライアントにアドインも常駐しません。以下の設定により、送信メールの経路にワンホップを追加し、メッセージが転送中に署名を挿入します。- チームメンバーがメールを送信します。 Exchange Online は、使用されたクライアントやデバイスを問わずメールを受け付けるため、Web、デスクトップ、Apple Mail、iOS、Android のいずれにも同じルールが適用されます。チームメンバーのメールボックスを介して送信するツールも対象となります。HubSpot のセールスメールや、メールボックスに接続されたその他の CRM・シーケンサーは、追加設定なしで署名を取得します。ただし、差出人アドレスが、署名をインストール済みのチームメンバーのものである必要があります。HubSpot のマーケティングメールのように、Exchange Online を介さず独自のサーバーから送信するツールは、このルールに到達せず、署名は付与されません。
- Exchange Online がメッセージを Scribe にルーティングします。 以下で作成するメールフロールールが、組織内にいる送信者を照合し、送信コネクタへリダイレクトします。送信コネクタは、TLS 経由でスマートホスト
smtp.server.scribe-mail.comにルーティングします。 - Scribe が署名を追加します。 Scribe は、公開されているチームメンバーの署名を挿入し、文脈に応じた適切なバリアントを選択します。その後、変更後も認証が通るようメッセージを再署名し、
X-Scribe-Processedヘッダーを付与します。 - メッセージが Exchange Online に戻ります。 Scribe は受信コネクタ経由でメッセージを返します。受信コネクタは、Scribe の 2 つの IP アドレスからの接続のみを受け付けるよう構成されています。
- Exchange Online が配信します。
X-Scribe-Processedヘッダーがルールの例外条件に一致するため、ルールが再度発動することはなく、メッセージは他のメッセージと同様に受信者へ送信されます。
X-Scribe-Processed、リレーにメッセージの返送先を指示するルーティングヘッダー、更新された DKIM-Signature、ARC チェーン、そして書き換え後の本文に対応する Content-Type です。宛先、件名、添付ファイル、およびチームメンバーが記載した本文はそのまま引き継がれます。
インストールガイド
前提条件
- Microsoft 365 の管理者アクセス(Exchange 管理センター)
- Scribe で作成済みの署名が1件以上あること
1
送信コネクタを作成
メールを Scribe のセキュアなサーバー経由でルーティングするため、Exchange 管理センターで送信コネクタを作成します。Exchange 管理画面で メールフロー → コネクタ に移動し、“Add a connector.” をクリックしてください。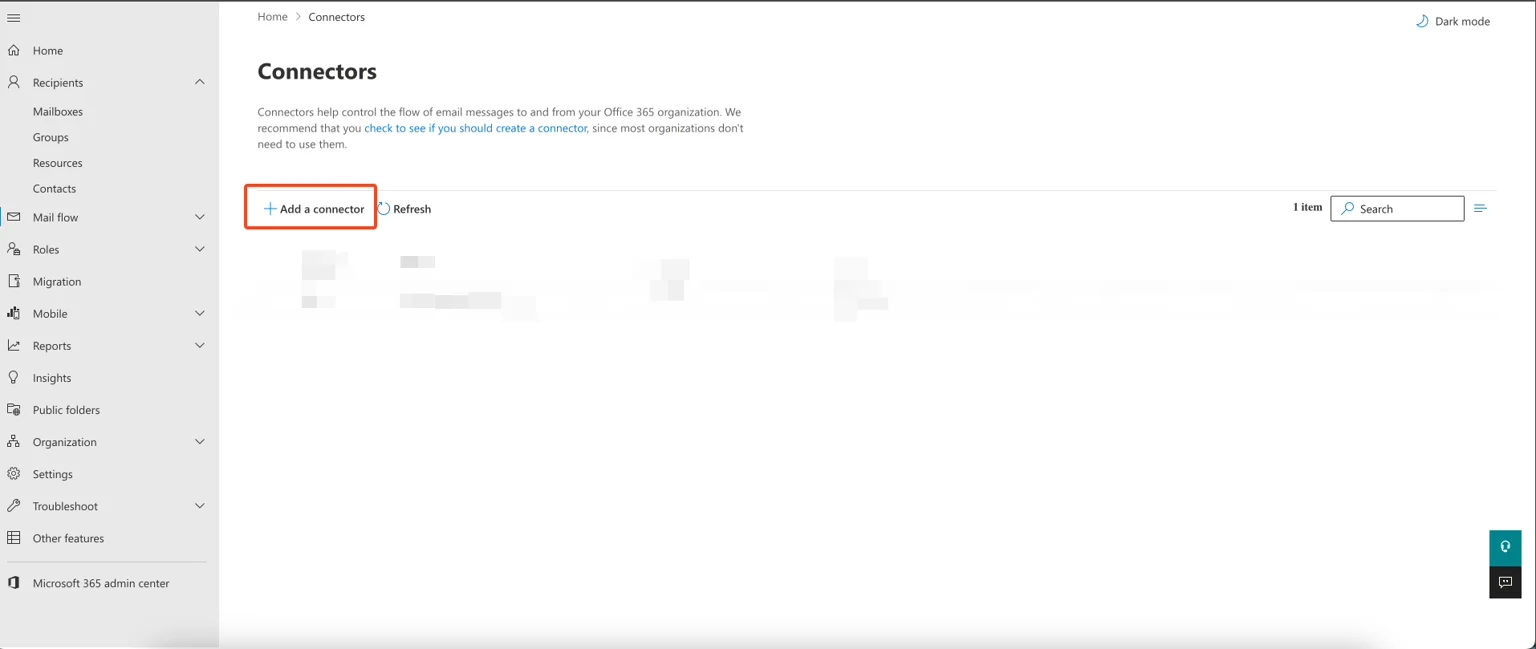
Exchange 管理:コネクタページ
2
接続タイプを選択
接続元に “Office 365”、接続先に “Partner organization” を選択します。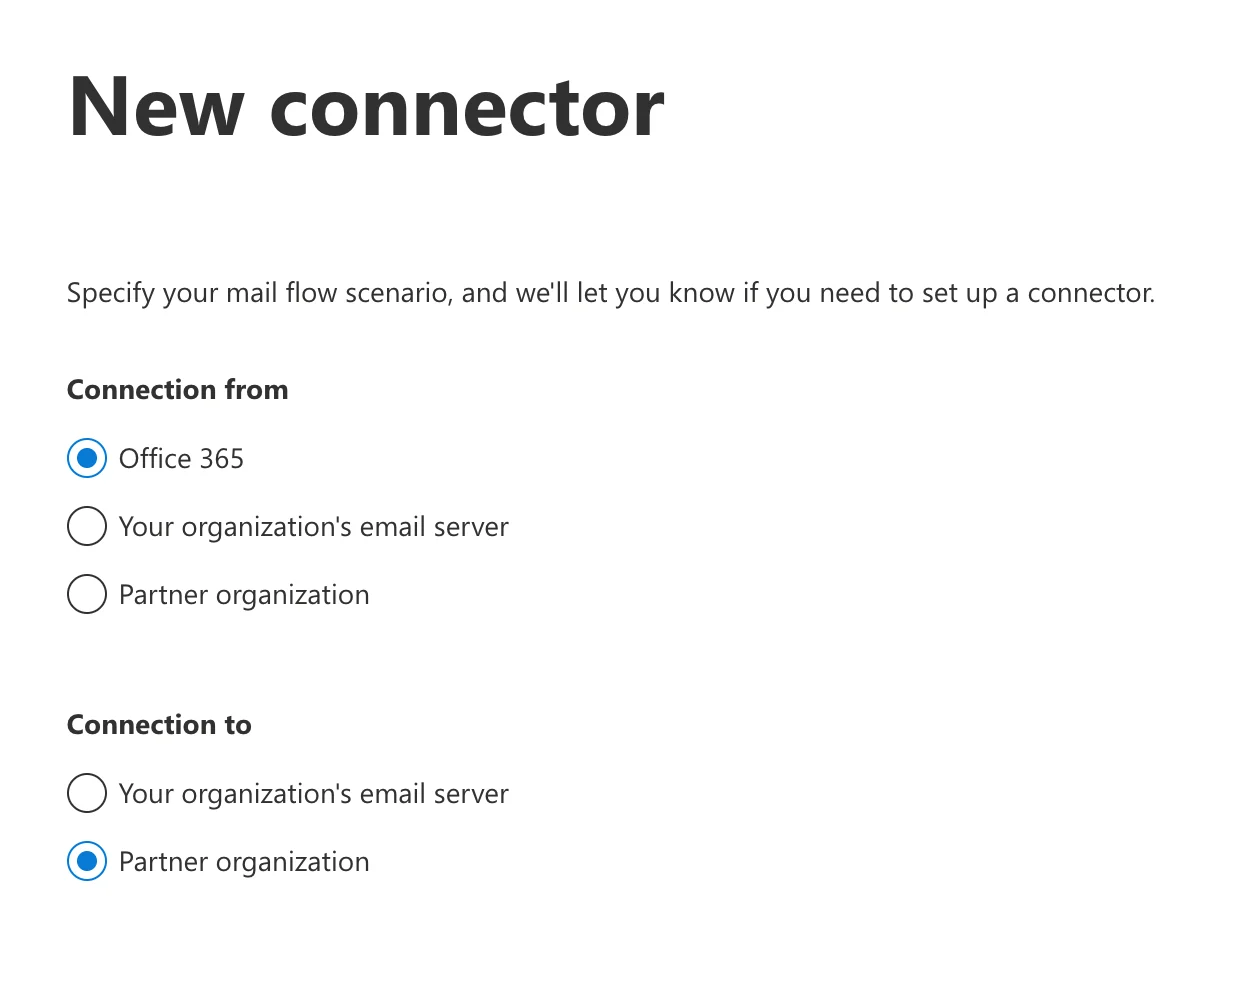
新規コネクタ:接続タイプの選択
3
コネクタの詳細を設定
コネクタ名と説明を入力します。すぐに有効化する場合は “Turn it on” にチェックを入れてください。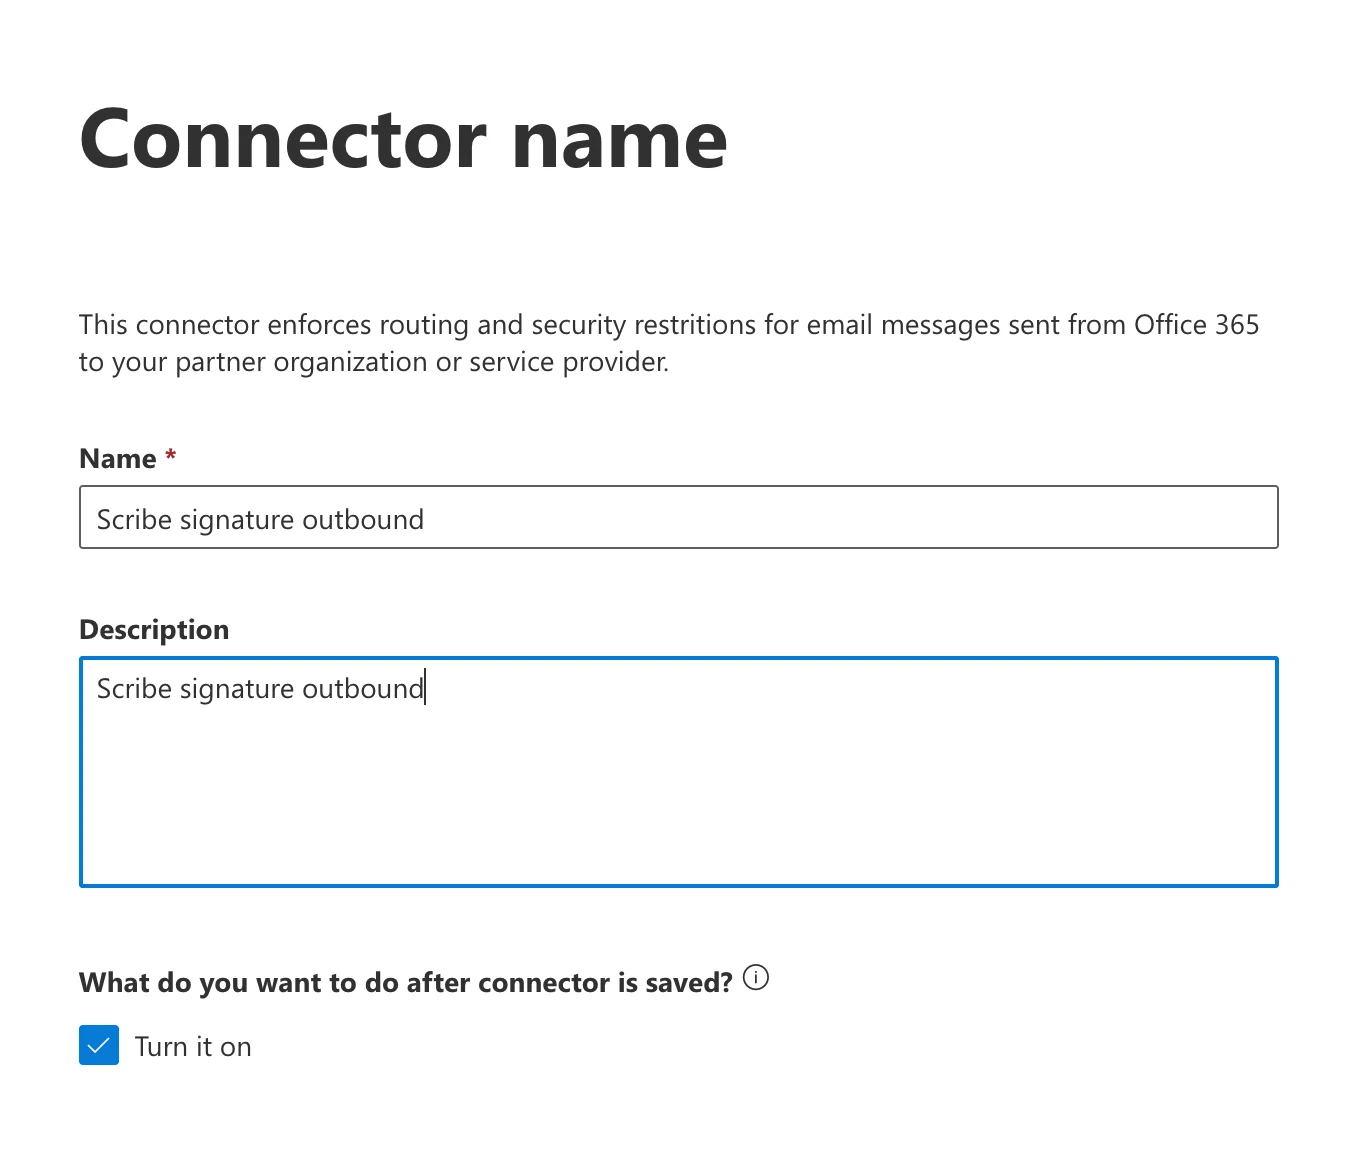
- 名前:
Scribe signature outbound - 説明:
Scribe signature outbound
コネクタ名と説明
4
コネクタの使用方法を選択
“Only when I have a transport rule set up that redirects messages to this connector.” を選択します。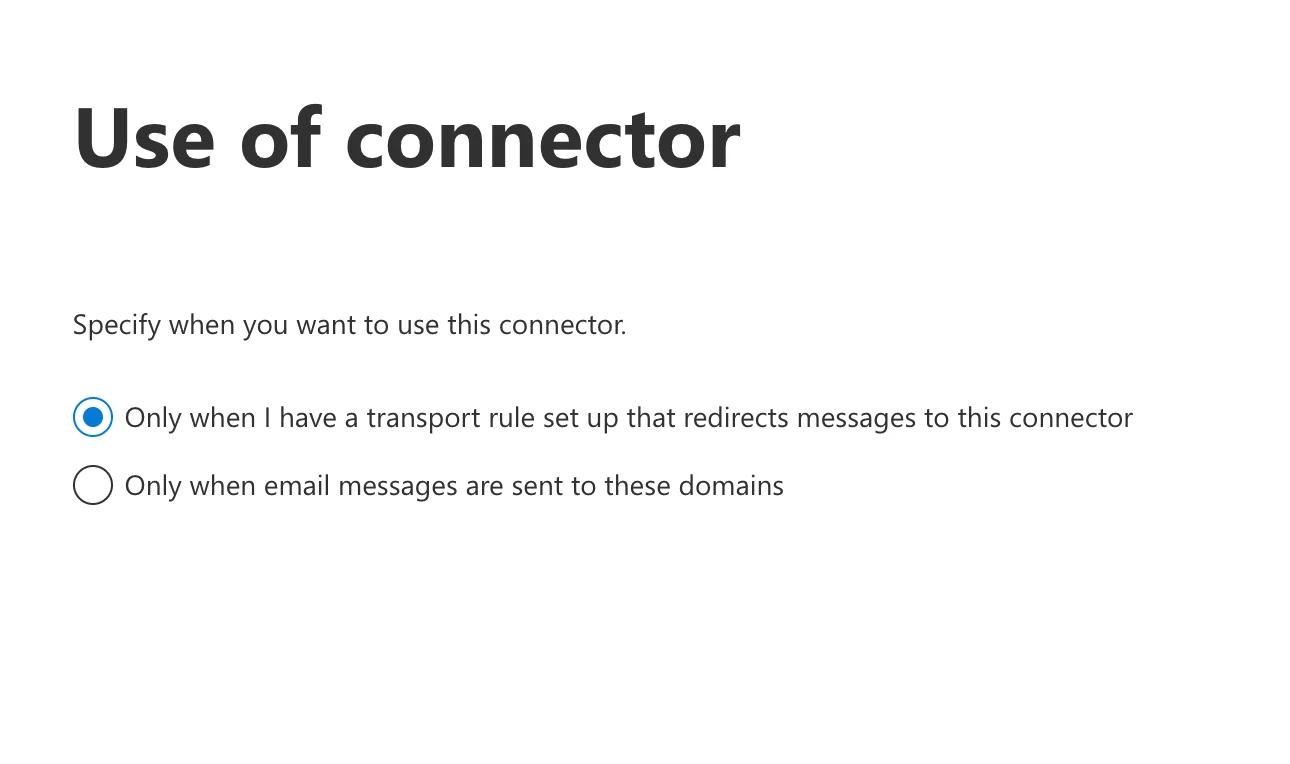
コネクタの用途の選択
5
ルーティングを設定
“Route email through these smart hosts” を選択し、次のホストをリストに追加してください: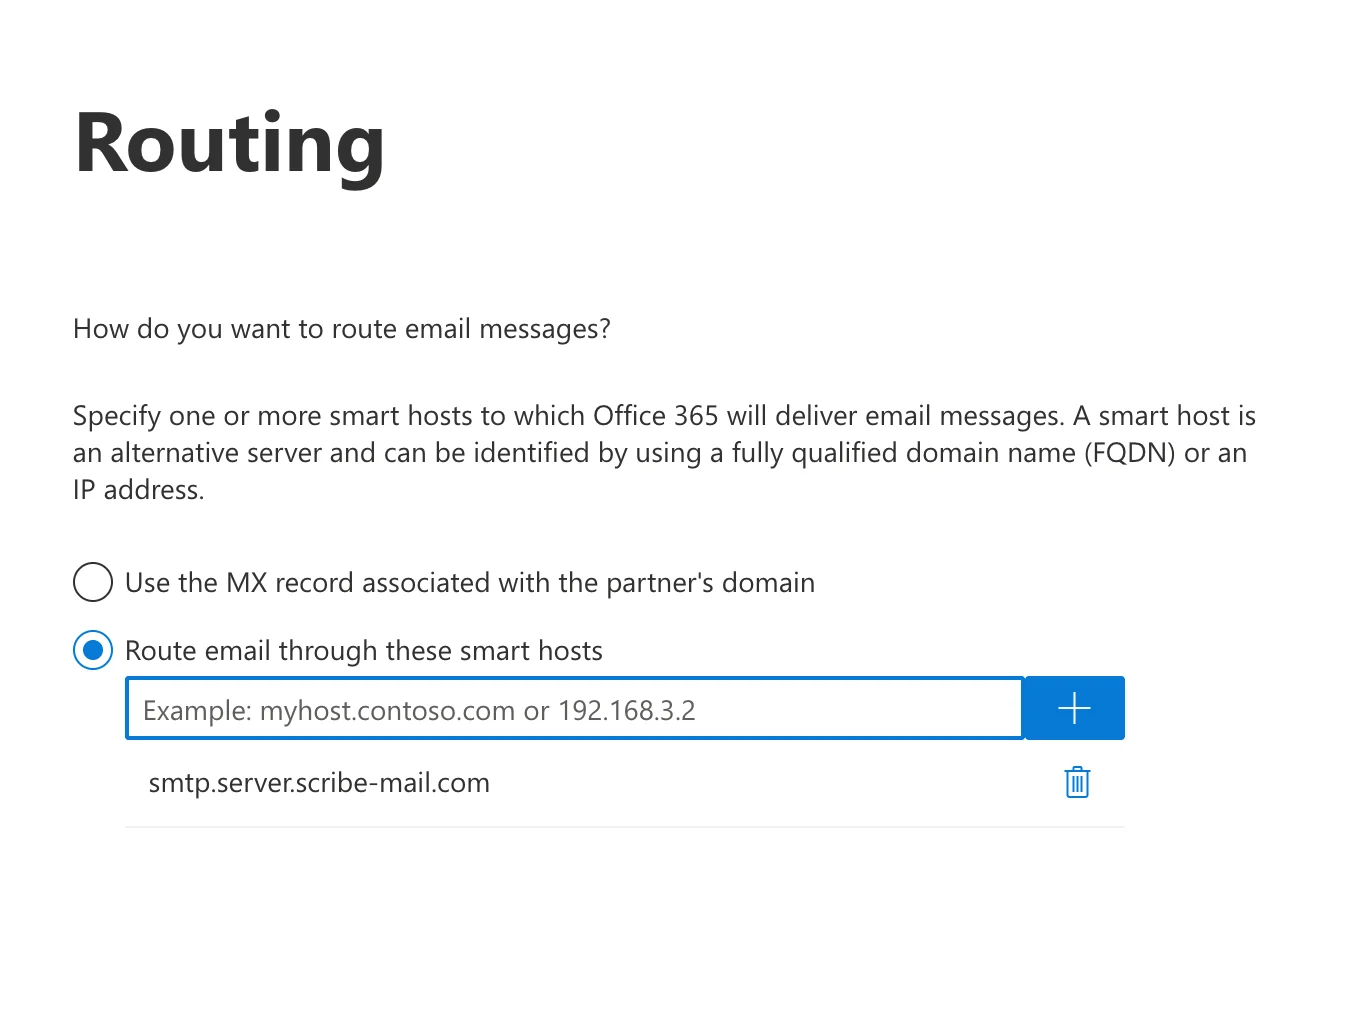
Scribe のスマートホストによるルーティング設定
6
セキュリティ制限を設定
“Always use Transport Layer Security (TLS) to secure the connection (recommended)” を選択し、次を行ってください:a. 次を選択します:“Issued by a trusted certificate authority (CA).”b. 次にチェックを入れます:“Add the subject name or subject alternative name (SAN) matches this domain name.”c. フィールドに次の値を入力します: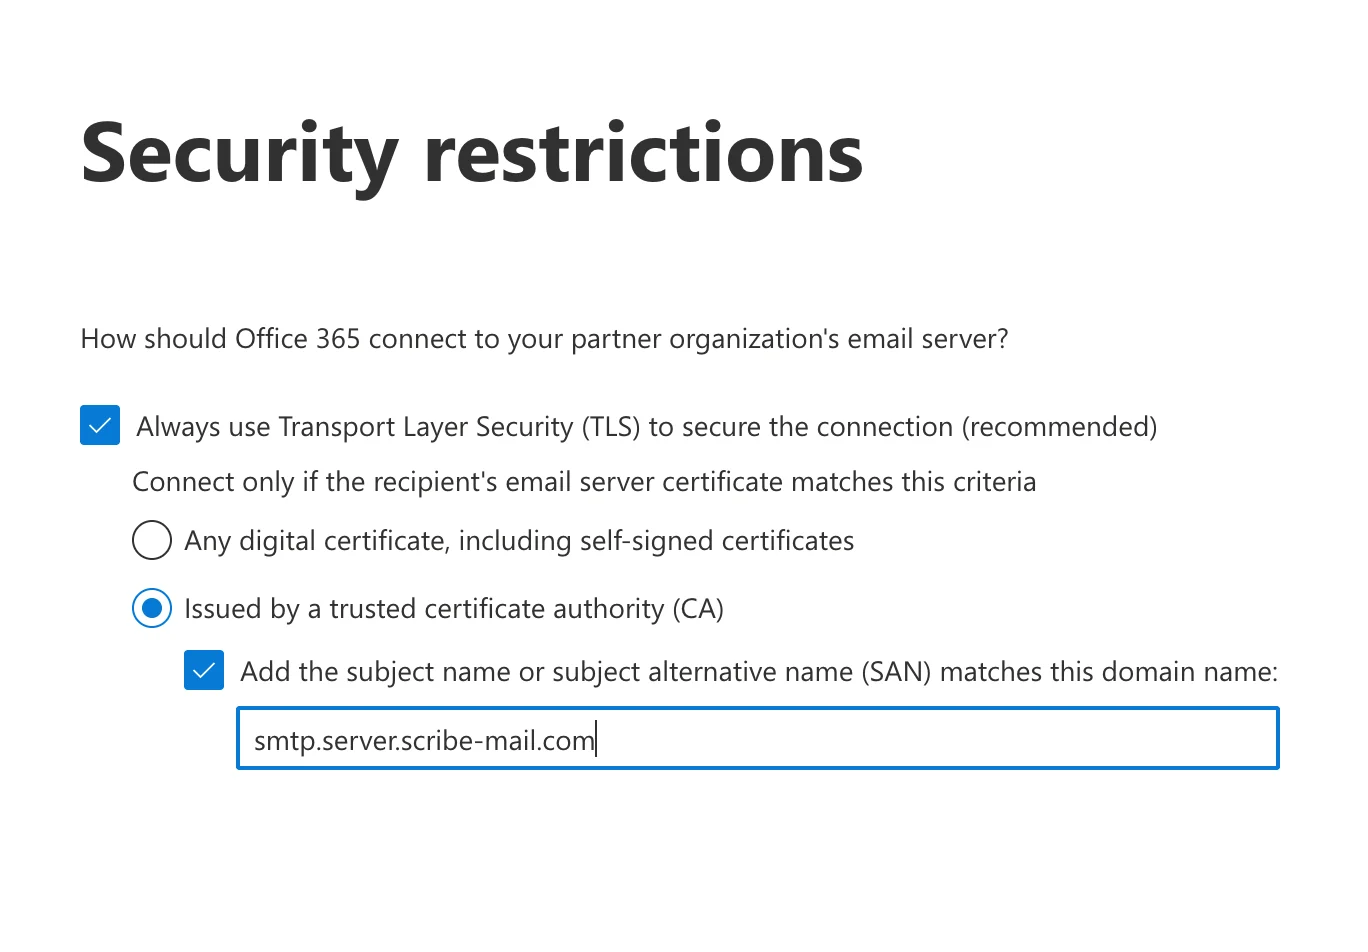
セキュリティ制限:TLS の設定
7
コネクタを検証
テスト用メールアドレスとして次を入力し、検証を開始してください: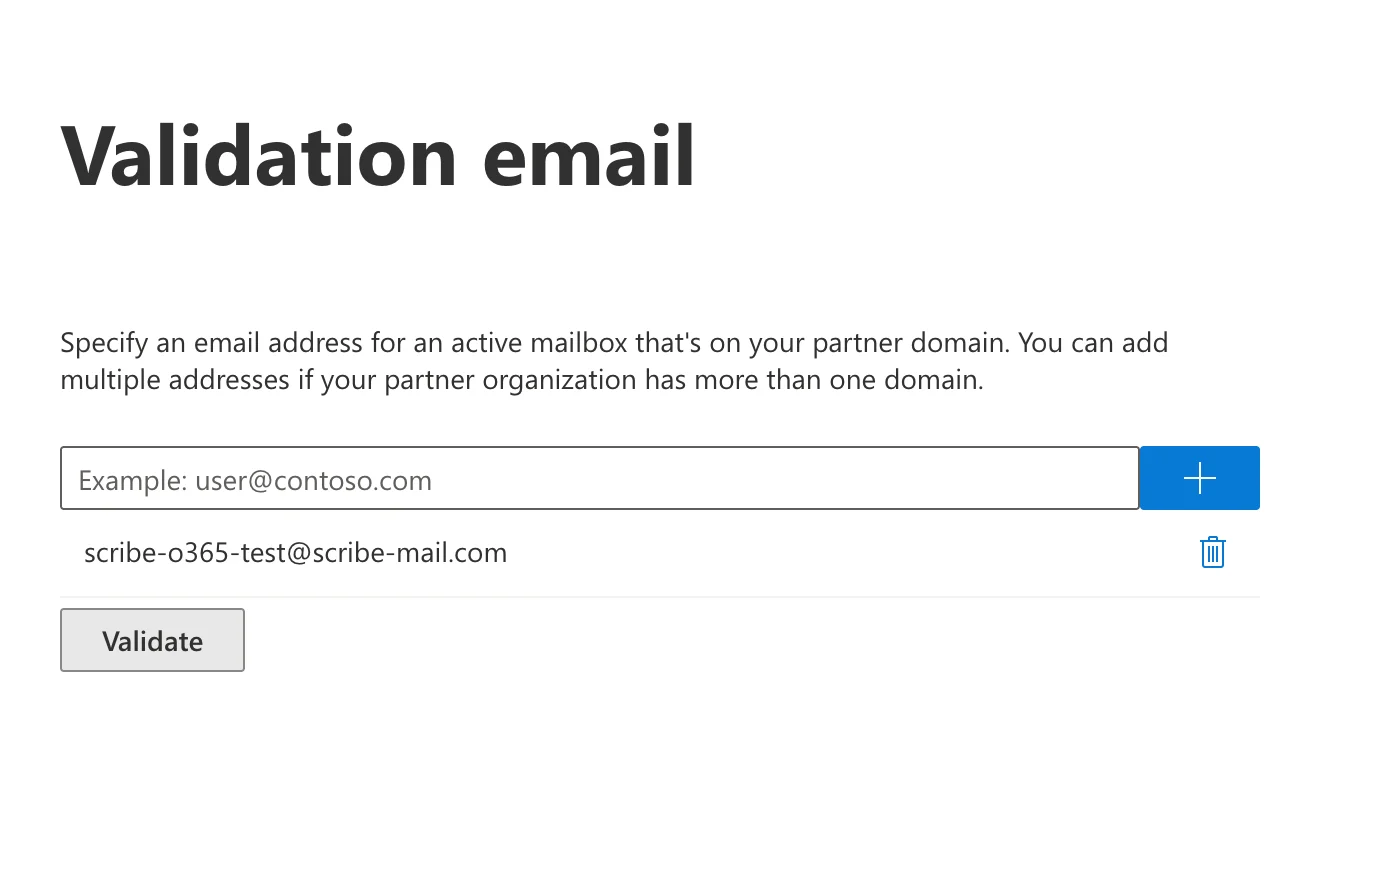
検証が失敗する場合もありますが、検証せずにそのまま進めても問題ありません。
検証用メールの設定
8
受信コネクタを作成
Exchange 管理画面で Mail flow → Connectors に移動し、“Add connector.” をクリックしてください。接続元として “Your organization’s email server” を選択します(接続先は自動的に Office 365 に設定されます)。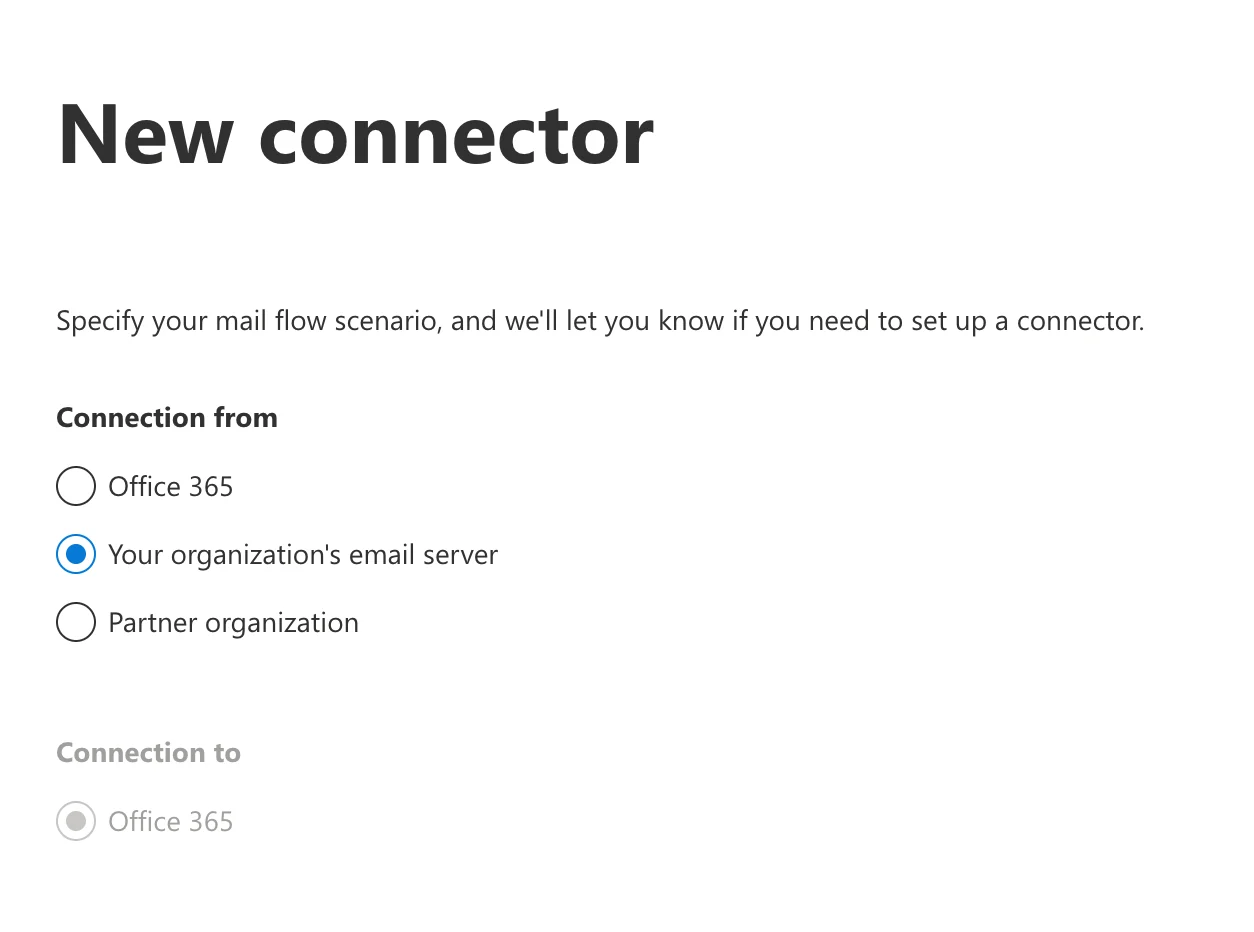
新しい受信コネクタ:接続種別の選択
9
受信コネクタの詳細を設定
名前と説明を入力してください。“Turn it on” にチェックを入れると、コネクタをすぐに有効化できます。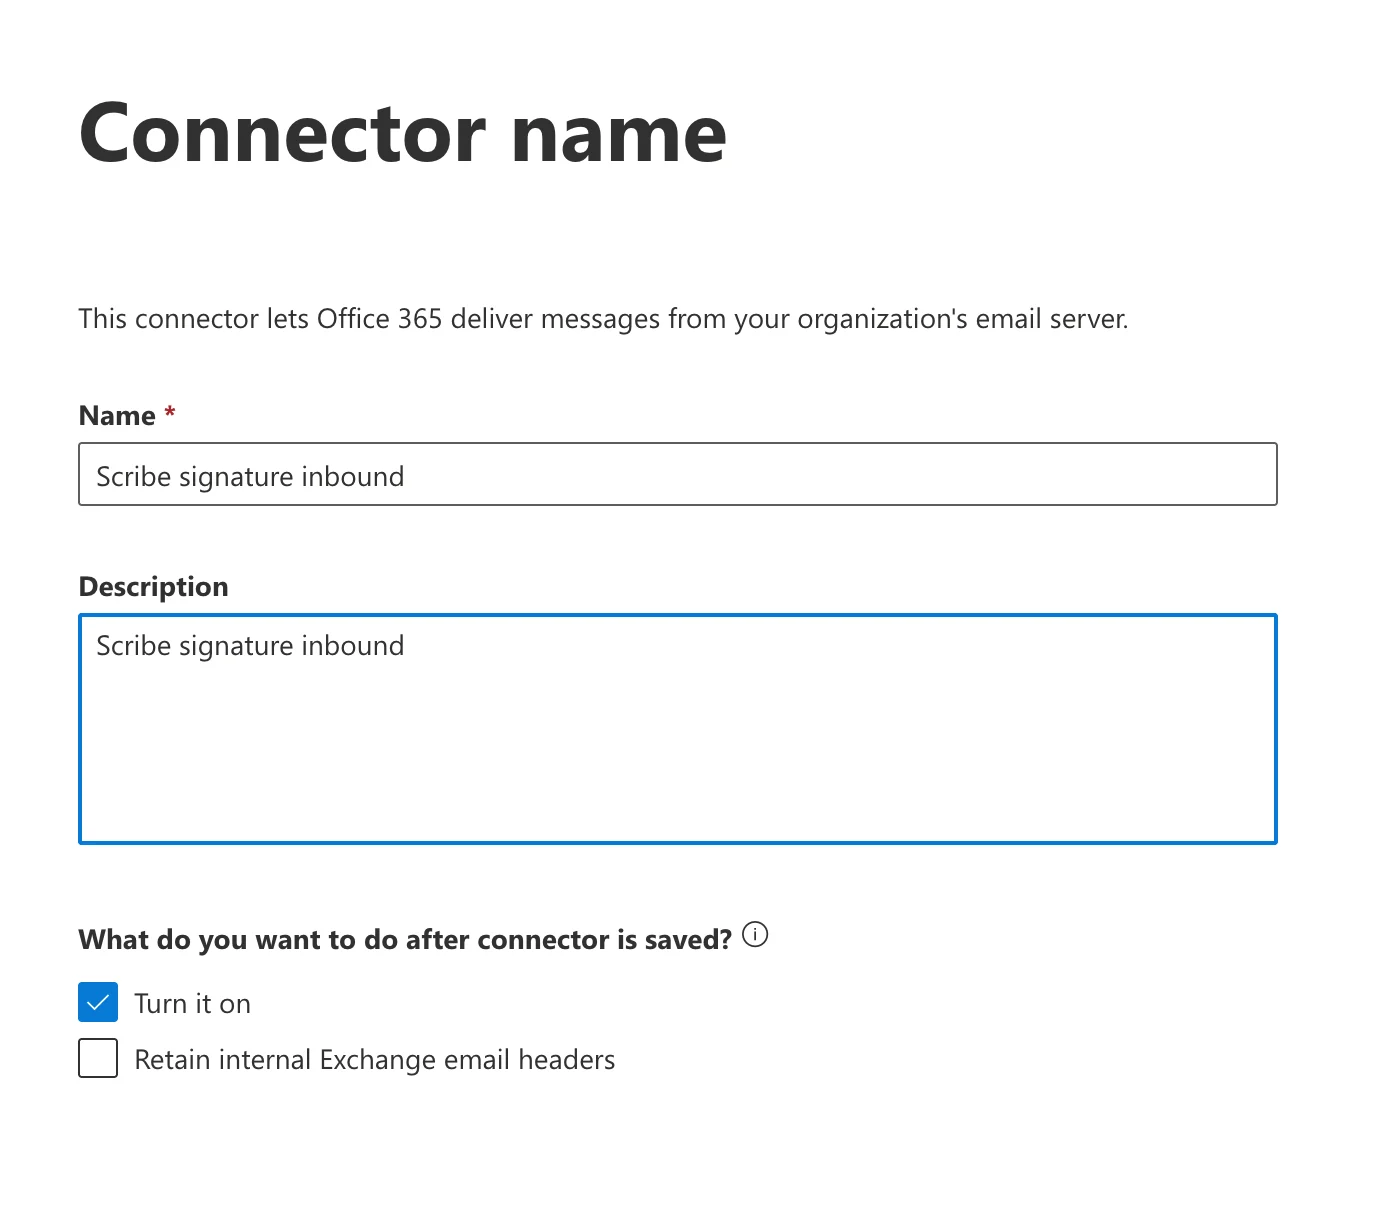
- 名前:
Scribe signature inbound - 説明:
Scribe signature inbound
受信コネクタの名前と説明
10
送信メールの認証
“By verifying that the IP address of the sending server matches one of the following IP addresses, which belong exclusively to your organization.” を選択してください。次の2つのIPをリストに追加してください: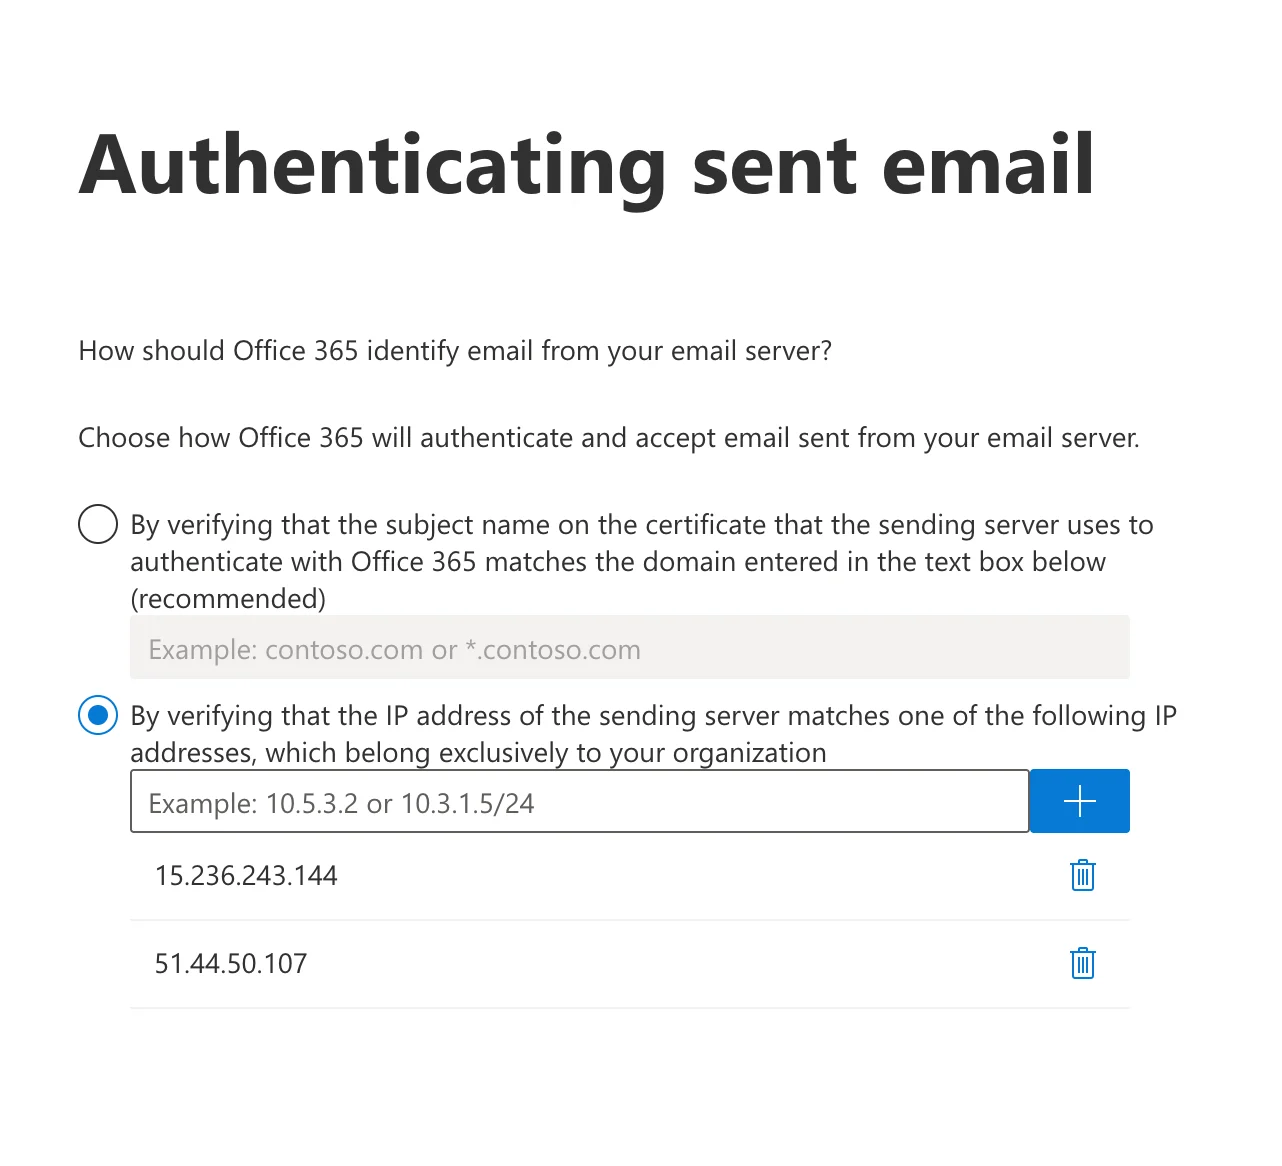
送信メールの認証:IP検証
11
メールフロールールの作成
Exchange管理インターフェースで、Mail flow → Rules に移動してください。a. “Add a rule” をクリックしてください。b. “Create a new rule” をクリックしてください。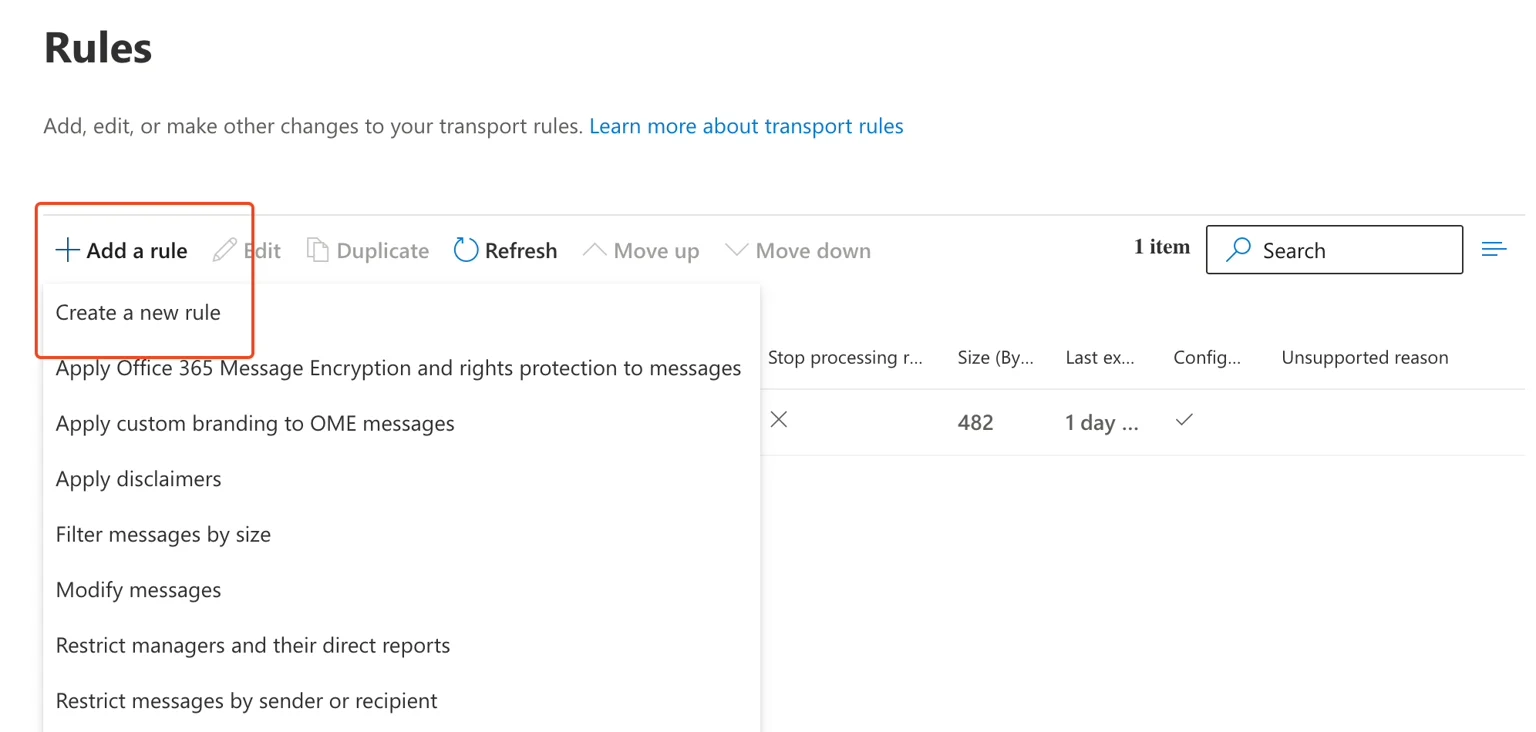
Rulesページ:新しいルールの作成
12
ルール条件の設定
ルールフォームを以下のように入力してください: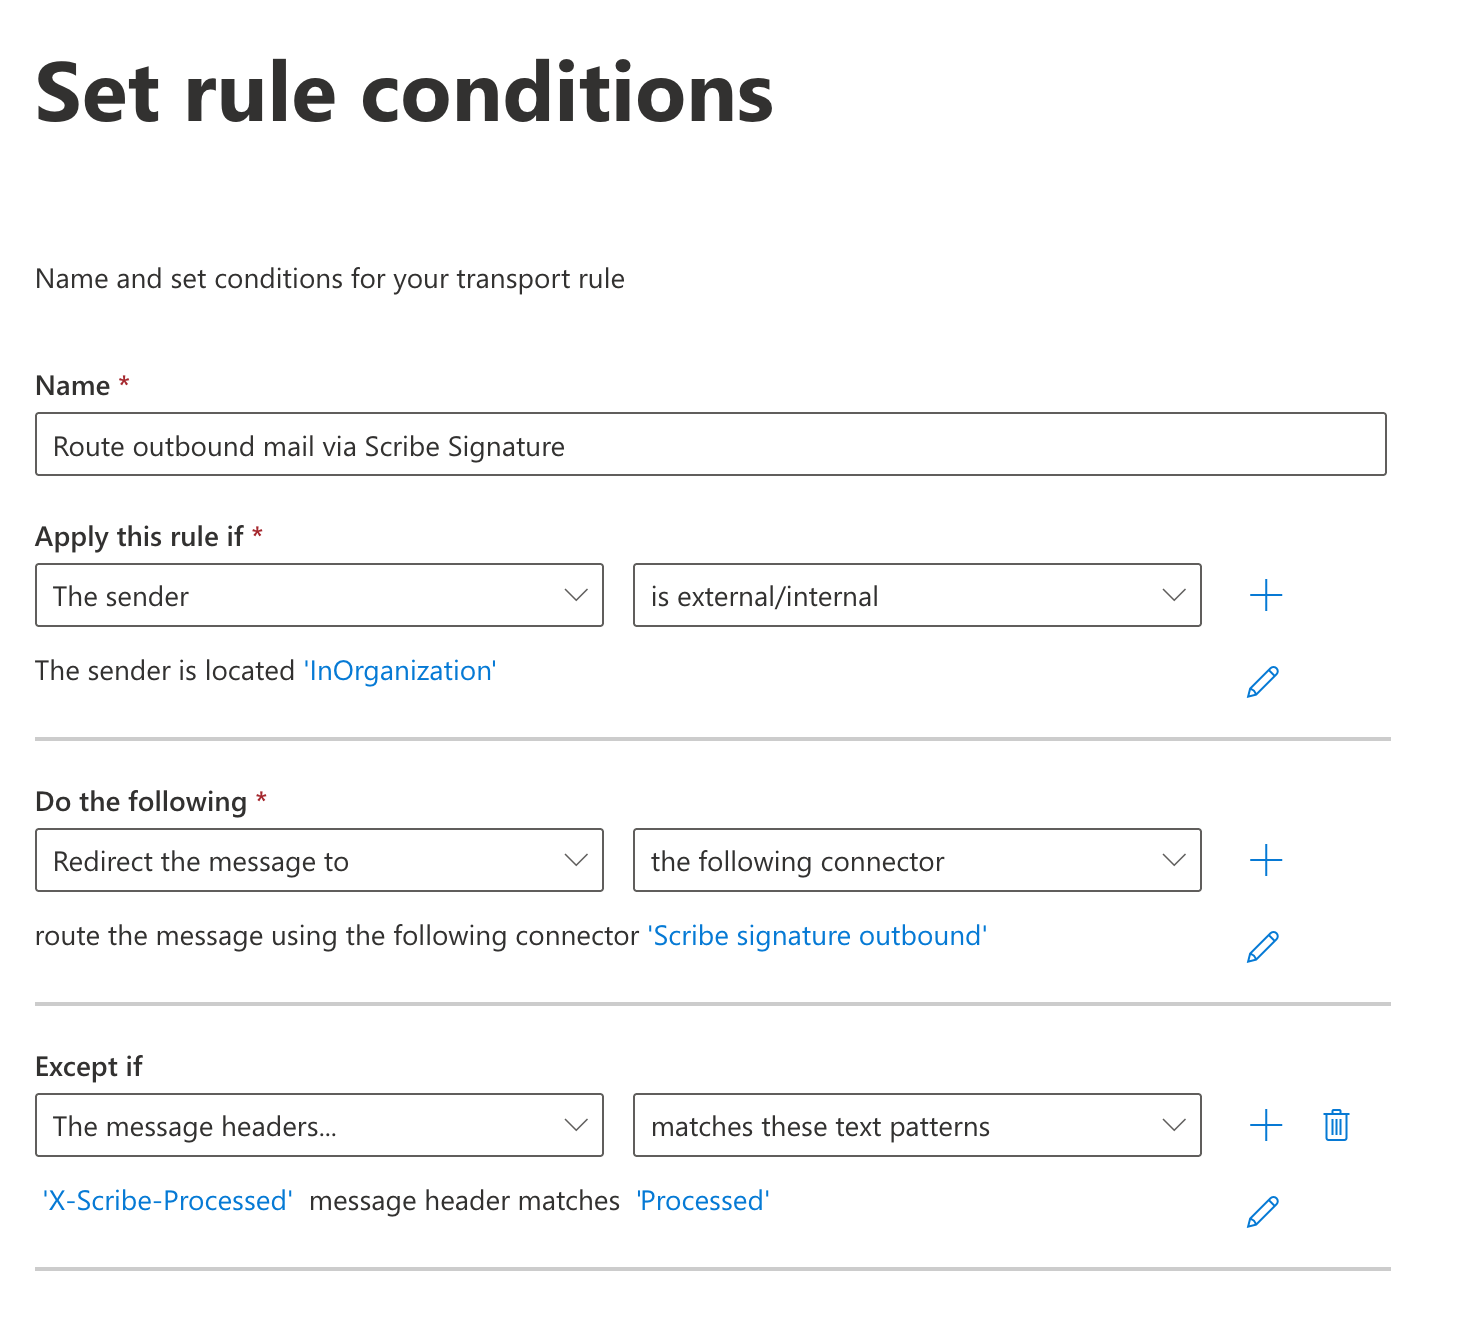
- 名前:
Route outbound mail via Scribe Signature - このルールを適用する条件: The sender → is external/internal → The sender is located “InOrganization”
- 実行する処理: Redirect the message to → the following connector → “Scribe signature outbound” を選択
- 例外条件: The message headers → match these text patterns →
X-Scribe-ProcessedメッセージヘッダーがProcessedに一致
ルール条件の設定フォーム
13
ルールの有効化
次のステップでは、ルール設定はそのままで構いません。ルールを確認して保存してください。ルール一覧から作成したルールを選択し、有効化してください。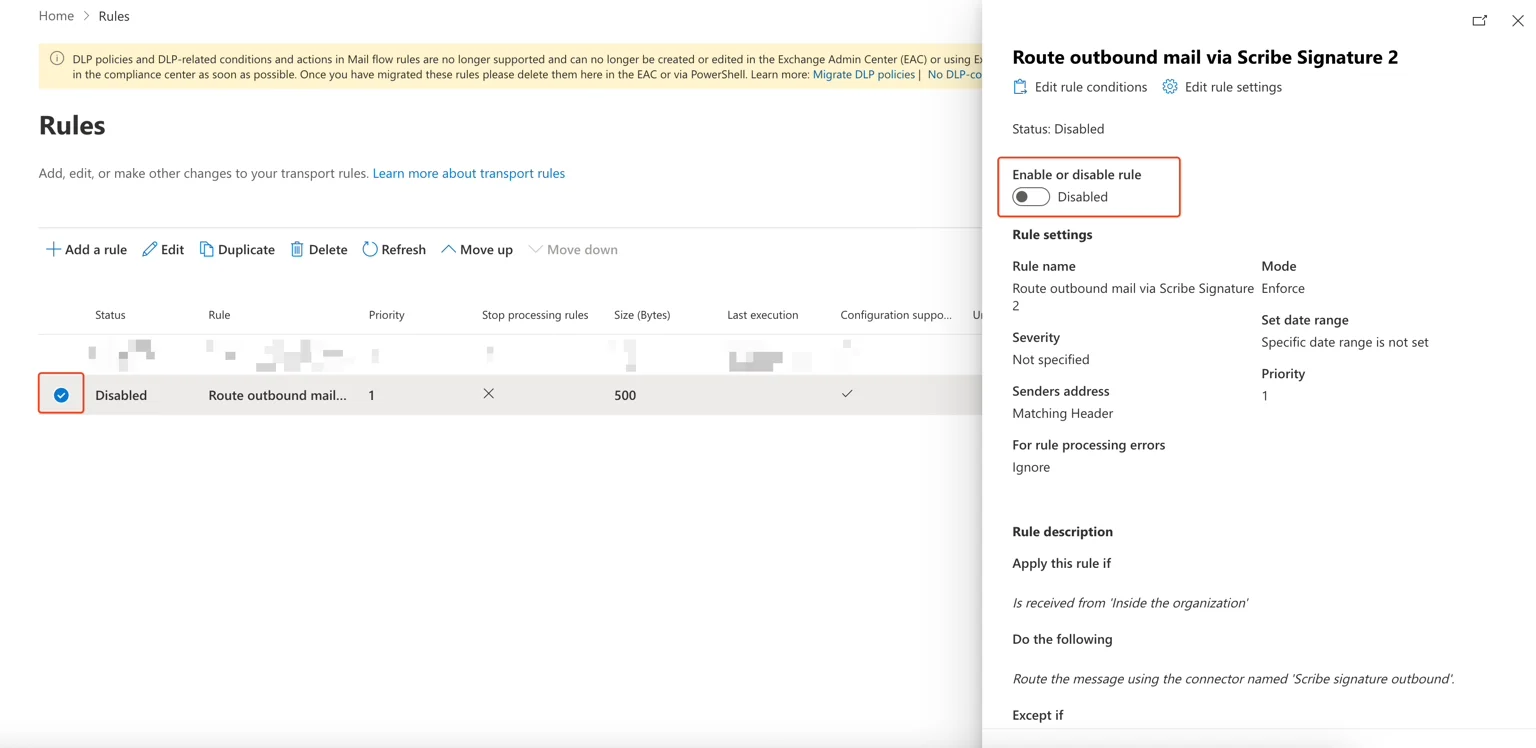
メールフロールールを有効化
14
DKIM を設定
メールが迷惑メールフォルダーに振り分けられたり、画像やリンクなどのアセットが欠落したりするのを防ぐため、送信ドメインの DKIM を設定します。Scribeで Configure DKIM をクリックして設定を開始します。
Scribeの Configure DKIM ボタン
15
チームの署名をインストール
署名一覧から、チームメンバー全員分の署名を一括でインストールするか、段階的に展開するために一件ずつインストールします。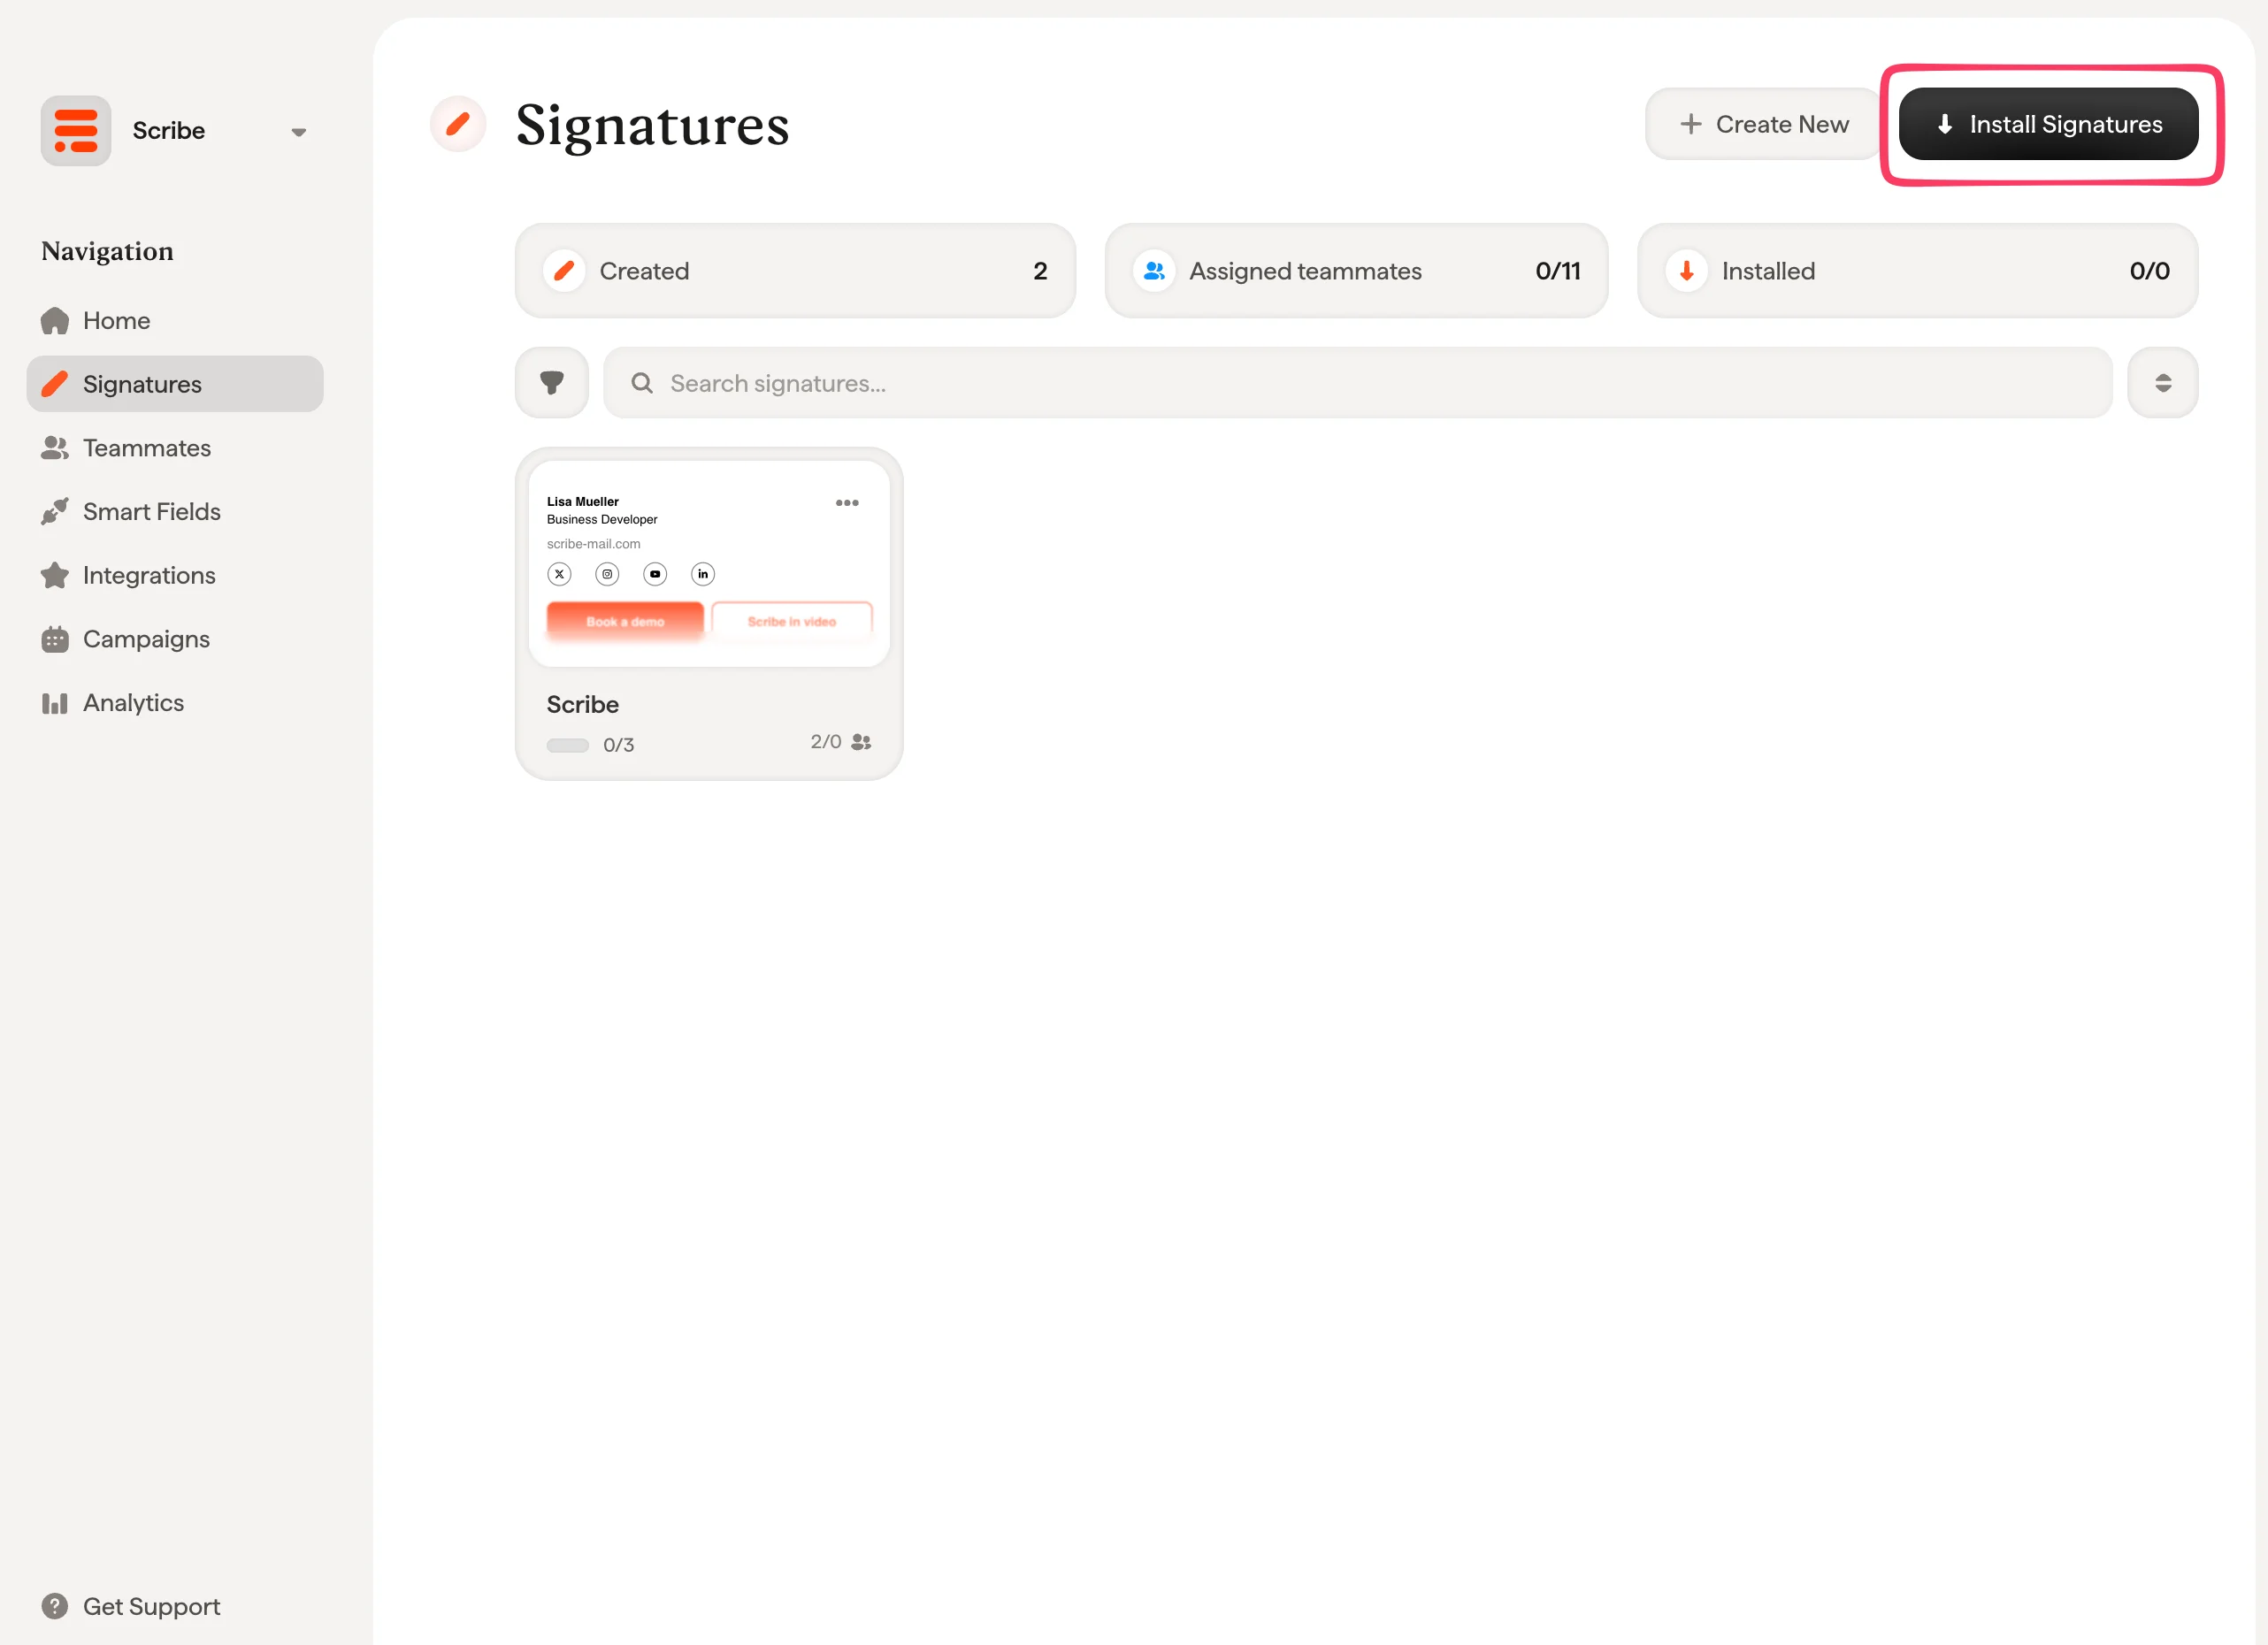
Install Signatures ボタン付きのScribe署名一覧
IT・セキュリティに関するよくある質問
IT チームがこの連携を確認する際によく寄せられる質問です。どのメールがScribe経由でルーティングされますか?
どのメールがScribe経由でルーティングされますか?
メールフロールールが一致するもののみ、つまり送信者が
InOrganization に所在するメッセージだけです。テナント外部から届いたメールがScribeにリダイレクトされることはありません。ルール条件を入力する際に設定される例外も 1 つあります。X-Scribe-Processed ヘッダーが既に付与されたメッセージはスキップされ、二重に処理されることはありません。Scribeへの接続は暗号化されていますか?
Scribeへの接続は暗号化されていますか?
はい、双方向で暗号化されており、セットアップでそれが強制されます。送信コネクタは Always use Transport Layer Security (TLS) を使用し、信頼された認証局が発行した証明書を要求し、サブジェクト名または SAN が
smtp.server.scribe-mail.com に一致することを確認します。受信コネクタは、Scribe自身の IP アドレスからのメールのみを受け付けます。ファイアウォールで許可が必要な通信は何ですか?
ファイアウォールで許可が必要な通信は何ですか?
送信方向では、コネクタは Scribe のスマートホストへルーティングします:受信方向では、Scribe は処理済みメールを 2 つの固定 IP アドレスから返します。受信コネクタはこの 2 つのみを受け付けるように設定されています:
Scribe 経由のルーティングは SPF、DKIM、DMARC に影響しますか?
Scribe 経由のルーティングは SPF、DKIM、DMARC に影響しますか?
DKIM に影響し、ガイドの DKIM を設定 の手順でこれに対応します。署名を挿入するとメッセージ本文が変わり、メッセージ送信前に Exchange Online が付与した DKIM 署名が無効になります。そのため Scribe は送出時にメッセージを再署名します。DKIM を設定すると、処理されるすべてのメッセージに次の 2 つが追加されます:
- 新しい
DKIM-Signature。ドメイン向けに Scribe が生成し、scribe._domainkeyレコードとして公開される鍵で署名します。対象はFrom、To、Cc、Subject、Message-IDの各ヘッダーおよび本文です。 - ARC チェーン(RFC 8617):
ARC-Authentication-Results、ARC-Message-Signature、ARC-Seal。Scribe が受信した時点でメッセージが持っていた認証結果を記録するため、受信サーバーは変更を改ざんと解釈するのではなく、認可された仲介者が変更したものと判別できます。
メッセージが二重に処理されないようにする仕組みは何ですか?
メッセージが二重に処理されないようにする仕組みは何ですか?
2 つの仕組みがあります。Scribe は処理するすべてのメッセージに
X-Scribe-Processed ヘッダーを付与し、メールフロールールにはこのヘッダーに一致するメッセージを対象外とする例外が設定されています。そのため Scribe から戻ってきたメッセージは再びリダイレクトの対象にはなりません。2つ目のガードとして、Scribeは署名を挿入する前に本文にすでに署名が含まれているかを確認します。同じメッセージが2回到達しても、送信される際には署名は1つだけになります。コネクタの検証に失敗しました。設定に問題がありますか?
コネクタの検証に失敗しました。設定に問題がありますか?
必ずしもそうではありません。Microsoftの検証は
scribe-o365-test@scribe-mail.comへプローブメッセージを送信しますが、ルーティングが正しい場合でも常に完了するとは限りません。コネクタを保存してそのまま進めて構いません。代わりに、メールフロールールを有効化したうえで実際のメールを送信し、受信者側で署名が表示されることを確認して設定を検証してください。作成中にチームメンバーが署名を確認できないのはなぜですか?
作成中にチームメンバーが署名を確認できないのはなぜですか?
署名は作成ウィンドウではなく、メッセージがメールボックスを離れた後に付加されるためです。同じ理由で、送信者の送信済みアイテムフォルダーに保存されるコピーはScribeが処理する前のバージョンとなるため、こちらにも署名は表示されません。受信者は常に完全な署名を受け取ります。チームで作成中の署名表示が重要な場合は、クラウドベースの連携もあわせて接続してください。両方を接続すると、Scribeは既定でクラウドベースを使用するため、チームメンバーは作成中に署名を確認でき、サーバーサイドはクラウドベースが到達できないクライアントを引き続きカバーします。
返信や社内メールには別の署名が付きますか?
返信や社内メールには別の署名が付きますか?
はい、公開している場合に限ります。署名バリアントはサーバーサイドのインストールで動作し、Scribeは各メッセージを処理する際に1つを選択します:
- 返信時:件名が
Re:、Fw:、Fwd:などの返信・転送プレフィックス(ローカライズされた同等の表記を含む)で始まる場合。 - 社内:すべての受信者が送信者と同じドメインの場合。
- プライマリ:上記以外のすべての場合。
Scribeはメール本文に何をしますか?
Scribeはメール本文に何をしますか?
Scribeは署名を挿入し、メッセージを再署名して、そのままExchange Onlineに戻します。チームメンバーが書いた内容には手を加えません。宛先、件名、添付ファイル、本文はそのまま通過します。この点に関するScribeの管理策は、SOC 2 Type IIプロセスの一環として検証されています。セキュリティレビューで求められる詳細は製品セキュリティおよびインフラセキュリティを、認証自体はTrust Centerをご覧ください。
ロールバックはどうしますか?
ロールバックはどうしますか?
Exchange管理センターでメールフロールールを無効化します。以降、メールは再びExchange Onlineから直接送信され、Scribeを経由せず、署名も追加されません。2つのコネクタは、削除するかどうかを判断するまで、未使用のまま残しておけます。
関連記事
- 連携の概要:クラウド側・サーバー側を問わず、Scribe署名を展開するあらゆる方法。
- Google Workspace(サーバー側):Scribe経由でメールをルーティングし、全デバイスをカバー。
- 署名バリアント:Outlookおよびサーバー側での、返信時・社内向けのバリアント。